CSOL Faculty Zoom User Guide

Zoom is an online meeting platform that can be used for holding classes online. Here, you will learn how to set up your Zoom classroom link as well as how to access the session. To view the guide in PDF format, please click here.

This blog article covers the items below:

  • Schedule a Zoom class meeting link
  • Start a meeting
  • Manage participants
  • Share screen
  • Breakout groups

Schedule a Zoom class meeting link (for faculty)

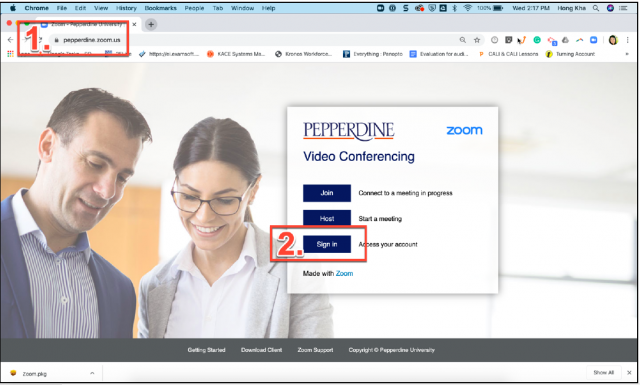
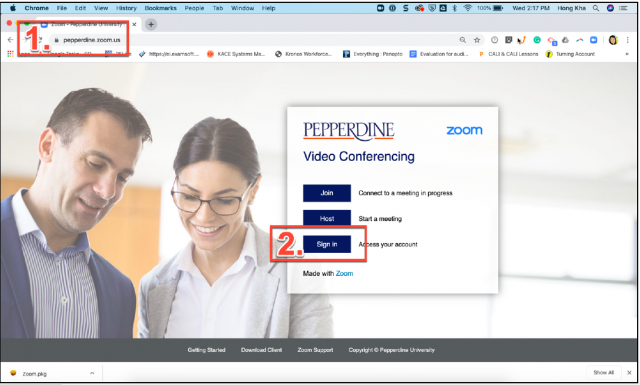
  1. Go to the Zoom website at http://pepperdine.zoom.us
  2. Click “Sign In.”

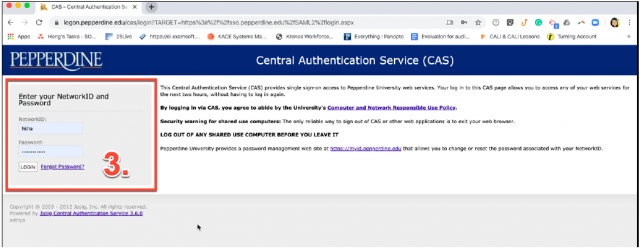
You will then be directed to the Pepperdine Central Authentication Page.

3. Login using your WaveNet username and password. (The same credentials you use for getting your Pepperdine email and WaveNet)
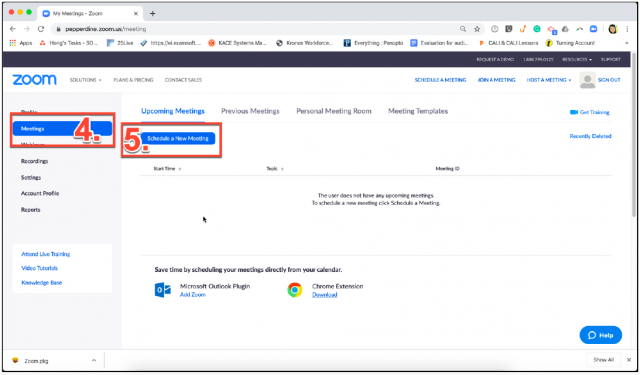
4. Once logged in, click on “Meetings” on the lefthand menu.

5. Select “Schedule a New Meeting.”
Now, you may proceed to fill out the information for your meeting.

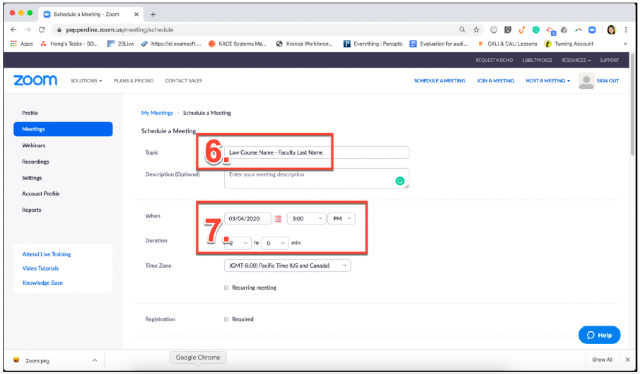
6. To the right of “Topic”, fill out your course name. (It is important to include your own last name and your section, if applicable; this information will allow students to easily find your course.)

7. At the middle of the page, find “When” and select or type in the date and start time of your class. If your start time isn’t in the drop down, pick an earlier time.

For duration, select the estimated duration of your class. Note that it is better to go a few minutes over your estimated class time than under… Zoom also gives you a 40 minute grace period beyond your stated duration to ensure that you will have plenty of time before the session ends.
8. Find the “Video” section. Set your “Host” and your “Participants” video settings to “Off”.

9. Just below the Video section, locate the “Audio” settings. Set to “Computer Audio”.
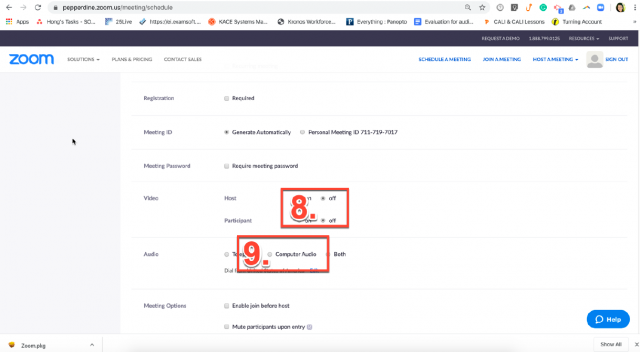
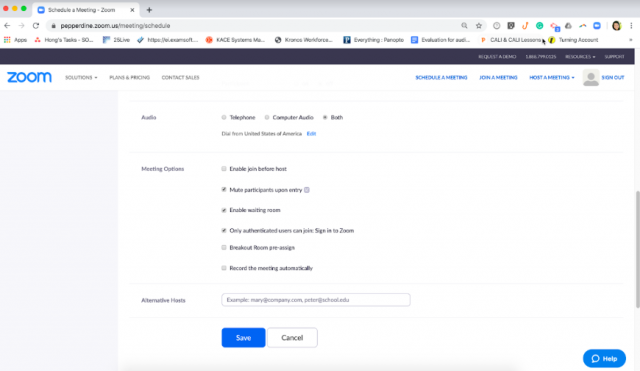
10. Scrolling down further, you will find “Meeting Options”.

  • Select: Mute Participants upon entry,
  • Enable waiting room
  • Only authenticated users can join

11. Click “Save” at the bottom of the screen.

12. At this point, copy the meeting link and paste it in an email along with the course name. Please send to this email [email protected].

Starting your meeting:

1. To join your meeting when the time and date comes, simply browse to “pepperdine.zoom.us”.

2. On this page, login as before (see step 1).
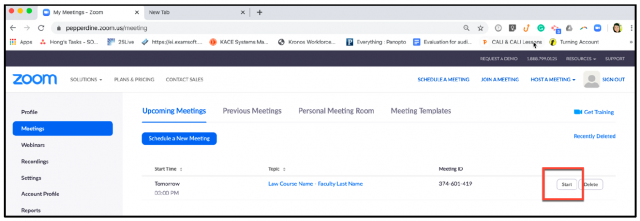
3. Lastly, click on “Start” to begin the class.
Additional Information:

Manage Participants

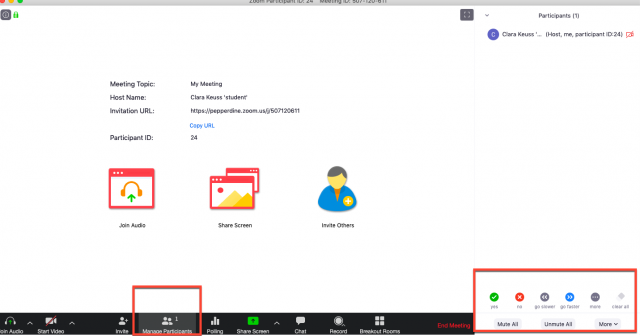
To manage participants and access their settings, the host may click the “participants” icon on the bottom toolbar.

Here, the host can access audio/visual and control settings for the other participants in the meeting. You may manage the settings for audio, and send messages from the manage participants feature.
Share Screen

To share your screen in zoom, click the “share screen” icon. Then you will need to wait for the student(s) you are sharing your screen with to accept; with the sharing feature, they will be able to see your screen.

This feature will allow you to share PowerPoints or other media with the students, mirrored on their own screen.

You do not need to grant access to participants during screen share, and you may block participants from accessing the screen share if necessary.
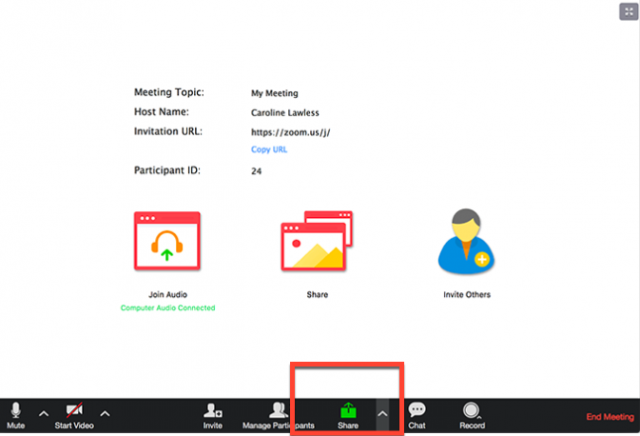
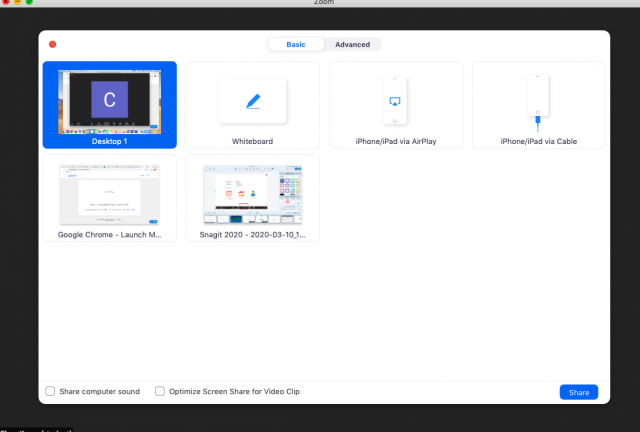
After clicking “share screen”, you will have the option to choose which screen the students can view. You may choose to have them view your entire desktop, just a browser or PowerPoint, or a different web page.
See a quick video to better understand how to share your screen.

Breakout Groups

One helpful feature on Zoom allows you to split your Zoom class into sub-meetings, called breakout rooms. The feature enables the host to split participants up into groups, where they can interact with each other in their own meeting space.

Breakout rooms are separate chat rooms with full audio, screen share and visual settings. The meeting host has the ability to split the members of the class into these separate sessions automatically or manually, and can switch between sessions at any time. Up to 50 breakout rooms can be created and a room will hold 200 participants maximum.

It is important to note that the host will need to monitor the breakout rooms and have full control of the meeting, by responding to participants’ questions and giving assistance when needed.

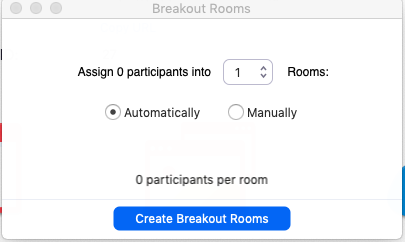
To create separate breakout rooms for the participants of your meeting, click “breakout room” in the bottom tool bar.

This will prompt you to format the room for participant number and assignment. When customized, click “create breakout rooms” to enable access to the participants of your meeting.
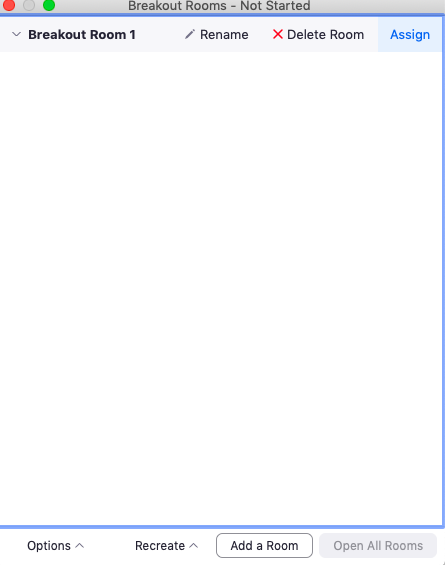
There, you will be able to view the breakout room you have created, and manually assign/rename/delete the room. At the bottom of the breakout room box, you may also add rooms.
Gmail Filtering

This post will explain how to create rules within your Gmail to filter incoming emails; for more gmail information see google’s page:
How To Create Rules to Filter Your Email

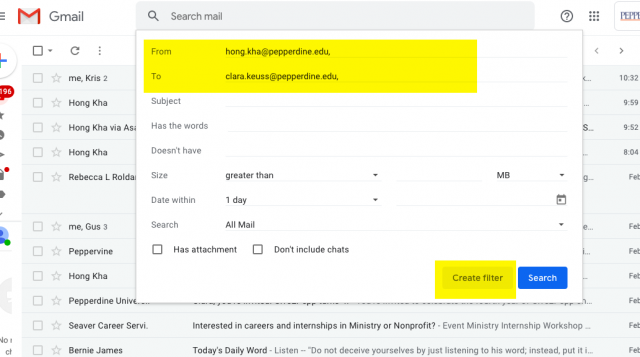
  1. Click on the down arrow by your search bar

2. Fill out the information for which emails you would like to be filtered, then click “create filter”

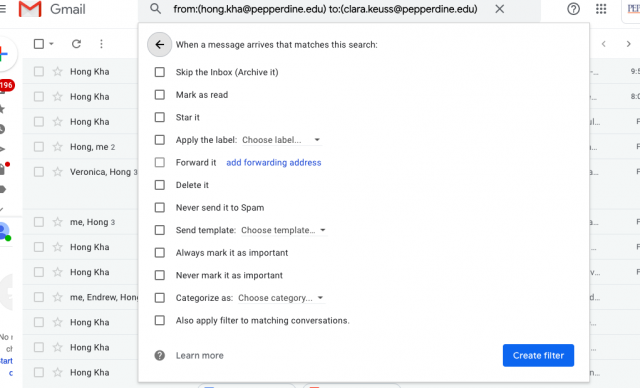
3. Next, choose what function you would like the filter to do; you can create a custom label in settings to tag the email, place the email in a subcategory such as social or updates, and more. Then, click “create filter” again

Note: When you create a filter to forward messages, only new messages will be affected. ​Additionally, when someone replies to a message you’ve filtered, the reply will only be filtered if it meets the same search criteria. 

Alternatively, you may choose an already existing email to serve as a template for what you would like to filter in the future:

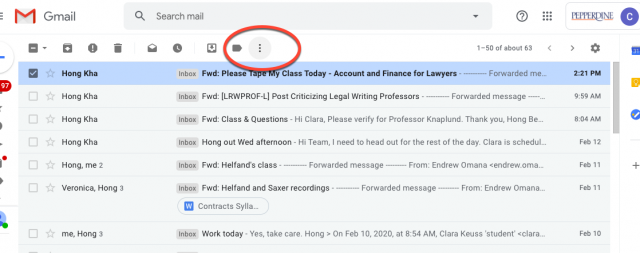
  1. First, click the checkbox next to the email you want.

2. Second, click “more” (the three gray dots)

3. Select “filter messages like these” and then proceed to fill out the filter information in the same way as the previous filter tutorial.

Another option is grouping emails by conversation:

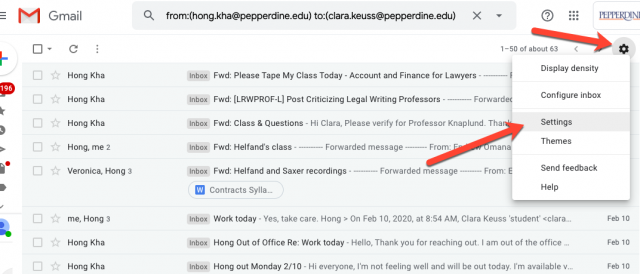
  1. In the top right of your email, click “settings”

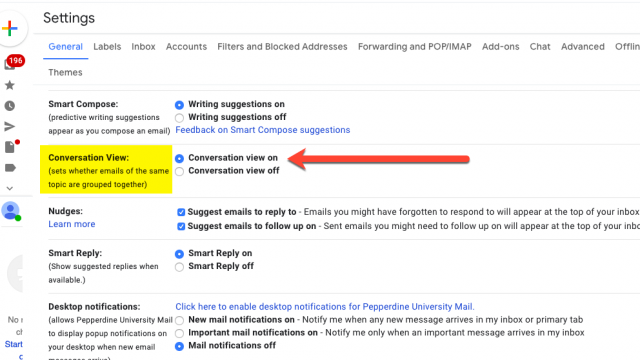
2. Scroll down to the bottom of the settings page to the “Conversation View” section. Select “conversation view on” to group messages.

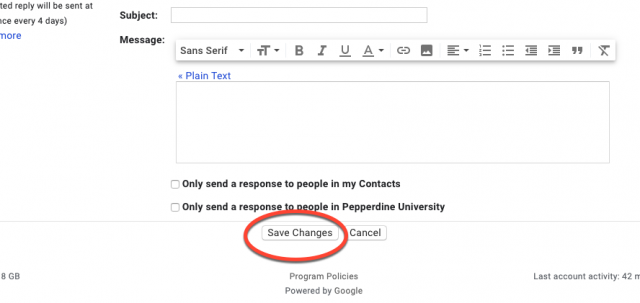
3. At the bottom of the page, click “save changes”

If you have any questions, please feel free to contact Information Services at [email protected] or (310) 506-7425.

iClicker Basics

iClicker is a polling software for use in a classroom or seminar setting.

iClicker is a responsive teaching and learning tool that incorporates clickers, mobile phone clicker usage, GPS attendance, polling/quizzing, and study guides.

To create an account, visit the iClicker website and select “create an account” in the upper right of the page.

iClicker

iClicker provides real-time feedback from students, and promotes active learning.

With iClicker, a toolbar floats above instructor content and allows the instructor to ask multiple choice, short answer, numeric and target questions on the fly. Instructors do not input the text of questions into the clicker system ahead of time.

NOTE: If you as an instructor have existing TurningPoint questions, you can continue to use the PowerPoint slides, although you may want to remove the bar graph.

For more information on iClicker for students, please click here.

For more information on iClicker for faculty, please click here.

If you have any questions, please feel free to contact Information Services at [email protected] or (310) 506-7425.

Anonymous Grading in Courses

  • This article outlines how to engage anonymous grading in Courses, using Turnitin. For more information on Turnitin at Pepperdine, see Pepperdine’s Turnitin Policy.
  • Anonymous grading allows instructors to review content uploaded into an assignment without knowing which student submitted a particular document. This feature can be useful in ensuring that everyone is graded in an unbiased manner.

*Make sure to provide students with instructions not to use their name in their document, i.e. the document name and body of the written text should not contain student information.

Creating your assignment:

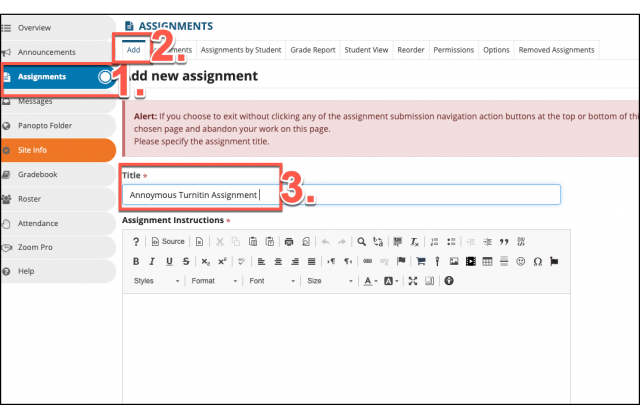
Step 1: Click on the “Assignments” tab on the far left column. Then click “Add” under the assignments tab in the top left of your screen to start a new assignment post. Title your assignment and proceed with filling out the options for your assignment.

Step 2: Select “Use Turnitin”.

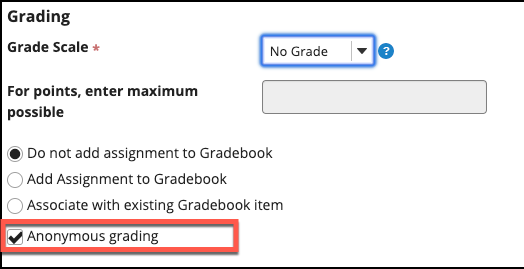
Step 3: Select “Anonymous grading” from the grading scale section checklist.

Step 4: Post your assignment.

Step 5: Confirm that your document is correct then select “post” again.


Viewing submissions

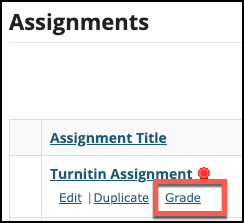
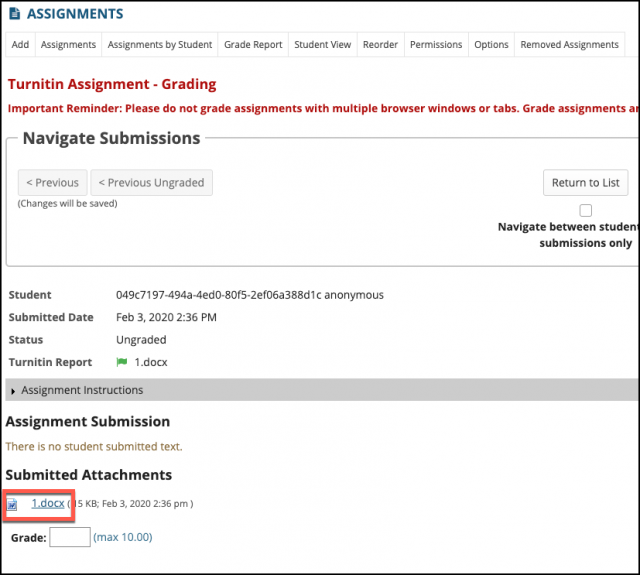
Step 1: Back under the assignments tab, click “Grade”, located under the title of your assignment.

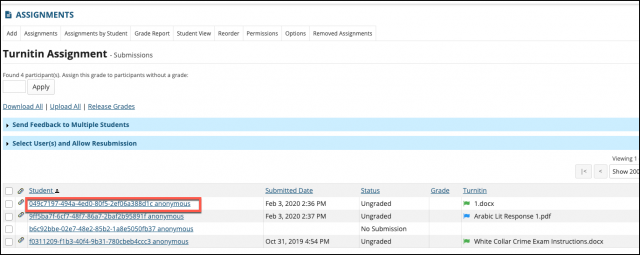
Step 2: Select a student’s paper. You should not be able to see a name in the title.

Step 3: Click on the document, located under “submitted attachments”. The document should open with regular instructor access.

If you have any questions, please feel free to contact Information Services at [email protected] or (310) 506-7425.

Google Drive: Tips & Best Practices

Google drive is an efficient platform for housing documents, but more than that, it provides a number of features to help keep organized– here’s an overview:

  • Upload files and folders
  • Share files and folders
  • Set permission levels
  • Search/sort files and folders
  • Collaborate on docs
  • Track version history 

Helpful Features in Google Drive:

  1. Your document is automatically updated and saved every time you make changes to it online, and you can access it through any browser.
  2. Make sharing work publicly simple. Want to share your document, presentation, or spreadsheet with the world? Just click file > publish to the web, and you’ll get a public link that you can share with anyone and everyone. Make sure to understand the difference between MyDrive and shared drives.
  3. The Save to Google Drive Chrome extension lets you save documents, images, audio, videos, and more straight from a web page to the Google Drive folder of your choice. (A good alternative to full-page screenshots)
  4. By choosing to get email updates on any changes to your document, you will be notified of any changes (edits, comments, etc.)  to a group document directly to your email without logging in to the drive itself.
  5. Automatically upload and store files via Google’s Backup and Sync from your computer so you can access them from any other device with Google Drive. A great way to make one of those extra copies of your data that you really should have.

What not to save to Google Drive:

  • Any information that is classified or restricted may not be uploaded to Google Drive.

For more questions, check out Drive Basics for training and FAQs

Or, check out Pepperdine’s Google Drive learning center

Law School Email Signature Update

Information Services is happy to announce an improved system for email signatures at the Pepperdine Caruso Law School (yes, remember that it’s now Caruso!). This new stationery system will be effective starting Nov. 26. We ask all members of staff and faculty to abide by the instructions listed in this article to ensure a sense of uniform professionalism and consistent brand identity.

Please make sure to scroll to the bottom of the page to utilize our 50th anniversary email signature!

Again, the informational instruction page link is here: https://community.pepperdine.edu/imc/resources/style-guide/email-signatures/

If you have any questions, please feel free to contact Information Services at [email protected] or (310) 506-7425.

Tips for Incoming Faculty

Welcome to Pepperdine School of Law!

On behalf of the Pepperdine School of Law Information Services Department, we want to welcome you to the Pepperdine family and let you know we are here to help with all your technology needs.

A few helpful hints: If you are new, or simply returning to Pepperdine, welcome back to Malibu! Here is some information regarding the more common technology questions we see to help you get started.

1. WaveNet:  Wavenet is Pepperdine’s central location for all web-based administrative systems including the Faculty Center, class rosters, grade submission, etc. You can communicate with all of your students by selecting student names on your class roster in WaveNet and then clicking on “Notify selected students”. You can also communicate with them directly via email. When communicating with students, we recommend that you use your Pepperdine e-mail located conveniently on your Wavenet page.

2. Pepperdine Email: Your Pepperdine email address is typically your first name, “dot”, your last name. To access your Pepperdine email, simply log in to WaveNet and select the “Email” button from the upper-right corner. Your Pepperdine email is your primary contact for students. Your email address is already listed in WaveNet, and therefore, once your students enroll in your class, they can find your @pepperdine.edu email address in our Gmail directory.

3. LawTech.pepperdine.edu: You may want to review our Information Services website on “The Basics”, which includes important technology and library information for the Pepperdine School of Law. The “Classroom Tech” tab at the top right of the page also provides an overview of the technology available in each individual classroom. This site is a great resource for finding answers to specific questions regarding Pepperdine law school technology.

4. “Courses” by Sakai is Pepperdine Law’s Learning Management System: Courses powered by Sakai a robust course management system that has a number of integrations (Zoom, Turnitin, Panopto, and more) that will benefit you and your students in various ways. You can access Courses by going to http://courses.pepperdine.edu. Here are some self-help pages about Courses.

5. Video Conferencing: Pepperdine uses Zoom for video conferencing. Here are a few links to help you get started:

6. Lecture Recordings: Panopto is a video platform available to faculty to record, store, edit and share videos. Panopto is directly integrated with Courses so that you can easily share lecture recordings or other video content with students.

7. Getting Help: If you have any general support questions, you can e-mail us at [email protected]. In addition, you can call our direct support line during normal office hours (Pacific Time) at 310-506-7425, should you have any needs or concerns with the classrooms, the technology therein, or your Pepperdine WaveNet account.

8. Classroom Tech Support: If you encounter any tech issues during your class, there are also support “hotline” phones located in each classroom. Simply pick up the hotline telephone’s handset to be automatically connected to a technician located in the law school.

Finally, please set a password by visiting myid.pepperdine.edu, select “SET/RESET PASSWORD” and follow the instructions on the screen. Your NetworkID is ______Your Campus Wide ID (CWID) is ______

Welcome to Pepperdine! We look forward to working with you, and hope you have a great semester!

Helpful Tips for Traveling Overseas

Virtual Private Network (VPN)

A VPN is sometimes necessary to have when traveling abroad. The purpose of this is to extend a private network across a public network through a safe and encrypted connection. This enables you to to send and receive data without concern, especially if you would like to access sites that may be geographically restricted.

You are recommended to install Pepperdine’s VPN to access our network through the following link, https://community.pepperdine.edu/it/services/network/vpnwindows.htm

If Pepperdine’s VPN doesn’t work, you can consider ExpressVPN. It’s free for the first 30 days. For more information, please click on the following link: https://www.expressvpn.com/

Email 

In regards to email, please view the link below. https://community.pepperdine.edu/it/tools/email/googlemail/failsafe.htmemail.pepperdine.edu

Authenticating your Laptop/Cellphone with DUO

Authenticating your devices with DUO is valuable so you can access Pepperdine’s online services like email, WaveNet, Google Suite, etc. on your device. 

If you will be using a mobile device to access our campus network that has not been registered on our network before, please visit the link below. https://community.pepperdine.edu/it/security/tools/secureconnect/

Click on the first orange button labeled “Secure Connect Portal Login” and follow the screen prompts. You can set your login to expire in 90 days. 

Cell Phone Rentals

If you need to rent a cellphone while you’re overseas, Cellular Abroad is a place to start. Please click the following link to be directed to their home page, https://www.cellularabroad.com/ .

Otherwise, check with your cell phone company to see what options they may have for overseas data plans.

Other resources from Pepperdine’s International Programs
https://community.pepperdine.edu/seaver/internationalprograms/resources/technology_abroad.htm

We hope this information is helpful, and the Law I.T. staff is wishing you a wonderful trip!

Courses by Sakai

Both TWEN and Courses are utilized by both students and faculty for effective classroom communication. Read on to learn more about COURSES.

Courses

Courses is Pepperdine’s open-source, learning management system that offers faculty and students a collaborative online environment to support teaching and learning. Basic features of Courses allow faculty to post syllabi, grades, and announcements. For more information, visit the University’s Courses Community page.  Watch the video below to learn more about the basic features of Courses and view the user interface. For step-by-step instructions and a list of FAQs, please visit Pepperdine’s Courses Faculty Guide.

Additional Features: Anonymous Grading in Courses

If you have any questions, please feel free to contact Information Services at [email protected] or (310) 506-7425.

Interactive Features of TWEN

Westlaw LogoThe West Education Network (TWEN) is an online extension of the law school classroom. It is a tool that many professors currently use to post syllabi, course notes and resources, and assignment information. However, there are many additional interactive features of TWEN that are either unknown or rarely utilized. I will highlight a few of those:

Sign-Up Sheets: These can be used to set up office hours and schedule student conferences. They can also be used for students to sign up for paper topics and/or in-class presentation times. Essentially, if there is something you need students to sign-up for, this is the tool for you! You choose the dates and times and set the parameters for cancellation. TWEN also makes it easy to set up regularly scheduled office hours for the entire semester in a matter of minutes.

Customized Polling: Create polls that students can respond to anonymously. You can poll the class with the following types of questions: yes/no, true/false, and multiple choice. Use these polls in class our outside of class. Polling is done within TWEN and you can view the results visually as a bar graph or pie chart.

Wiki: Within this section of TWEN, you set up pages that can be collaboratively edited by faculty and/or students. You can specify who can view each page and who can edit each page. This is a great feature for activities or assignments where two or more students or faculty are working together to create a product.

These are just a few of many interactive features now available on TWEN. Next time you, the faculty, are organizing your course on TWEN, consider ways in which you can integrate these components effectively into your classroom instruction. For more information on other features, such as creating alerts, sharing a folder, making a newsletter and much more, click here to be directed to Westlaw’s user guide.