

This blog article covers:
– Additional LawTech Articles and resources
If you have any questions, please feel free to contact Information Services at lawtech@pepperdine.edu or (310) 506-7425.
Zoom is an online meeting platform and the University’s web conferencing software that will be used for holding classes online. Zoom can be used on laptops, desktops, tablets, and smartphones. Here, you will learn how to set up your Zoom classroom link as well as how to access the session.
Using Zoom through Canvas’ Zoom Pro Tool
As we begin to utilize Canvas as our main learning management system, it is important to know how this site can be linked with other useful software for the benefit and convenience of faculty and their students. Here, we will discuss some important notes on integrating Zoom with Canvas.
Canvas has many tools that can be added-on to your class site, and they have numerous benefits, such as allowing students to quickly access third-party sites and overall give your teaching more dimension. Zoom is one of these tools. However, it is important to note that when the Zoom Pro tool gets added to a site, it does not have any connection to a specific meeting session ID until a meeting is actually scheduled or imported within the tool. If you would like to schedule or important a Zoom meeting into your Canvas site, please follow these instructions.
0. First, if you have not done so already, you must register for a Pepperdine Zoom account at https://pepperdine.zoom.us. Without an account, you will receive an error in the Zoom Pro tool in Canvas.

Once you have an account, go to Canvas and log in with your Pepperdine credentials. Navigate to the Zoom Pro sidebar.
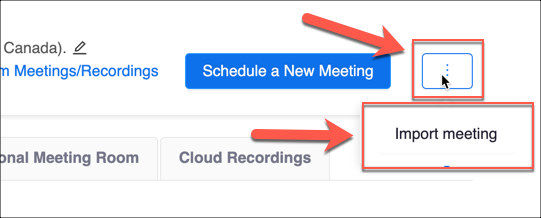
1. Now, you may select “Schedule a New Meeting” at the top right to directly create a meeting within the Zoom Pro add-on in your Canvas site.
Creating your Zoom sessions in the Canvas Zoom Pro tool directly is preferable to importing an existing sessions for many reasons, some including better centralization, ease of use, and less struggle when finding and sharing reports/recordings.
Additionally, consider setting a recurrence of the session to simplify the process. If so, it is suggested to adopt a general meeting title (e.x. LAW 1234 Class) so same title will be applicable to all future meetings.
For more details on the basics scheduling Zoom meetings and the potential settings you may utilize, please click here.
2. However, if you would like to import an already scheduled Zoom meeting, click or hover over the more icon that is indicated by three vertical dots. Then, select “Import Meeting” and follow the listed instruction for copying your existing Zoom Meeting ID.
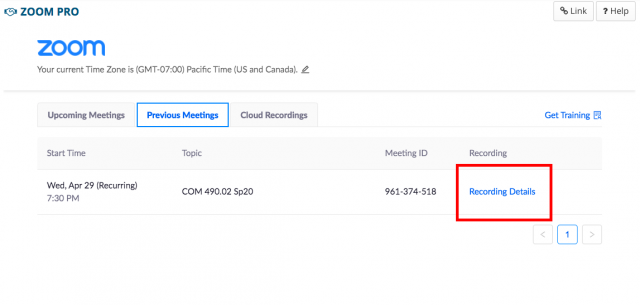
3. You should now be able to see a list of your scheduled meetings underneath the “Upcoming Meetings” tab in your Zoom Pro tool. Please note, if your meeting is recorded, your students may access the recording by clicking on “Previous Meetings” followed by “Recording Details” of the coinciding class session.
Additional Notes:
– You should not use your personal meeting ID (PMI) link (high discouraged for classes, and moderately discouraged for office hours), due to some reported issues.
– If you teach both formal Pepperdine classes and 2PEP classes, you must then navigate between the two Zoom accounts. Remember to always sign out of their Zoom app or web profile after each meeting and be sure to sign on to the correct profile based on your needs.
For more information on how to utilize Zoom for faculty, please click here.
Again, if you have any questions, please feel free to contact Information Services at lawtech@pepperdine.edu or (310) 506-7425.
Noteworthy Tips:
1. We strongly recommend that students and others participating in a Zoom session use either the smartphone app (Android or iOS) or the browser-based software by logging in through https://pepperdine.zoom.us
2. Make sure when setting up a Zoom session, the “Mute” option is selected as the default for attendees. They can un-mute themselves but if this engaged as the default for the beginning of class, things will start much more smoothly and you will find fewer audible distractions.
3. Make sure to require attendees be Authorized to join your session. This will ensure that the names of your attendees will be the same as the names on your course roster when they appear in the Zoom session.
4. For tips on how to maximize your remote internet experience, please click here.
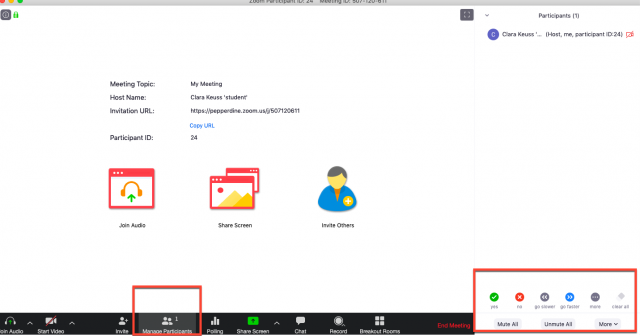
Manage Participants
To manage participants and access their settings, the host may click the “participants” icon on the bottom toolbar.
Here, the host can access audio/visual and control settings for the other participants in the meeting. You may manage the settings for audio, and send messages from the manage participants feature.
Share Screen
To share your screen in zoom, click the “share screen” icon. Then you will need to wait for the student(s) you are sharing your screen with to accept; with the sharing feature, they will be able to see your screen.
This feature will allow you to share PowerPoints or other media with the students, mirrored on their own screen.
You do not need to grant access to participants during screen share, and you may block participants from accessing the screen share if necessary.

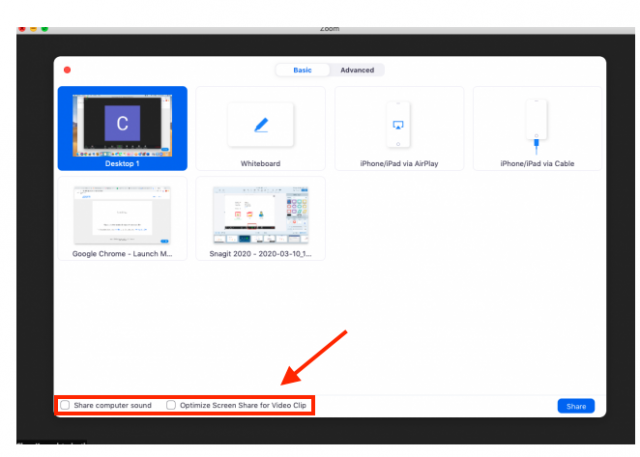
After clicking “share screen”, you will have the option to choose which screen the students can view. You may choose to have them view your entire desktop, just a browser or PowerPoint, or a different web page.
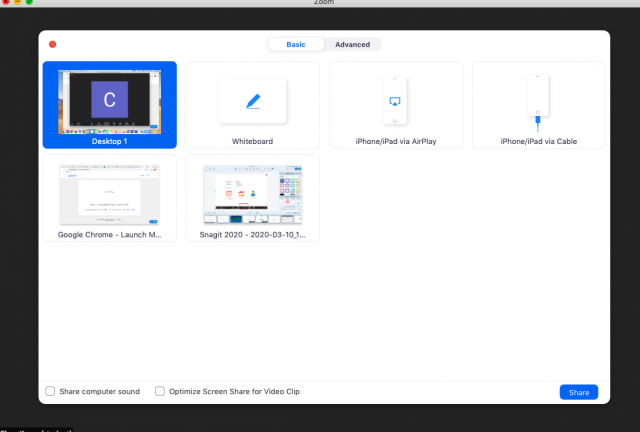
When sharing a YouTube video, select the two checkboxes at the bottom left to optimize the sound quality of the shared video.
See a quick video to better understand how to share your screen.
Breakout Groups
One helpful feature on Zoom allows you to split your Zoom class into sub-meetings, called breakout rooms. The feature enables the host to split participants up into groups, where they can interact with each other in their own meeting space.
Breakout rooms are separate chat rooms with full audio, screen share and visual settings. The meeting host has the ability to split the members of the class into these separate sessions automatically or manually, and can switch between sessions at any time. Up to 50 breakout rooms can be created and a room will hold 200 participants maximum.
It is important to note that the host will need to monitor the breakout rooms and have full control of the meeting, by responding to participants’ questions and giving assistance when needed.
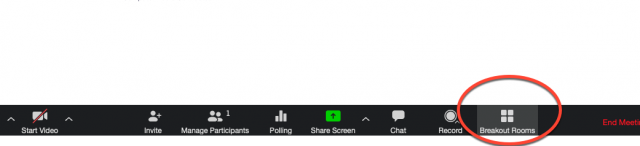
To create separate breakout rooms for the participants of your meeting, click “breakout room” in the bottom tool bar.
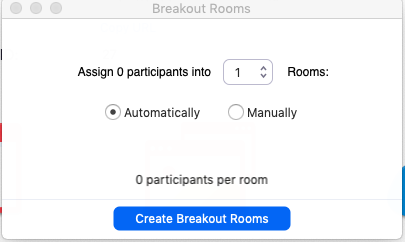
This will prompt you to format the room for participant number and assignment. When customized, click “create breakout rooms” to enable access to the participants of your meeting.
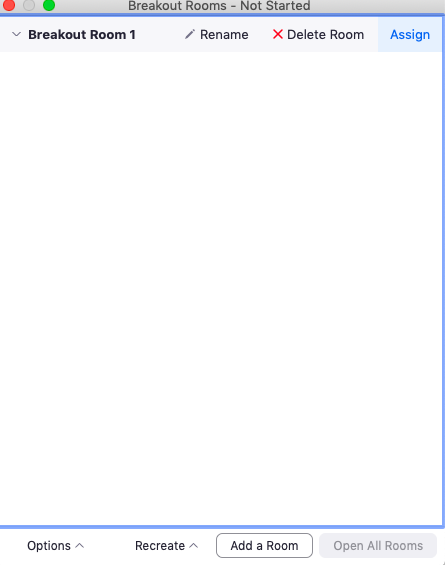
There, you will be able to view the breakout room you have created, and manually assign/rename/delete the room. At the bottom of the breakout room box, you may also add rooms.
AGAIN, IF YOU HAVE ANY QUESTIONS, PLEASE FEEL FREE TO CONTACT INFORMATION SERVICES AT lawtech@pepperdine.edu OR (310) 506-7425.
Additional LawTech Articles and Resources:
Download the Newest Version of Zoom
University IT website on Zoom (lots of pointers)
University IT website on Facilitating a Zoom meeting/session
Setup Automatic Recording in Zoom (Video tutorial and cheat sheet)
How to Remove Security Settings from Zoom Recordings
Trimming/ Editing a Zoom Recording
Adding an Alternative Host in Zoom
How to Set Up Zoom Meeting Breakout Rooms
Setup a Virtual Background for Zoom
Disabling the Waiting Room Feature in Zoom
How to Include a Guest Speaker in a Zoom Class Session
How to Use Your Personal Zoom Meeting ID for Office Hours
Using the Zoom Chrome Extension
How to Use Your Cellphone as a Document Camera in Zoom
Customize your Personal Meeting ID to your Pepperdine Phone Number