


In this post, we will discuss how to utilize PowerPoint and/or Google Slides to create an informational and visually effective presentation that will generate the optimal level of student learning engagement and retention.
Because this is a lengthy post, feel free to navigate to the topics of interest in the table of contents below, as well as be navigated back to the top at the end of each section.
We will touch on the following points:
Table of Contents
- Storytelling Structure
- Graphic Design
- Incorporating Visuals
- Multimedia Elements
- Transitions
- Animation
- Hotkeys/Shortcuts
When creating a presentation, it is important that the audience is in mind, the presentation is message focused, and that the information is presented in a clean, clear format. Knowing visual design concepts alongside presentational skills available on popular presentation platforms such as PowerPoint and Google Slides are vital to ensure your information is presented clearly.
Storytelling Structure
Creating a memorable and effective lecture is almost like crafting a story. Here are a few key points to keep in mind when considering the storytelling structure of a lecture or lesson.
Put the audience first.
Remember that your story is their story, meaning that though this lecture is coming from your knowledge and perspective, the goal is to have your students understand and relate well enough to envision the knowledge as their own. When creating a lecture, make sure to keep your audience in mind.
Have a solid theme and structure.
A theme can be as simple as the main subject point of the day’s lecture–however, it is important to have a clear and set theme which each sub-point is constantly reconnected to. The structure can be as simple or as complex as the instructor desires, but it must help build his or her narrative. The more details and complexity included in the lesson, the more important it is to have a clear theme so your students may hear, understand and remember your points.
Hook them early, and add emotion.
Though somewhat cliche, it is often helpful to begin a long topic with an engaging anecdote. Individuals are more likely to engage and retain information on topics that they resonate with, so adding an emotional hook with story examples or a brief anecdote may increase your chances of having a more responsive audience. Otherwise, throughout the presentation, attempt to keep only one or two points on each slide, along with visuals that illustrate the message (more details on these topics to come later in this blog post).
Click here to go back to the Table of Contents!
Graphic Design
Typography
Typography can make or break the presentation. Choosing the right font (proper typeface and proper sizing) is important in determining how efficiently a student can read, decode and process the information presented on the slides.
In terms of typeface selection, the general lesson is: good fonts are invisible, while bad fonts are noticed right away. For beginner designers, stick to Helvetica, Arial or Proxima Nova.
When considering font size, ensure your text big enough in order to ensure readability on your screen or projector even in the back of the classroom. For titles, 30pt minimum is suggested; for main text, size 18pt minimum is recommended.
Notice the difference between the first and second slides presented below in terms of readability in typeface and font size selection.


Once you get more advanced, you can start to play around with whatever readable and compatible fonts you like. Keep in mind that for screen projection, sans serif type faces are preferable, as serif is mainly used for print. However, sans serif and serif fonts are compatible when wanting to contrast titles and body text.
Notice the visual hierarchy created with these two different fonts and boldness selection. We will go more in depth on hierarchy in the next section.

Text Hierarchy
The amount of text you include on your slides and the way you present them contribute greatly to the way your readers take in your information. Text hierarchy revolves around the perception of importance. You can stress the importance of points in many ways, such as making the font larger, bold, a different color, etc.
When designing slides, make sure to keep in mind good visual hierarchy so you can be confident that the right elements are catching the students’ attentions.
In general, it is better to bullet your points instead of including full, complete sentences on the slide. This will ensure that your students are paying attention to you and your lecture, rather than simply attempting to read the text on the slide.
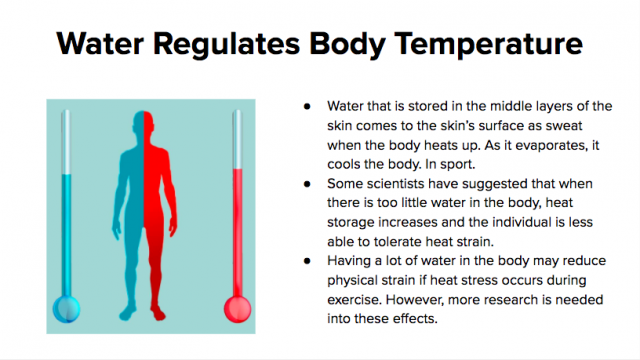
Notice how in the first slide, complete sentences overwhelm the reader and make it difficult to understand what facts are key pieces of information. In the second presentation slide below, the points are bulleted and the key takeaways are highlighted in a bolder typeface of the same family as well as with color (we will go more in depth on color in the next section).

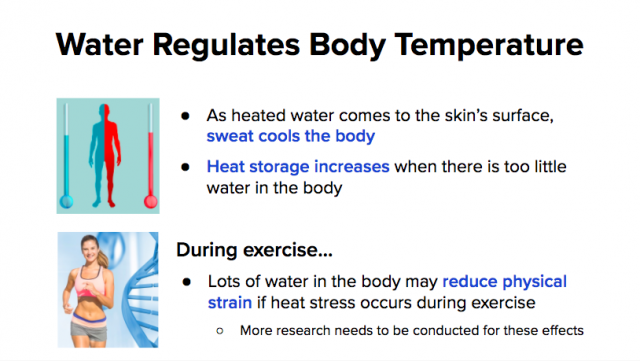
In this last example, notice how the incorporation of more than one visual aids separates the points by categories, alongside the subheading in a bolder, larger font. The sub-point in the last bulleted statement is in a smaller font, showing that it holds the least amount of importance on this slide.
Color
In a perfect world, we would all have the time to learn the basics of color theory. Though seemingly intuitive, figuring out which colors are compatible is harder than it seems.
The easiest rules to remember are those of complementary colors and analogous colors. Complementary colors are those that are on opposing sides of the color wheel (for instance, Christmas’s green and red, or Pepperdine’s blue and orange). Analogous colors are any four slices on the wheel that are directly connected to one another (such as “yellow” all the way to “red-orange”).
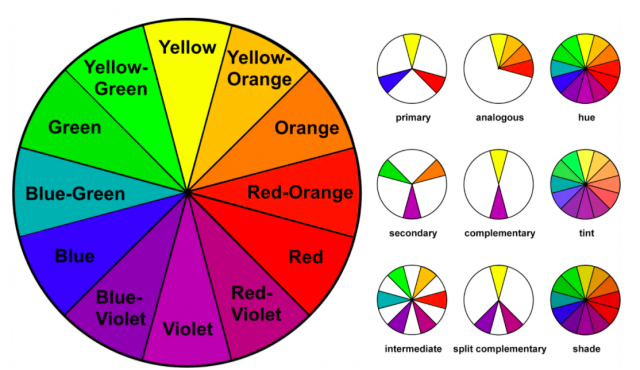
Don’t worry, color theory memorization is not required to create a great presentation. If you would like to experiment with color, Adobe Color allows you to select any color on the color wheel and will automatically provide you with compatible colors based on your selection.
In terms of perception, brighter, more vibrant colors often come across as more playful, while darker colors often feel a little cooler and usually more professional.
Notice how in the slide below, incorporating a complimentary color theme and visual hierarchy makes the slide seems more professional and more engaging.

This slide was created with the help of a free template. Powerpoint and Google Slides both have pre-generated theme templates that are easily accessible. SlideCarnival is a reliable site with more options that may be downloaded for Powerpoint and/or Google Slides.
Click here to go back to the Table of Contents!
Incorporating Visuals
To breathe life into an ancient cliche, a picture is worth a thousand words. This is even more noteworthy when presenting information to an audience. Though a picture may not give all of the detail needed to grasp a concept, a picture will act as a visual image to aid in the memory and understanding of whatever topic presented, as long as it is related.
Overall, the best visuals are often the ones that are simply designed. If your image is too large, the audience may tend to focus on it and be distracted from the key information.
pictures
One of the only times suggested to use a large image, or background picture, is for introductory slides. This image paints a foreshadowing picture of the topic, as well as leaves room for the instructor to provide a preliminary lecture for the upcoming section.

It is often handy to incorporate visual images in presentations, whether that be through pictures, icons or data displays. It is pertinent that the image is directly relevant to the topic discussed on the same slide to aid in consistency and lecture retention.

Icons
Visuals should always help illustrate the point. If desired, icons can be the extras that make your presentation fun and visually pleasing. Much like images, icons should always directly relate to the point being presented.
You can download free icons online through reliable sites, such as TheNounProject, FlatIcon, or IconFinder.
Charts, TABLEs and graphs
You can also use visuals to conceptualize big numbers and data.
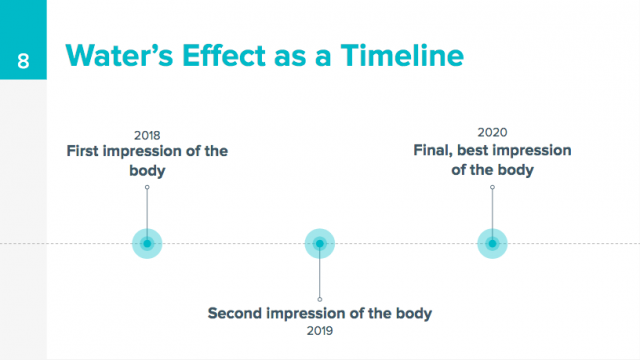
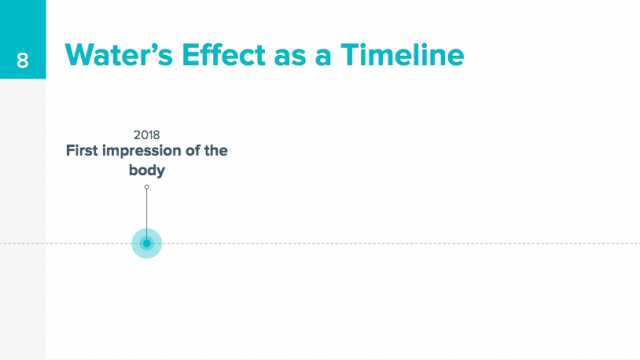
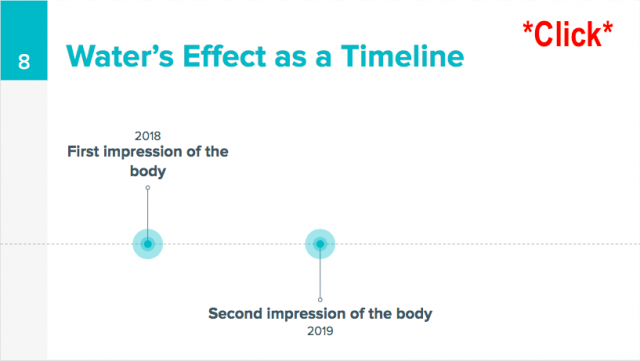
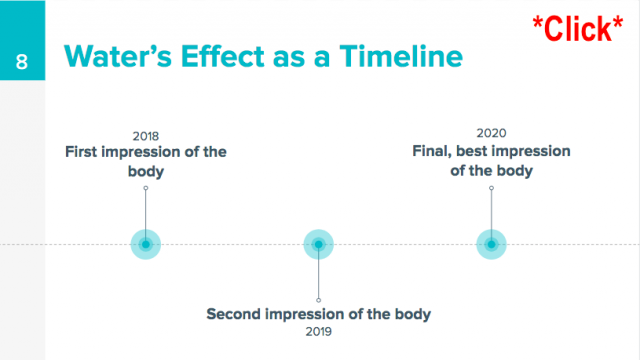
Timelines, such as the one shown below present data against time in sequential order. This allows you to tell a story chronologically or present data that shows progression over time.
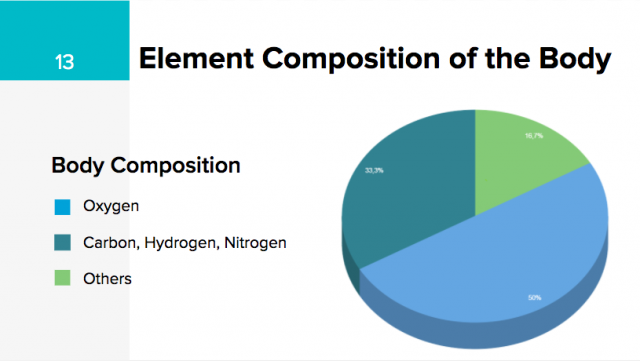
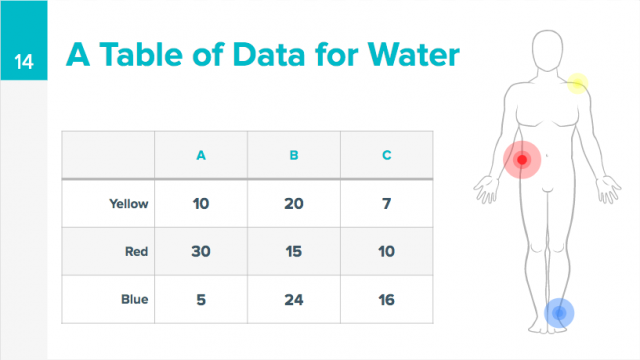
A pie chart or data table as shown, or any other chart/table that best represents your data can be a fantastic visual aid for a presentation. Incorporating visuals that are standard and your audience is likely already familiar with can make your presentation easier to understand.
Click here to go back to the Table of Contents!
Multimedia Elements
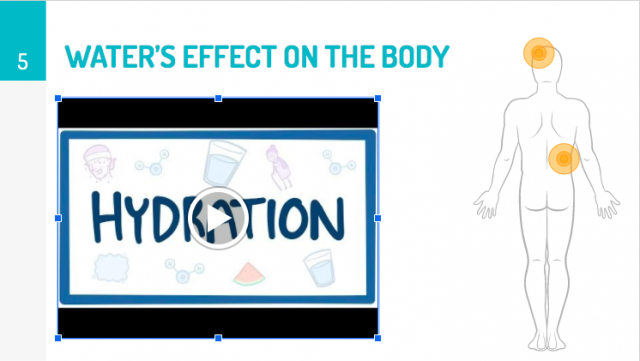
Multimedia elements can be extremely useful and memorable ways to convey information. If there are certain videos or audio clips that you would like to incorporate into your presentation, it may behoove you to embed them into your slideshow rather than disrupting your flow by exiting out and opening a new window.
Aside from videos and audio clips, you can also incorporate gifs by downloading them off reliable websites, such as Giphy.com, and importing them as if they were ordinary images.
VIDEO INSTRUCTIONS FOR GOOGLE SLIDES
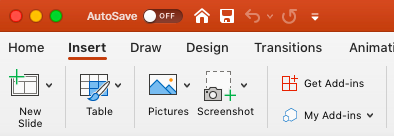
1. On the slide that you would like the place an audio or video clip, select “Insert” at the top left of your menu bar on Google Slides.
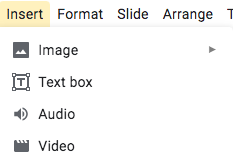
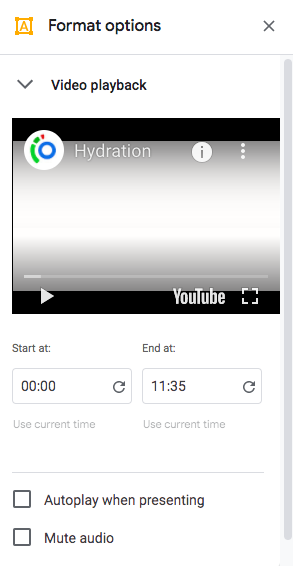
2. For this guide, we will select “Video.” A new window will appear with a title of “Insert Video.” From here, you may either search for a video on Youtube, copy and paste a video URL, or import a video from your Google Drive.

3. After choosing your video and embedding method of choice, click “Select” to have your video placed on your side. Feel free to resize and reposition your video to your liking.
4. Notice that a new menu titled “Format options” now appears to your right side. Here, you can adjust the settings of your video, such as whether you would like the video to automatically play once you enter this slide, when the video should start/end, etc.
VIDEO Instructions for Microsoft Powerpoint
1. On the slide that you would like the place an audio or video clip, select “Insert” at the top left of your menu bar on Powerpoint.
2. Navigate to the right side of the toolbar that has now been presented. Here, you will see the options to either import your video or audio of choice.
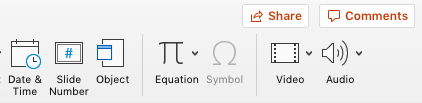
3. For this guide, you may select “Video” and have the drop-down menu appear. From these two selections, you may either use “Movie Browser” to search your computer for movies (iMove files, Adobe Premiere files, etc.) or “Movie from File” if you would like to import a video saved from your desktop.
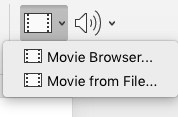
Note that, unlike Google Slides, you are not able to search a video on Youtube or simply link a URL. This will mean you need to take a few extra steps for inserting a specific video from online that you desire. You may download the video off Youtube through any reliable Youtube to MP4 converter, such as https://ytmp3.cc/en13/, or find a free, downloadable source.
Click here to go back to the Table of Contents!
Transitions
Transitions are the potential effect selections you may choose as you move from one slide to the next. It is advised to either choose one (or no) transitions throughout the entirety of the presentations for consistency, or mindfully choose a transition for a specific slide to illustrate a memorable point. This is due to the fact that though continuously changing transitions may be fun and quirky, they have the potential to seriously distract your audience.
transition instructions for google slides
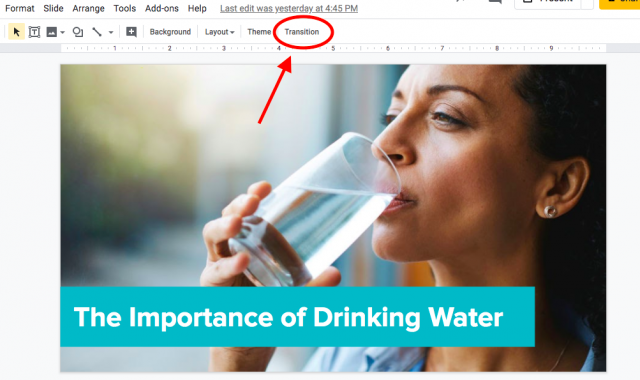
1. If you would like to emphasis a certain slide with a transition, go on the slide you wish to have a transition effect on in Google Slides. Select “Transition” at the top of your menu.
If you would like to set one consistent transition throughout your presentation, you may click on “Transition” as well.
2. From here, a new menu will appear on your right. Under “Slide Transition” you will see that you can select your desired transition, as well as dictate the speed at which the effect will occur by moving the yellow bar.
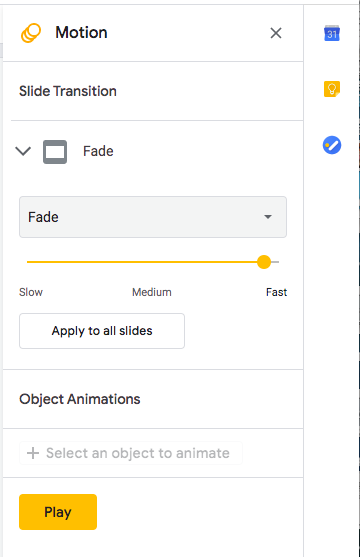
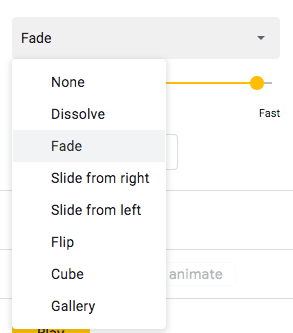
By selecting the drop-down menu, you will see a list of possible Google Slide transitions. By selecting “Play”, you may preview the effect. The button titled “Apply to all slides” will automatically set this effect to all slides in your presentation.
transition instructions for microsoft powerpoint
1. If you would like to emphasis a certain slide with a transition, go on the slide you wish to have a transition effect on in Powerpoint. Select “Transitions” at the top of your menu.
If you would like to set one consistent transition throughout your presentation, you may click on “Transitions” as well.
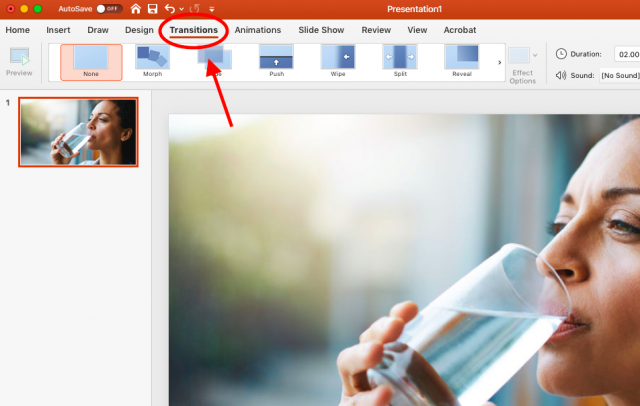
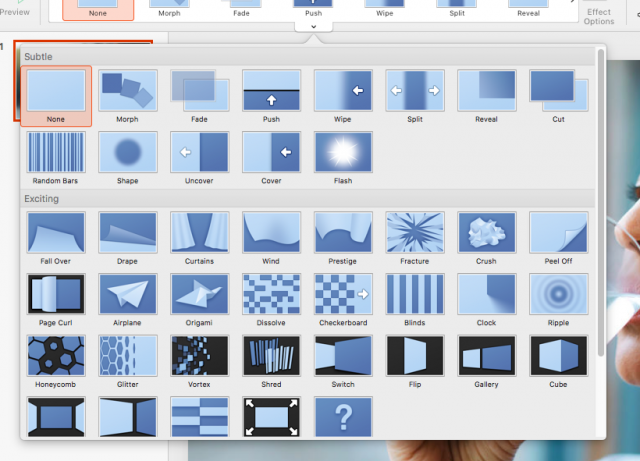
2. By selecting the dropdown menu under the transition images, you will see the entirity of your transition effect options.
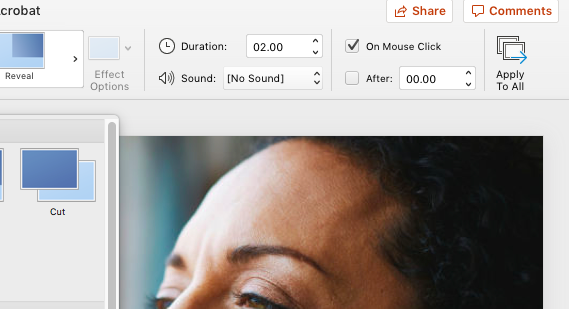
3. On the right side of your transition options, you will see a variety of transition preferences you may adjust, such as how this transition will occur and for how long.
If you would like to set a general, consistent transition effect across your entire presentation, select “Apply To All” on the far right of the menu.
Click here to go back to the Table of Contents!
Animations
Animations are movements that can be applied to objects within a slide. Since animations are pretty fun, it’s easy to get carried away. Animations are best used when it relates and enhances the message presented and you want the audience to remember the point you are making.
We will now give you two examples and step-by-step instructions on how to properly incorporate animations in your presentation. Though one set of instructions will be for Google Slides and another for Microsoft Powerpoint, the concepts and procedures remain the same on both interfaces.
animation instructions for google slides
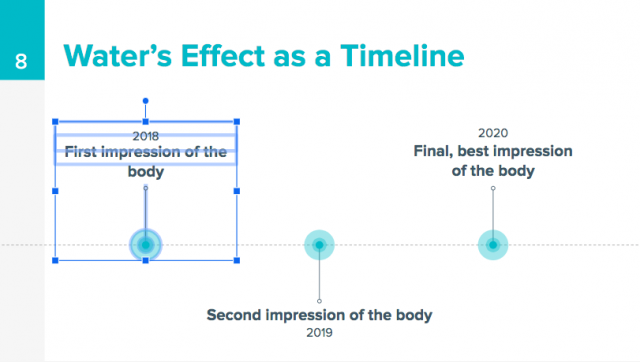
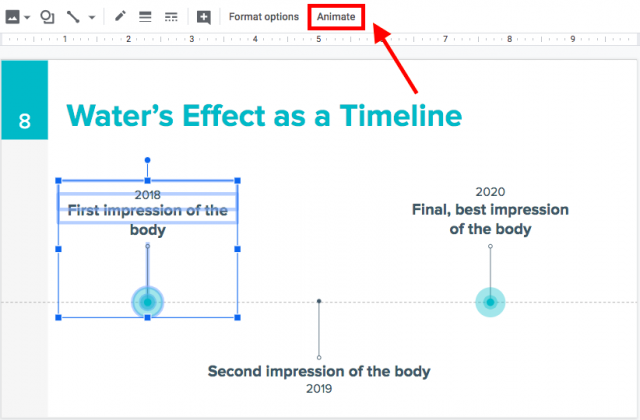
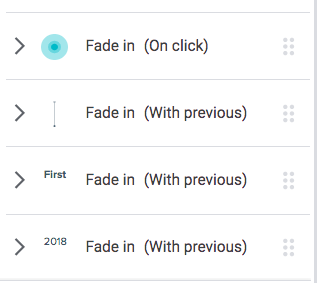
Sometimes, it’s beneficial to not have all of your information presented on the screen at once, so students can focus on one point at a time instead of haphazardly attempting to copy all information provided in their notes. For this example, we will be using the timeline icons slide. Having a point on a timeline appear on-click is a very common way to guide discussion.
1. Go on the presentation and slide in which you would wish to have animations.
2. Highlight the object(s) you would like to be animated. In this case, we are highlighting the text boxes, bar, and circle icon all together to be animated as one cohesive object.
3. With the object(s) still selected, you may release your click and navigate toward “Animate” at the top of Google’s menu bar.
4. Now you will see a “Motion” menu pop-up on the right side. This is where you can adjust the animation settings. Because we mass selected objects, you will see each object and their coinciding default selection. Click the arrow on the left to see a list of animation details.
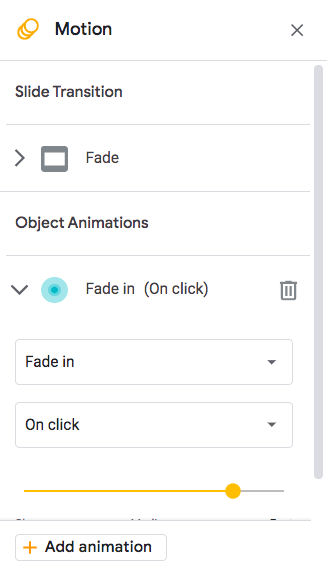
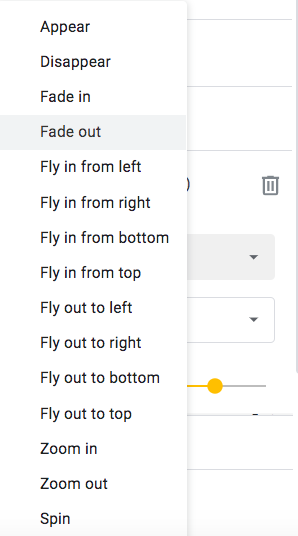
5. If you click the arrow next to the “Fade In” option, you will see a drop-down menu of all potential animation selections for an object. For our purposes, we will leave it at “Fade In.”
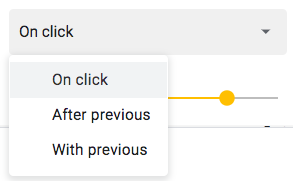
6. If you click the arrow next to the “On Click” option, you will see a drop-down menu of all potential selections for when the object will animate. For our purposes, leave the selection to “On Click” for the first selected object on the top.
7. The right-hand bar in yellow indicates the speed of which these animations will move. For our example, you may leave the animation at it’s default pace.
8. For the latter objects, make sure that the “On Click” selection is set as “(With previous)”. This will ensure that all objects will appear at the same time, instead of staggered.
9. Apply steps 2-8 to the next timeline objects.
10. Now, when you press “Play” or present your slideshow, you will see that the animations will appear on each click.
ANIMATION INSTRUCTIONS FOR microsoft POWERPOINT
1. Go on the presentation and slide in which you would wish to have animations.
2. Highlight the object(s) you would like to be animated. In this case, we are highlighting the text boxes, bar, and circle icon all together to be animated as one cohesive object.
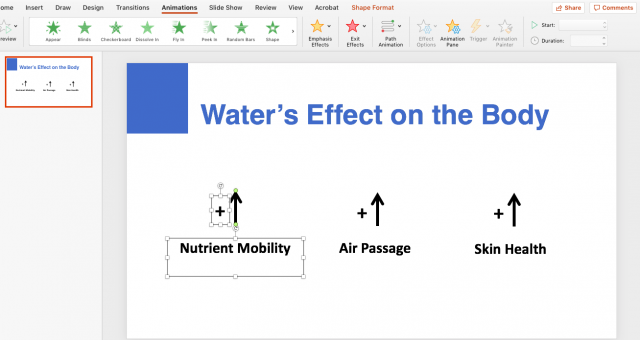
3. Next, select “Animations” on the top of your menu.
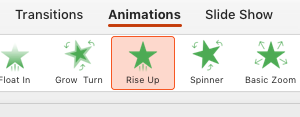
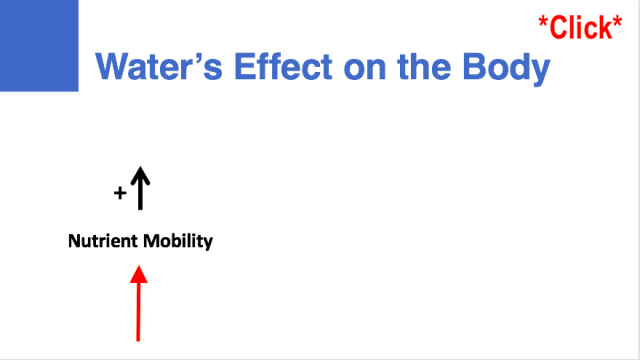
You can now see all of the default animation selections at your disposal. Since we are trying to represent the fact that “water positively increases nutrient mobility in the body,” the “Rise Up” animation will help illustrate that point.
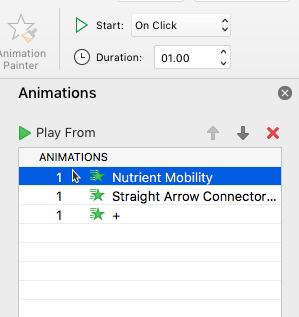
You will now see a new menu appear on the right of your presentation. This will show all of the objects that you have animations on this particular slide. Notice the tabs titled “Effect Options,” “Timing,” and “Triggers.” This is where you may adjust the details for your animations.
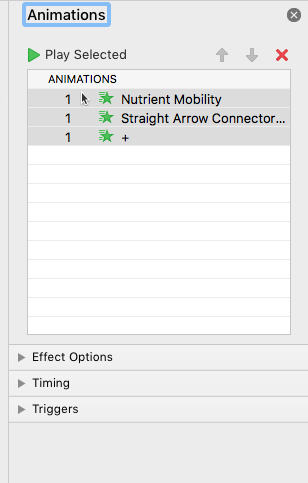
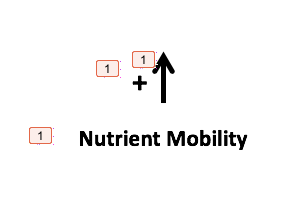
You will also notice your selected objects on the slide having numbers next to them. Since they are grouped as one, all of these objects will have the number “1” next to them, meaning that they will be the first to animate. These numbers will not appear when you present the presentation.
4. Under “Timing,” it is preferential to select “On Click” so your animation will happen on the command of your click.
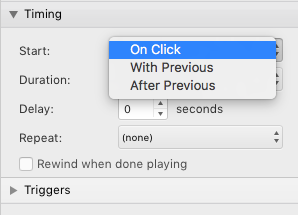
You can also see the same options appear on the top right of your menu bar.
5. Now, this “Rise Up” animation can be shown through a trial play through of your presentation. On your click, the selected objects should now move themselves up to their establish position.

Click here to go back to the Table of Contents!
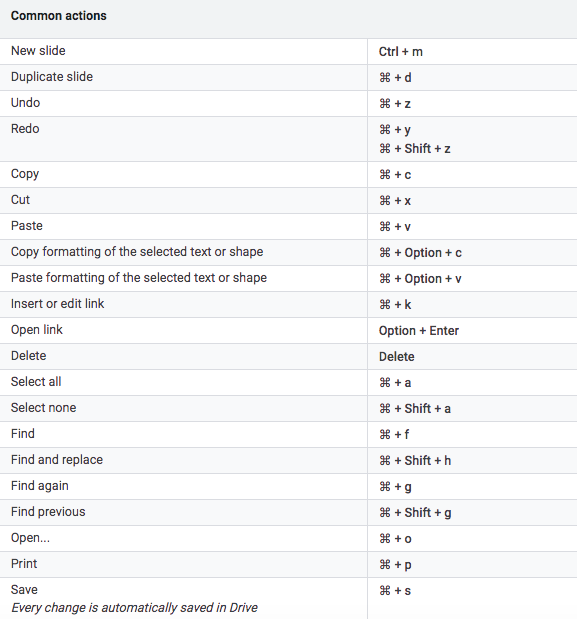
Hotkeys
Hotkeys are keyboard shortcuts. By clicking these letters and/or symbols at once, you may conduct an action in one press that may have taken you several clicks. Though seemingly confusing and hard to memorize at first, after frequent practice, hotkeys are incredibly useful for speeding up the presentation creation process.
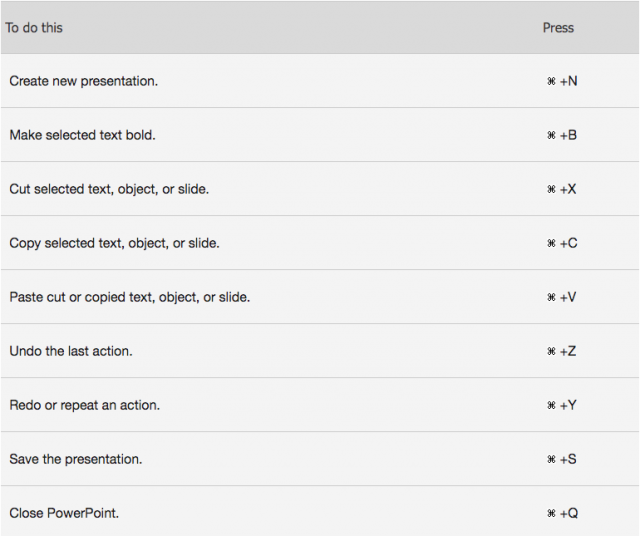
KEYBOARD SHORTCUTS for microsoft powerpoint
Below is a list of the most popular hotkeys/shortcuts used for creating Powerpoint presentations. For a complete list, visit Microsoft’s blogpost by clicking here.
KEYBOARD SHORTCUTS FOR MICROSOFT POWERPOINT
Below is a list of the most popular hotkeys/shortcuts used for creating Google Slides presentations. For a complete list, visit Google’s blogpost by clicking here.
Click here to go back to the Table of Contents!