

Faculty may utilize Zoom’s dual monitor display feature so the students’ video layout and screen share content can be placed on two separate monitors/screens. Specifically, gallery (grid view of all of your students) or speaker view (full screen view of the current speaker’s video) can be displayed on one monitor while the other monitor displays your slide presentation, documents or videos.
As a prerequisite to continuing on with the information provided in this article, please make sure that you have installed the Zoom desktop client and have dual monitors enabled on your system. For an instructional guide on establishing a dual monitor setup with your Mac computer, please click here. For an instructional guide on establishing a dual monitor setup with your Windows computer, please click here.
Enabling Dual Monitors in Zoom
1. As a trial, you may join or start a solo meeting through the Zoom Pro tool in Canvas, or through the Zoom desktop client on your computer.
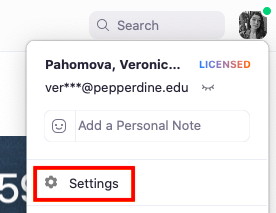
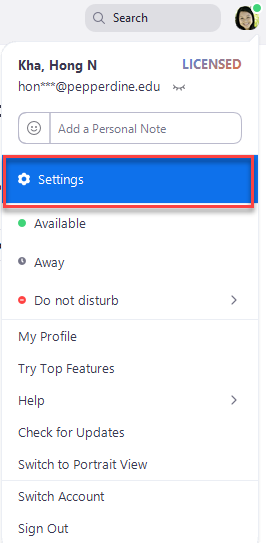
2. To enable the dual monitors feature in Zoom, click your profile picture, and then click “Settings.”
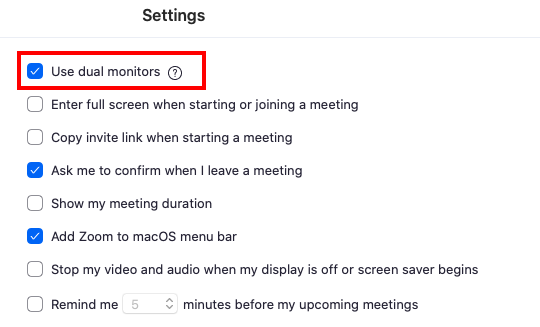
3. Click the “General” tab, and under “Settings,” check the box that is labeled, “Use dual monitors.”
Testing Your Dual Monitor System
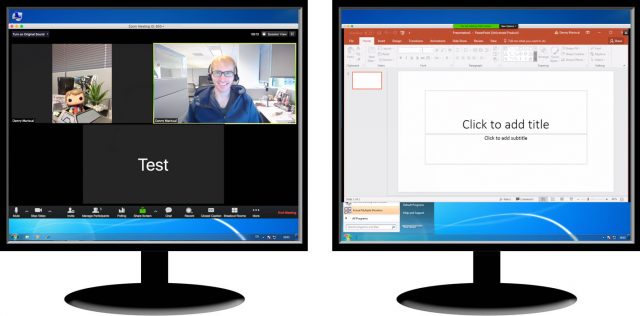
4. Once in the Zoom meeting interface, with the dual monitor setup already configured on both your computer and Zoom, you will see a Zoom window open on each monitor. Though it may be different based on your individual computer, typically, the meeting controls and your video will display on one monitor, while the other monitor will display students’ videos.
As a note, Zoom tends to default to full screen view. If you would like to exit the full screen view to access your desktop, simply press “ESC,” or escape, on your keyboard.
5. To share your screen with your desired presentation (slideshow, document, video, etc), open the display on your preferred monitor.
6. Then, press the green “Share Screen” button on the bottom center of your Zoom screen.
You will be redirected to a pop-up window where you may select whether to share Desktop 1 or Desktop 2, and you may select whichever monitor has your desired display open.
7. When sharing your screen, you will still be able to view your participant’s videos on the other monitor while selecting what specific window to share on the second monitor. Feel free to adjust your windows to your preferred layout.
POWERPOINT SETTINGS TO ENABLE “GALLERY VIEW” AND “SPEAKER NOTES”
One useful approach to note is how to set up your PowerPoint presentation in a separate window. This prevents PowerPoint from taking over both of your monitors, so you may move your slideshow with your speaker notes to the monitor of your choice and keep gallery view on the second monitor.
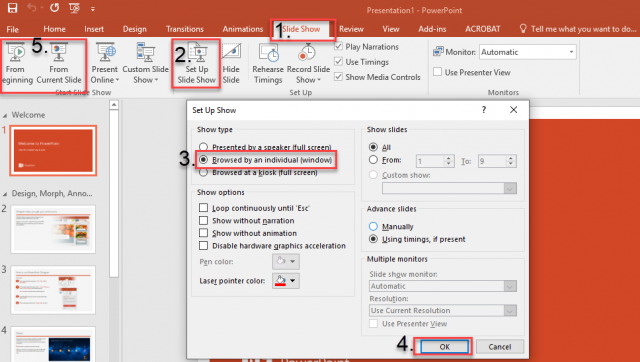
1. To do this, open your PowerPoint presentation “Slideshow” menu.
2. Select “Setup slideshow.”
3. Then, “Browse by an individual (windows)”
4. Click “OK.”
5. Then you may either play “From Beginning” or “From Current Slide.”
You should now see your slideshow with your speaker notes on one monitor, and still have your Zoom gallery view available on the second monitor.
“Gallery View” Settings (setting up display to 49 participants)
If you would like to view more than 25 profiles on a screen, by modifying your Zoom settings, you will be able to display up to 49 participants at a time. This is provided that your computer has the capacity to display more than 25, however, which depends on your computer’s CPU.
First, navigate to the Zoom App.
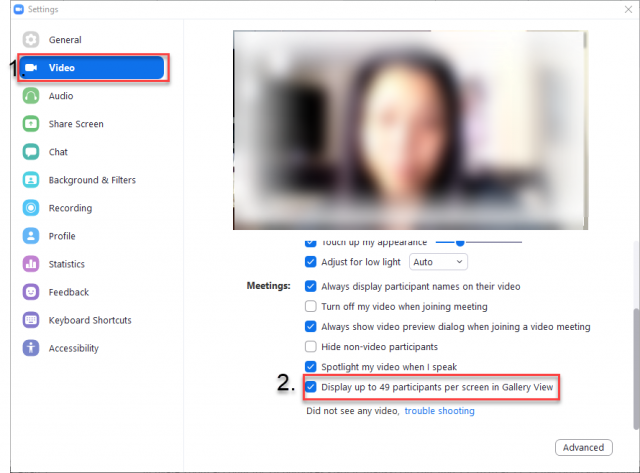
Then, select your profile from the top right corner, and select settings.
Under the video tab (1), scroll down and check the box to enable “Display up to 49 participants per screen in gallery view” (2). (If it is gray and inaccessible, your computer does not support the 49 participant display.)
For more information on Zoom for faculty, please click here.
If you have any questions, please feel free to contact Technology Services at lawtech@pepperdine.edu or (310) 506-7425.