Gmail Filtering

This post will explain how to create rules within your Gmail to filter incoming emails; for more gmail information see google’s page:
How To Create Rules to Filter Your Email

  1. Click on the down arrow by your search bar

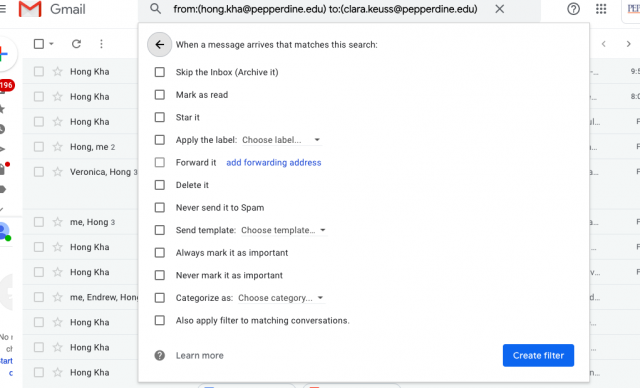
2. Fill out the information for which emails you would like to be filtered, then click “create filter”
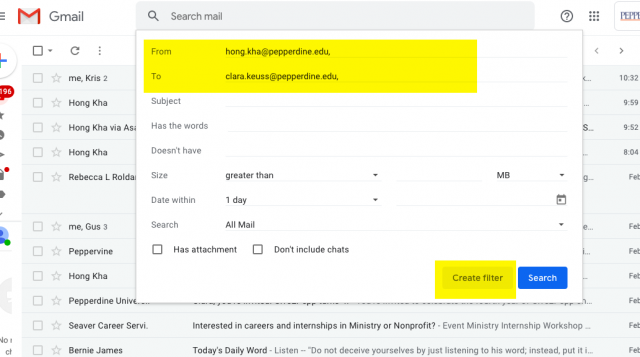
3. Next, choose what function you would like the filter to do; you can create a custom label in settings to tag the email, place the email in a subcategory such as social or updates, and more. Then, click “create filter” again
Note: When you create a filter to forward messages, only new messages will be affected. ​Additionally, when someone replies to a message you’ve filtered, the reply will only be filtered if it meets the same search criteria. 

Alternatively, you may choose an already existing email to serve as a template for what you would like to filter in the future:

  1. First, click the checkbox next to the email you want.

2. Second, click “more” (the three gray dots)
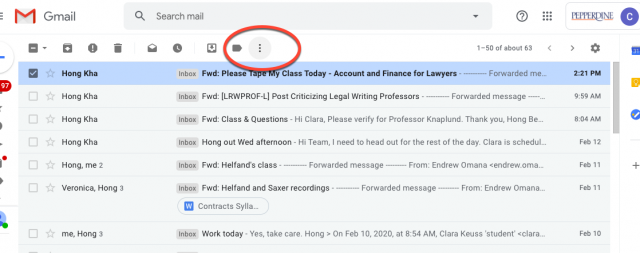
3. Select “filter messages like these” and then proceed to fill out the filter information in the same way as the previous filter tutorial.

Another option is grouping emails by conversation:

  1. In the top right of your email, click “settings”
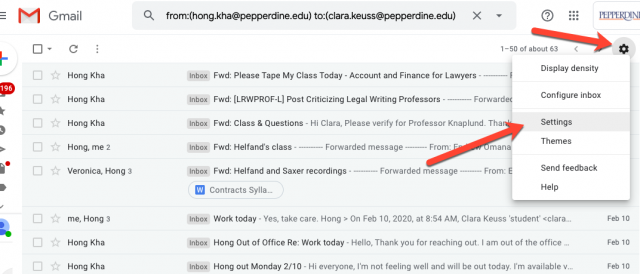
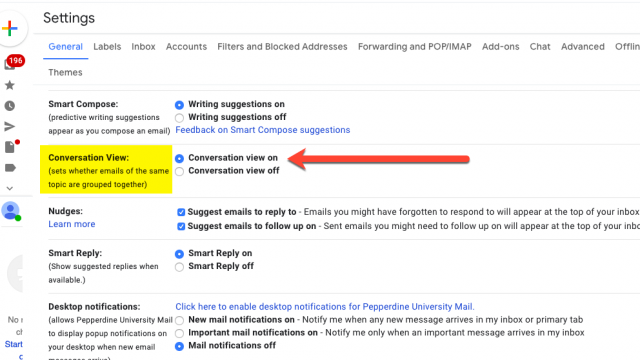
2. Scroll down to the bottom of the settings page to the “Conversation View” section. Select “conversation view on” to group messages.
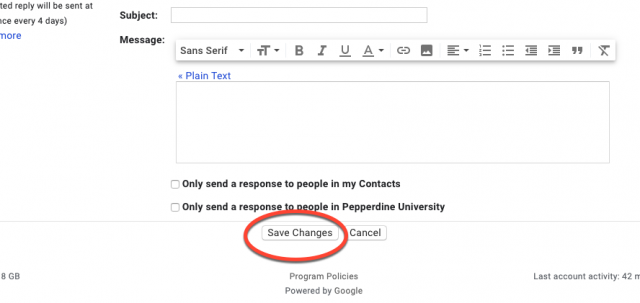
3. At the bottom of the page, click “save changes”
If you have any questions, please feel free to contact Information Services at [email protected] or (310) 506-7425.

iClicker Basics

iClicker is a polling software for use in a classroom or seminar setting.

iClicker is a responsive teaching and learning tool that incorporates clickers, mobile phone clicker usage, GPS attendance, polling/quizzing, and study guides.

To create an account, visit the iClicker website and select “create an account” in the upper right of the page.

iClicker

iClicker provides real-time feedback from students, and promotes active learning.

With iClicker, a toolbar floats above instructor content and allows the instructor to ask multiple choice, short answer, numeric and target questions on the fly. Instructors do not input the text of questions into the clicker system ahead of time.

NOTE: If you as an instructor have existing TurningPoint questions, you can continue to use the PowerPoint slides, although you may want to remove the bar graph.

For more information on iClicker for students, please click here.

For more information on iClicker for faculty, please click here.

If you have any questions, please feel free to contact Information Services at [email protected] or (310) 506-7425.
Anonymous Grading in Courses

  • This article outlines how to engage anonymous grading in Courses, using Turnitin. For more information on Turnitin at Pepperdine, see Pepperdine’s Turnitin Policy.
  • Anonymous grading allows instructors to review content uploaded into an assignment without knowing which student submitted a particular document. This feature can be useful in ensuring that everyone is graded in an unbiased manner.

*Make sure to provide students with instructions not to use their name in their document, i.e. the document name and body of the written text should not contain student information.

Creating your assignment:

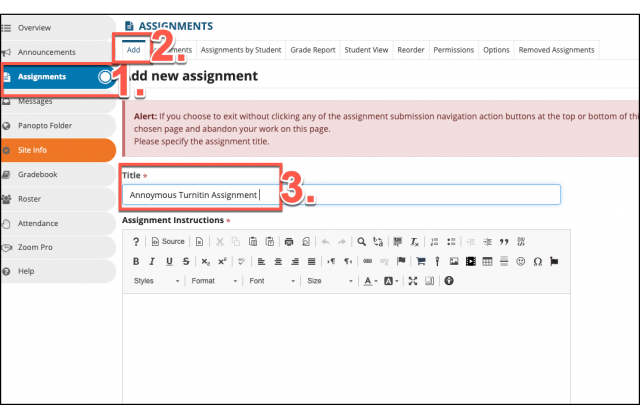
Step 1: Click on the “Assignments” tab on the far left column. Then click “Add” under the assignments tab in the top left of your screen to start a new assignment post. Title your assignment and proceed with filling out the options for your assignment.

Step 2: Select “Use Turnitin”.

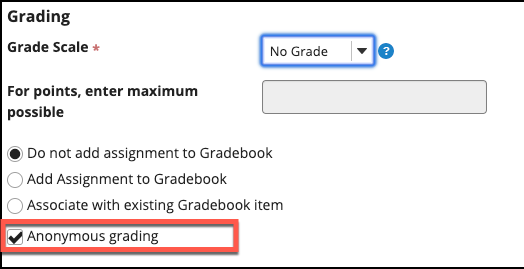
Step 3: Select “Anonymous grading” from the grading scale section checklist.

Step 4: Post your assignment.

Step 5: Confirm that your document is correct then select “post” again.


Viewing submissions

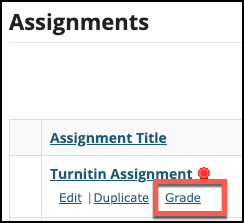
Step 1: Back under the assignments tab, click “Grade”, located under the title of your assignment.

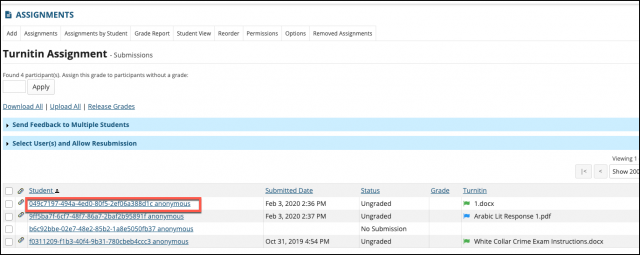
Step 2: Select a student’s paper. You should not be able to see a name in the title.

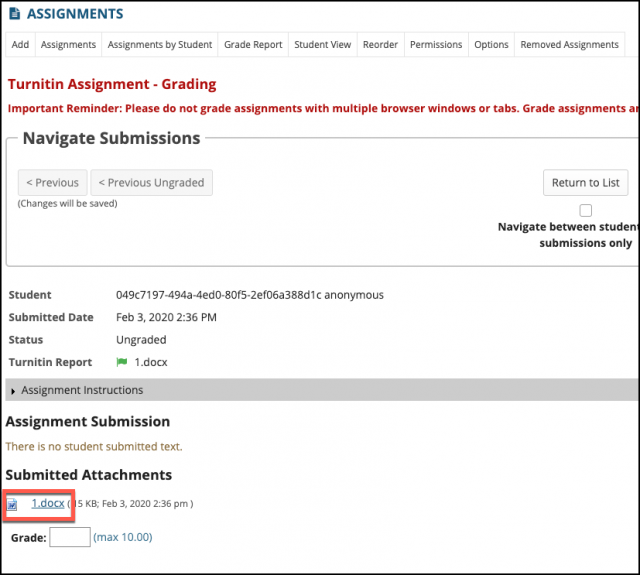
Step 3: Click on the document, located under “submitted attachments”. The document should open with regular instructor access.

If you have any questions, please feel free to contact Information Services at [email protected] or (310) 506-7425.

Google Drive: Tips & Best Practices

Google drive is an efficient platform for housing documents, but more than that, it provides a number of features to help keep organized– here’s an overview:

  • Upload files and folders
  • Share files and folders
  • Set permission levels
  • Search/sort files and folders
  • Collaborate on docs
  • Track version history 

Helpful Features in Google Drive:

  1. Your document is automatically updated and saved every time you make changes to it online, and you can access it through any browser.
  2. Make sharing work publicly simple. Want to share your document, presentation, or spreadsheet with the world? Just click file > publish to the web, and you’ll get a public link that you can share with anyone and everyone. Make sure to understand the difference between MyDrive and shared drives.
  3. The Save to Google Drive Chrome extension lets you save documents, images, audio, videos, and more straight from a web page to the Google Drive folder of your choice. (A good alternative to full-page screenshots)
  4. By choosing to get email updates on any changes to your document, you will be notified of any changes (edits, comments, etc.)  to a group document directly to your email without logging in to the drive itself.
  5. Automatically upload and store files via Google’s Backup and Sync from your computer so you can access them from any other device with Google Drive. A great way to make one of those extra copies of your data that you really should have.

What not to save to Google Drive:

  • Any information that is classified or restricted may not be uploaded to Google Drive.

For more questions, check out Drive Basics for training and FAQs

Or, check out Pepperdine’s Google Drive learning center

Update Operating Systems for Examplify

A big thank you to the students who paid attention to our note about not updating your MacOS to Catalina at the beginning of Fall 2019 semester until further notice. That notice releasing the OS update hold came out in the blog entitled, “Examplify is NOT compatible with Mac OS lower than 10.13 (High Sierra, Catalina)” posted on November 4, 2019.

With finals upon us, please make sure your operating system is not out of date. Mac users, you must have an operating system with High Sierra (OS 10.13) or higher. You can even update to the latest version – Catalina (10.15.1) Here are some links from Apple where you can learn more:

If you are a Windows user, I haven’t forgotten you. Please make sure to upgrade your operating system to Windows 10. Microsoft will no longer support Windows 7 in January 2020. Check out Pepperdine’s Student Discounts page if you need to purchase Windows 10. 

If investing in tech isn’t something you were expecting this holiday then perhaps making a Christmas gift request for a new computer is the way to go. Here’s a page we put together on computer requirements to help you select the best computer for law school. 

Please note that when you registered your computer onto the university network, you agreed to the usage policy that states: “Actively maintain the security of personally-owned and University-assigned computers.” This includes keeping your OS updated. 

One last thing: Pepperdine IT is here to help if you have any tech issues. We may not be able to fix your computer all the time but we can help troubleshoot and make recommendations– just don’t wait until the last minute. 

Good luck on your exams!

Law School Email Signature Update

Information Services is happy to announce an improved system for email signatures at the Pepperdine Caruso Law School (yes, remember that it’s now Caruso!). This new stationery system will be effective starting Nov. 26. We ask all members of staff and faculty to abide by the instructions listed in this article to ensure a sense of uniform professionalism and consistent brand identity.

Please make sure to scroll to the bottom of the page to utilize our 50th anniversary email signature!

Again, the informational instruction page link is here: https://community.pepperdine.edu/imc/resources/style-guide/email-signatures/

If you have any questions, please feel free to contact Information Services at [email protected] or (310) 506-7425.