Using Canned Responses in Gmail for multiple signatures

Did you know that Gmail will support multiple signature files?

This can come in handy when you are working with different teams or are responding to messages from a prospective employer.

You may need to put different information in your signature (block of text at the end of your email message) based upon the person or group with whom you are corresponding.

This is actually not in the signature functionality, it’s really kind of a cheat.  You employ the “Canned Responses” feature.  It works pretty well but you will be limited to using this in your web browser (Chrome, Firefox, Safari, Internet Explorer, Edge).


Setting up and using Canned Responses:

First, enable the Canned Responses feature

  1. Go to your Gmail Settings (gear icon upper right hand of the Gmail screen).
  2. Click on Settings.
  3. Select the Advanced tab at the top of the Settings screen
  4. Scroll down to Canned Responses (Templates)
  5. Select the Enable radio button.
  6. At the bottom of the page, click Save Changes.

Next, create a canned response (alternate signature)

  1. Compose an email message. This is just to create your canned response, you won’t be sending this message.
  2. Leave the To field blank (filled automatically with the recipient’s email address).
  3. Leave the Subject field blank (filled automatically with a reply to the recipient’s subject).
  4. At the bottom of your compose window – bottom right of the screen — there are three vertical dots these dots are the “More Options” button. Click here
  5. Select Canned Responses.
  6. Click New canned response.
  7. Enter an appropriate name for the response; e.g., “Signature A” to use for certain messages where you want this signature at the bottom of your messages.
  8. Click OK.
  9. Enter the wording for the canned response.
  10. Click Save.

Use a canned response (alternate signature) in a new message

  1. Compose an email message.
  2. Fill in the To field
  3. Fill in the Subject
  4. Type out your message, then hit return a few times to create a space for your canned response text
  5. Click on the “More Options” symbol (three vertical dots) in the lower right of your editing window.
  6. Select Canned Responses.
  7. Click on the Canned Response (alternate signature) you want and it will be inserted


(This content was adapted from materials at: https://google.oit.ncsu.edu/core/gmail/canned-response/)

Kronos 7: Timekeeping at Pepperdine

Have you figured out how to use Kronos 7 yet? Perhaps you’re still struggling with the basics of getting around and entering your information correctly. Here are a few resources which you might find helpful.

First, a video introduction to Kronos 7:

The video is helpful, but still limited. So here are some recommended help-guides for more in-depth and user-specific reference (students and adjuncts take special note):

Support for Kronos is provided by the Payroll Department at (310) 506-4636 or check out their Finance and Payroll FAQs.

Please note that while Google Chrome and newer versions of Microsoft Internet Explorer are fine browsers, Kronos still works best in Mozilla Firefox. Whatever browser you use, be sure it is up to date and that you have the most recent Java patches installed for the best experience possible.

Forgot Your Password? MyID Reset

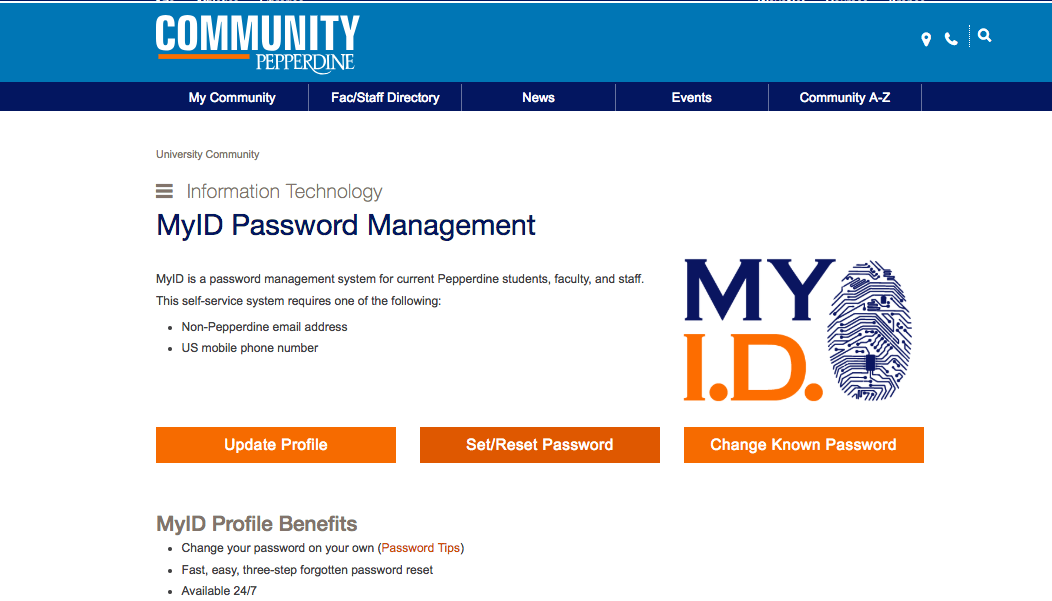
The MyID PIN Reset outlines the process for resetting a forgotten password via MyID:

1. Go to: https://myid.pepperdine.edu

2. Click Option 2: Click “Set/Reset Password”
3. Enter your NetworkID.
4. Type the letters displayed in the picture.
5. Select the check box (to allow PIN text message)

6. Click “Request PIN”

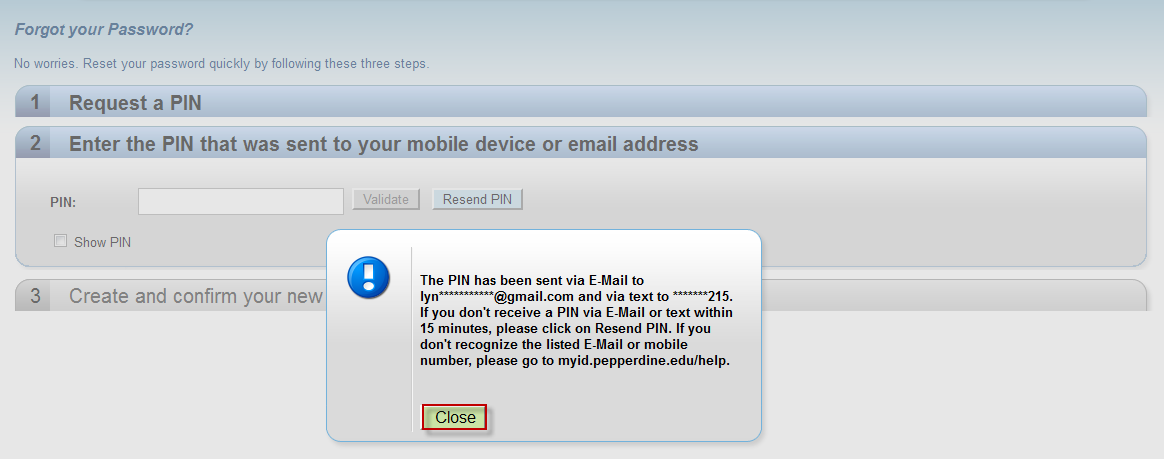
7. You will receive a confirmation message, click “Close”
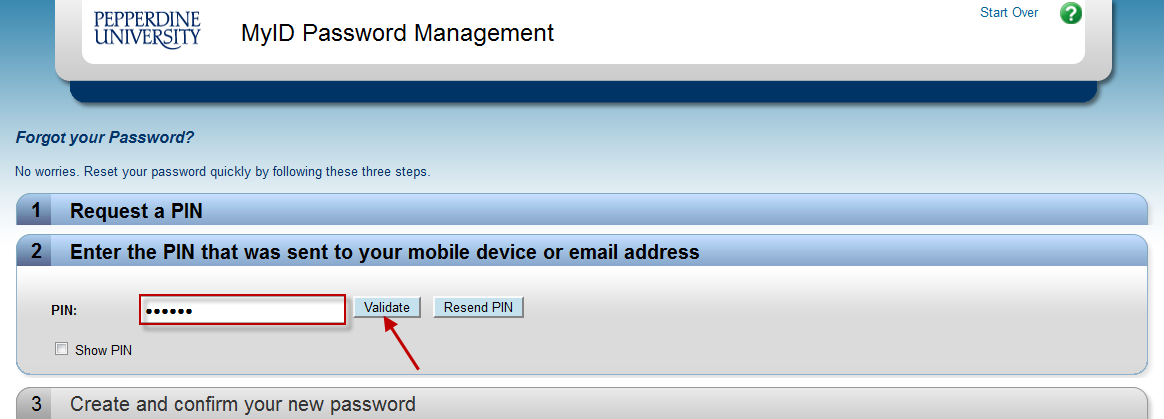
myid38. Retrieve the PIN from your alternate email or mobile phone. Enter it here and click “Validate”
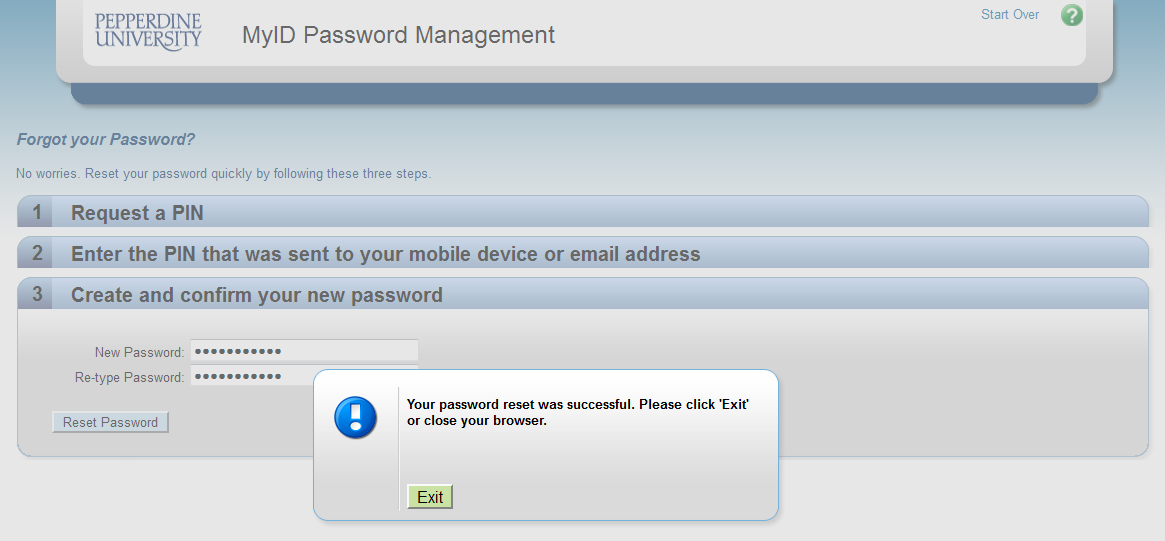
myid49. Enter your new password twice and click “Reset Password”
*Please Note: If your password does not meet our complexity requirements, you will see a red X next to the issues that need to be fixed.myid5
10. Password reset was successful. Please close your browser.
myid6Password Tip: Don’t Get Locked Out!
Update passwords you stored on your mobile devices, too!

Free and Discounted Software for Students: Microsoft, Adobe and Windows

Being a Pepperdine student has a variety of perks, ocean view, Olympic swimming pool, close access to the beach, and now either free or discounted access to software such as Microsoft Office 365 and Adobe Creative Cloud.

Microsoft Office 365

As a Pepperdine student, you can sign up for free access to Microsoft Office 365 and earn access to Microsoft Office tools like Word, PowerPoint, and Excel. Simply go to the Microsoft online store and enter your Pepperdine email address, then follow the prompts to set up your free account and that’s it! Simply download the Desktop apps to your computer and you will be writing in style in no time.

Adobe Creative Cloud

With your Pepperdine student email, you can download Adobe Creative Cloud and earn access to software like Acrobat PDF, Photoshop, InDesign and more for $19.99/month instead of the standard payment of $52.99/month. To purchase the subscription, visit their website for more information.

For more information on student discounts provided to you, please click here to be redirected to Tech Central’s page. Thanks for being a Pepperdine Law student and we hope you enjoy your free and discounted software with an ocean view.

Panopto: Class Recording

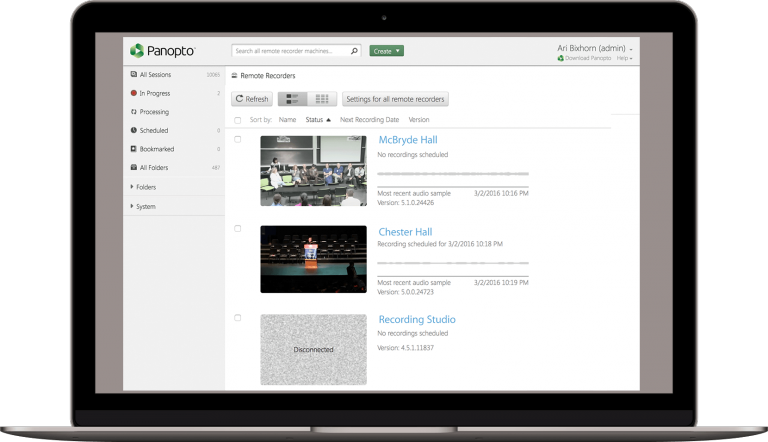
Interested in recording your class? Panopto is Pepperdine University’s lecture capture system integrated into Courses by Sakai and will archive your course session recordings for up to five years.

Courses hosts the Panopto features which are automatically linked with Zoom’s recording features when accessed through Courses’ Zoom Pro Tool.

If you plan on recording your class more than once a semester, you can easily set this up through Zoom Recording.  The recordings you save with Zoom will be automatically saved to Panopto. Zoom recordings will only save videos for six months so Panopto acts as an automatic backup that saves videos where they can be accessed for much longer.

Videos can also be recorded and edited within Panopto. There are different recording options, such as:

  • Audio– all recordings capture audio by default
  • PowerPoint– records the presentation slides you show on the class computer by default
  • Video– available for classrooms with cameras, records the front of the room only
  • Primary Screen– records any applications you use on the class computer, such as  Documents, Web pages, Excel Files, Courses pages, etc.

For more specific informational videos on Panopto, please refer to the links under the “Faculty” heading of this page. If you have questions or assistance please reach out to us via [email protected] and a member of the Information Services team will be glad to assist you.

Pepperdine Passwords and Password Managers

True or False: It is against Pepperdine policy to reuse your Pepperdine password for any other web service.

It’s true, it is against Pepperdine policy to reuse your MyID password for other accounts or sites.

When you reuse your Pepperdine MyID password on Internet sites or accounts, you are making yourself vulnerable to attacks on your Pepperdine account, finances, grades, and more. In 2011 alone, millions of passwords were stolen from Internet sites like Sony Entertainment and Gawker. In 2012, more than 6 million LinkedIn passwords were compromised.

If you use the same password over many sites, the security of your password is only as good as the security of each individual website you use that password. And if one site is compromised, your entire web presence is compromised. Your author actually uses a different 20 digit passphrase for every single website he uses and its actually quite easy to manage using a Password Manager.

Password Managers

A password manager is a software program that securely stores many passwords and IDs with the goal of making multiple passwords easier to access and use. A password manager can be very helpful to people who have lots of passwords. Read more about password managers here.

http://community.pepperdine.edu/it/security/password/passmgrs.htm

If that seems like too much work, its probably because it is, but that all depends on how you value your security. Strong passwords take a hacker with lots of computing power a very long time to guess. And if all your passwords are different, having your password compromised on LinkedIn just means that you only have to change that password and not have to worry about your Pepperdine account, Bank account, or whatever password that you may also be using that password on.

If the thieves find a connection to Pepperdine, they will use your account to send spam or attack your identity. This has already happened at Pepperdine!

Pepperdine Google Suite

Welcome to the incredibly usefully and incessantly expanding world of Google! Here, you will learn about some of the relevant Google Apps that may help you throughout not only your education career, but also your future life.

You can access Google Apps through your @pepperdine.edu account. For more information on accessing your personal account, please visit the Community page by clicking here. Google Apps includes the following components: Gmail, Sheets, Calendar, Sites, Google Drive (formerly Google Docs), Hangouts, Groups, Contacts, and many more. To learn more about these components and how they will be useful to you at Pepperdine Caruso School of Law, please watch the video at the bottom of the page.

Google Drive

Google Drive is a very useful tool that can be accessed anytime, from anywhere, via the internet or the Google Drive App. Some of the feature of Google Drive allow you to:

  1. Share files with people, such as meeting minutes, class notes, and task lists
  2. Collaborate on conference presentations with colleagues
  3. Edit student papers with in-text comments
  4. Backup files (you can never have too many copies!)
  5. Work from home without the need of Remote Desktop or your Work Computer
  6. And more…..

You can even use Google Drive to create and share documents, spreadsheets, and presentations online. Although Google Drive has its own applications, you can download the Google files to your desktop and they will open in Microsoft Word, Excel, and PowerPoint. Collaborate on projects without the hassle of emailing files and version tracking. Multiple Users can edit the Google files at the same time, without conflict. Revisions are saved automatically and Google Drive has a revision tracking feature so you can see what changes were made, when.

Google Drive can also be used as an online repository for all of your important school-related documents. These documents can then be accessed from any computer with Internet access at any time.

GOOGLE DRIVE NOTE:  The Google Drive service allows up to 50gb of storage (combined storage encompasses all Google Suite modules including your Pepperdine email account).

Our friends at University IT have put up some helpful guide information. Check it out today.

Here’s another great article on Google drive with helpful video. Anson Alexander has done great work to make the product accessible to new users–very thorough.

Google Docs

Google Docs is the informal predecessor of Google Drive, if you will. Google Docs allows you to create documents from scratch or from pre-set templates as well as sort your already created documents.

Through Templates, folks at Pepperdine using Google Apps can now share private templates for presentations, documents (like stationary or departmental memos) and spreadsheets. We now have our own private template gallery. Anything you make in Google Docs (or import into Docs from Word, etc) can be offered as a template, shared and rated by the Pepperdine community.

If you’ve never used Templates before in Google Docs, here’s a link to their help page: Google Help: Google Docs Templates

Google Docs has also upped their collaboration tools through quick and easy comments that can be placed on selected portions of a document. If you’ve been staying out of the Cloud, there are some real incentives to get in now.

Google Sheets

Google Sheets is a free online spreadsheet tool that is similar to Microsoft Excel. This tool has fewer formatting features that its software-based counterpart, but can be accessed from any computer with Internet access. You can also share spreadsheets with others and save the spreadsheet as multiple file formats including (but not limited to) XLS, PDF, and HTML.

Google Slides

Google Slides is a free, online presentation tool that you can use to create, edit, present, and share slideshows. It is very similar to Microsoft PowerPoint, with fewer formatting features. Much like most other Google Apps, Google Slides allows you to collaborate on slideshow presentation with unlimited users.

Google Calendar

Google Calendar is Google’s scheduling calendar service that can assist you with time-management through easy organization and helpful reminders. This is nothing short of the most open and configurable calendar offering available today. And while there is a wealth of things you might never do, it never feels like that power gets in the way. If you just want to login and check your appointments and type in new ones you can do that. If you want to go a step farther and have it email you a daily appointment list, that’s available. If you want your cell phone to alert you, that’s just another click away.

Google Chat

Google Chat is an intelligent and secure communication and collaboration tool, built for teams. From ad-hoc messaging to topic-based workstream collaboration, Chat makes it easy to get work done where the conversation is happening.  For more information on Google Chat, click here.

Google Sites

Google Sites is a free and easy way to create and share webpages as well as a nice place to brainstorm and manage projects. Its an easy basic wiki with almost no ramp-up time needed due to no real training being required. Just decide a name for your knowledge base and go. To learn more about Google Sites, click here.

Login to Panopto with your WaveNet Credentials

If you’ve ever had to miss class before, then you may have asked the professor to have the session recorded via Panopto. You then received a viewing link to view the recording and all you had to do was click on the link and Presto! the recording appeared. Only one small issue with that… a little thing called “security”.

In an effort to ensure a more secure environment for all class recordings, the Panopto service has now moved to an online authentication that prompts you to log into the service with your Pepperdine WaveNet credentials.

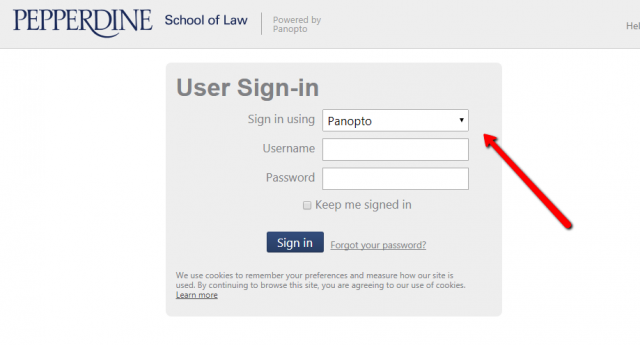
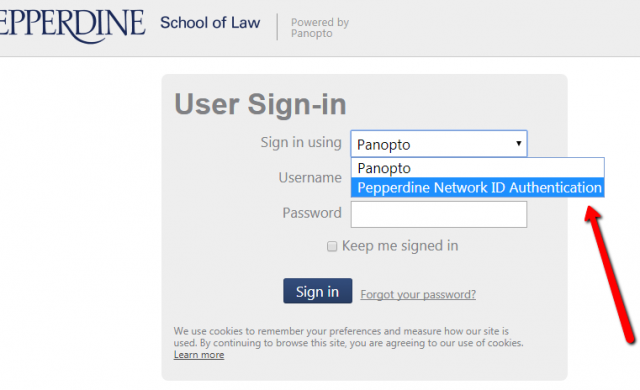
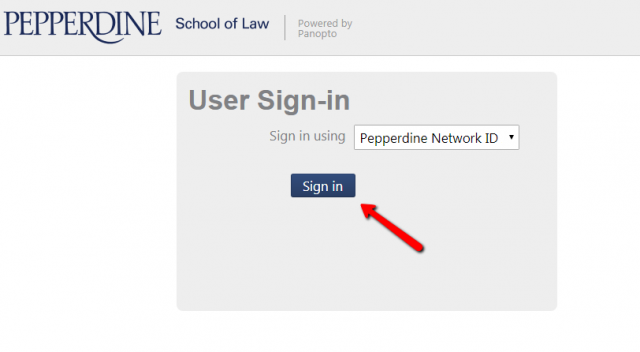
This means that when you get a viewing link now, you may have to “login” before you can view the session. This is super easy as long as you have a current Pepperdine network ID. All you have to do is follow the 3 steps listed below to login and “Viola” you’re watching your riveting class recording in no time!

1. Select the drop-down menu for the “Sign-in using” box.


2. Choose the “Pepperdine Network ID” option.


3. Then choose “Sign In” and sign in through the Pepperdine Portal to be connected.

Installing Printers (Windows and Apple)

A quick step by step instruction guide for installing on a Windows computer:


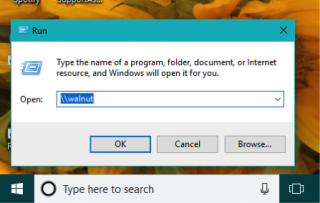
1. Open a new explorer window (not Internet Explorer).
a. Type (Windows Button)+(R)


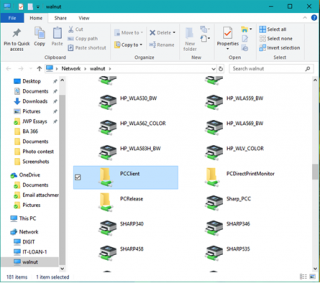
2. Enter the following in the address bar.  \\walnut
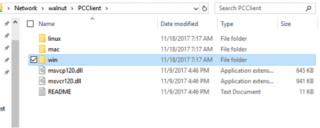
3. Locate and open the folder PCCLIENT.

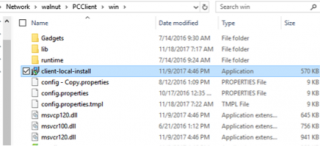
4. Open the WIN folder and double-click on the CLIENT-LOCAL-INSTALL installer.


5. Accept the UAC if prompted.
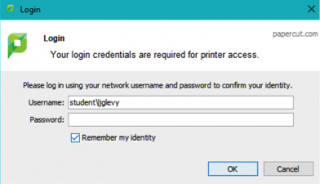
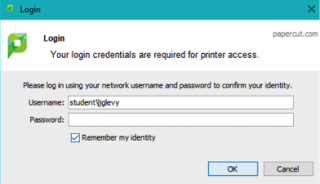
6. Enter your network credentials.  DOMAIN\USERNAME
EX: student\juser


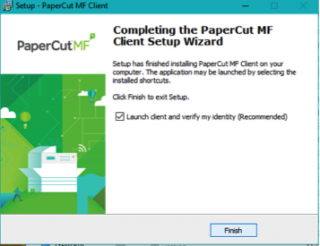
7. Run through the installer and leave all of the default settings.
8. Leave the checkbox checked to LAUNCH CLIENT… and click FINISH.


9. Enter your credentials into the pop-up client as noted in step 6.

EX: student\juser


Install FindMe Queue:

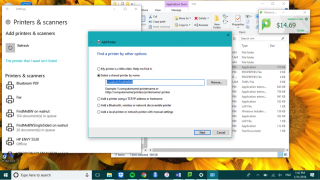
1. Open CONTROL PANEL and launch DEVICES and PRINTERS.
2. Click ADD A PRINTER.
3. Click THE PRINTER I WANT ISN’T LISTED.
4. Select the radio button to add PRINTER BY NAME and enter the following. Click NEXT.
\\walnut\FindMeBW

5. It may take a few minutes to locate the printer.
6. When prompted, enter your credentials.  DOMAIN\USERNAME
EX: student\juser


A quick step by step instruction guide for installing on an Apple computer:


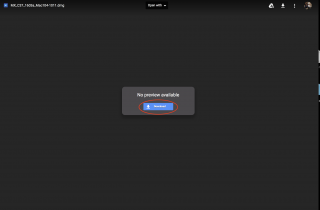
  1. Download the Mac Driver.
  2. Install the driver by opening the image file from the download. (e.g. MX_C37_1603a_Mac104-1011.dmg)
    • Click on “MacOSX”.
    • Choose the driver for your operating system (e.g. Version 10.11). Go to the Apple Menu > About This Mac to see the operating system version.
    • Click on MX-C37 to install the driver
    • The Installation Window will appear. Click Continue and follow the on-screen instructions. Use the password that you use to log into your machine when asked for the password.
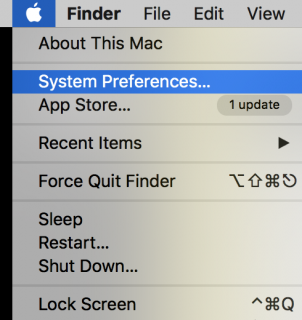
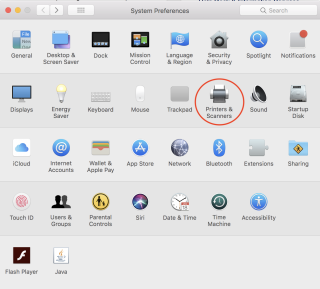
  3. Go to System Preferences > Printers and Scanners.
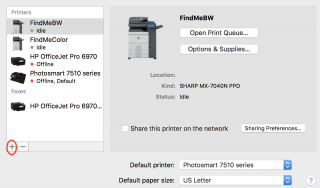
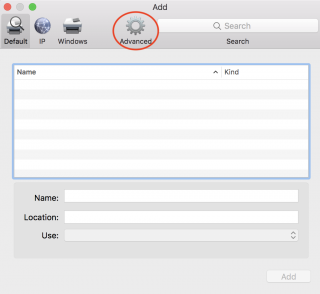
  4. Click “+” to add a new printer.
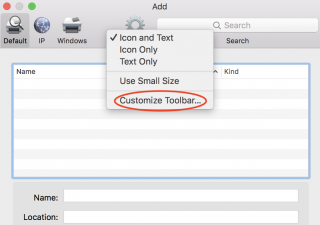
  5. Control-click the toolbar; then select Customize Toolbar.
  6. Drag the Advanced icon onto the bar; then click Advanced.
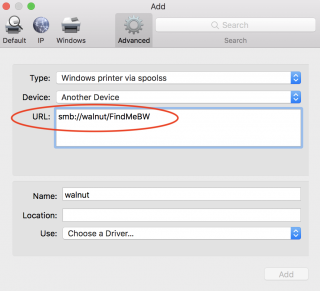
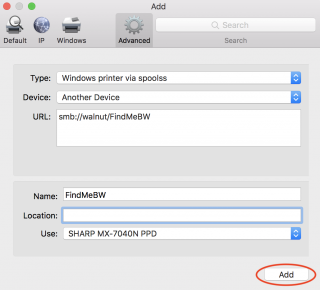
  7. In the “Type” drop down menu, select “Windows printer via spoolss”.
  8. Enter the Device URL, smb://walnut/FindMeBW or smb://walnut/FindMeColor, depending on the current printer you are installing.
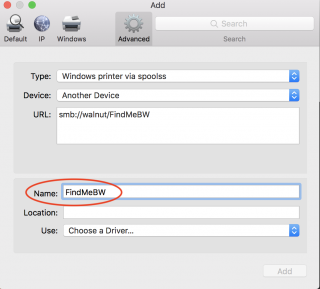
  9. In “Name”, enter FindMeBW or FindMeColor depending on the current printer you are installing.
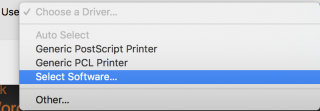
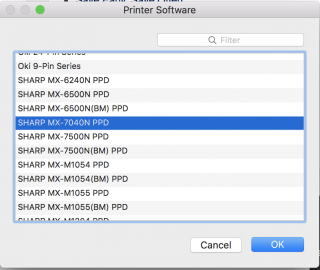
  10. In the “Use” drop down menu, click “Select Software.”
  11. Select Sharp MX 7040N PPD and click OK.
  12. Click Add.
  13. Click “+” and repeat 7-12 for both FindMeBW or FindMeColor depending on which one you have already installed.
  14. Now, when you print to FindMeBW or FindMeColor, a window asking for your credentials should pop-up. If you are staff or faculty, enter your Network ID and password. If you are a student, add “student\” before your Network ID and enter your password as usual.
  15. Go to any Sharp copier and swipe your Pepperdine ID card. Select the job(s) to release and retrieve your document from the print tray.

Install the LiveSafe App today!


Go ahead and take a moment to go to the Apple App Store or Google Play Store and download the LiveSafe app onto your mobile device.

The “LiveSafe” app is designed to improve communication between our University community members and Public Safety, and allows for faster emergency response in distress situations.  The app is free and available to all members of our community: students, faculty, staff, parents, visitors, and friends.

Through LiveSafe, you can submit information and chat with Public Safety in both emergency and non-emergency situations, and you can look out for your friends and loved ones by watching them get to their destination safely with SafeWalk. If you need a medical or security escort on the Malibu campus or a ride back to the Malibu campus, you can call Public Safety using the SafeRide feature.  When you submit a tip, you can attach a photo, video clip, or audio clip, and you can submit all of this information anonymously if you choose.  And, when you use LiveSafe to call 911 or contact Public Safety in an emergency, the app can track your location, which helps first responders know exactly where help is needed.

We’ve also loaded critical information resources into the app, so you now have emergency response information and contact information for key University services at your fingertips anytime, anywhere—even internationally.[i]

Here’s how you can get the app:

  1. Open Google Play or the Apple App Store on your phone. Search for “LiveSafe” and download the option with the blue shield.
  2. Tap “Sign up.” Fill in your profile information and create a password.  (You are welcome to use your personal, non-Pepperdine e-mail address. We suggest that you do not use the same username and password as you use for the Pepperdine Central Authentication Server.)
  3. “Pepperdine University” may pop-up if you are close to the campus. If so, tap “Yes.” Otherwise tap “Change” to select “Pepperdine University” as your institution.

[i]  Most of the app’s features will work internationally, so long as you have a Wi-Fi or cellular data connection.  You will still be able to submit tips and information to Public Safety, and you will be able to utilize the SafeWalk feature.  However, the “Call 911” option is programmed for US emergency dispatch only and will not automatically route to local first responders. In an emergency situation overseas, it will be important to dial the correct 911-equivalent number for your location. You can find this information at http://travel.state.gov.

[Above text pulled from http://emergency.pepperdine.edu/livesafe/ on 8/15/2017]