Security Risk With Storing Passwords in Browser

It is becoming increasingly popular to store passwords automatically, as modern browsers come equipped with password managers that store login credentials. The centralization of passwords becomes dangerous when one part of your browser system is exposed to someone else however, which can happen through hackers decoding weak passwords (such as 123456), or password sharing to friends and family, which has become increasingly popular in a work from home environment. Due to the passwords being stored on one platform, if someone has access to one password or even access to your browser, they have access to most all passwords stored there.

There are several examples of how this centralization of passwords can create a major security breach: credential dumping happens when a hacker attempts to gain access to your system through persistent phishing or hacking, and there is malware created specifically to steal autofill data (like stored passwords). To read more about these tactics, see this article from the tech help oriented website toolbox.com.

Solutions

To reduce the risk of exposing your information to the web at large, consider taking these steps.

  1. Turn off the auto-fill feature in your password management.
  2. Turn on a “safe browsing” feature in your browser, which will alert you to any breach of credentials or password changes immediately.
  3. Set a password management software. There are plenty to choose from, and these will allow you to:
    -Set a master password that will protect your entire password library.
    -Define optional two-factor authentication (like a text to your phone as well as password).
    -Require manual password entry for sensitive websites, like banks.

If you have any questions, or would like to learn more about the content covered in this article, please feel free to contact Information Services at [email protected] or (310) 506-7425.

Turn Off PowerPoint Presenter View

Turn off Presenter view before a presentation begins

By turning off the presenter view before you begin a presentation over Zoom, your students will not be able to see any personal notes you have created for yourself in the presentation. While presenter view is viable for a classroom setting (where your personal computer screen can be separate from wha a projector is showing), for sharing your own screen over Zoom, sharing the slides without personal notes is best.

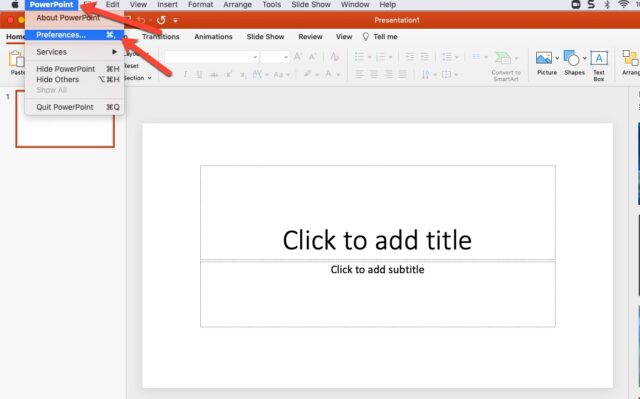
  1. Open the PowerPoint you will be sharing. On the PowerPoint menu, select Preferences.
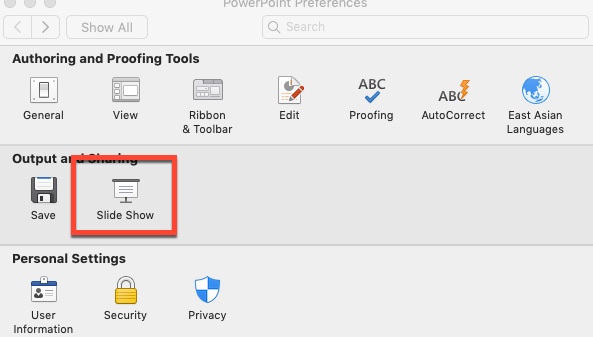
  1. In the PowerPoint Preferences dialog box, under Output and Sharing, click Slide Show.
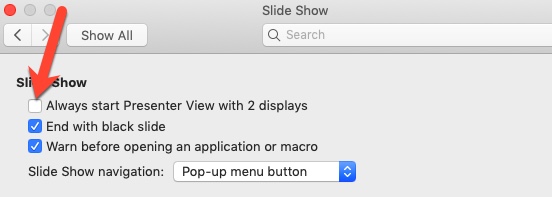
  1. In the Slide Show dialog box, UNCHECK the Always start Presenter View with 2 displays check box.

If you have any questions, please feel free to contact Information Services at [email protected] or (310) 506-7425.
Update Your Zoom – Staying Current!

Zoom releases updates fairly frequently. Some of those updates contain significant changes to the functionality of your Zoom installation. All provide a better overall experience because the Zoom engineers improve security and stability with nearly every update.

Instructions from Zoom on how to update are here: https://support.zoom.us/hc/en-us/articles/201362233-Upgrade-update-to-the-latest-version

The other UPS, Uninterruptable Power Supply

With the power outages affecting our students, faculty, and staff, the IS team recommends using an Uninterruptable Power Supply, UPS, to protect your electronics and keep you working.

A UPS is a battery backup for your electronics. Depending on the size of the UPS, they can provide a few extra minutes of power to safely turn off your computer or a few extra hours to keep working on your project.

No matter the battery size, please purchase one with Automatic Volt Regulation, AVR. This will protect your electronics from voltage issues, like brownouts, and will keep the UPS battery healthy.

Please contact the IS team at 310-506-7425 if you have any questions.

Zoom on your Phone

As we continue working and teaching online, you may need use your phone for your Zoom classes and meetings.

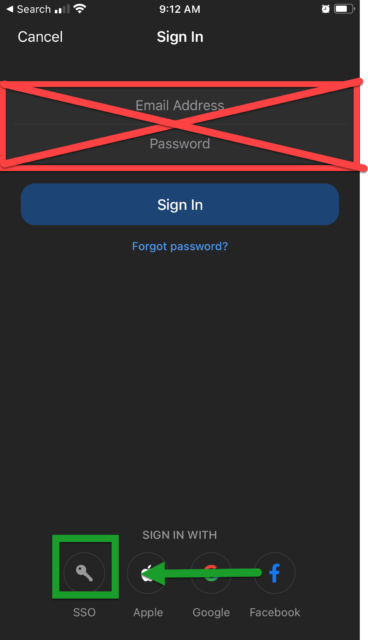
Remember that you’ll need to sign in using Pepperdine’s Single Sign-On (SSO) service.

To do this, select SSO and not the email login option. You may need to scroll down to select SSO.

Select the SSO option and not the email login option.

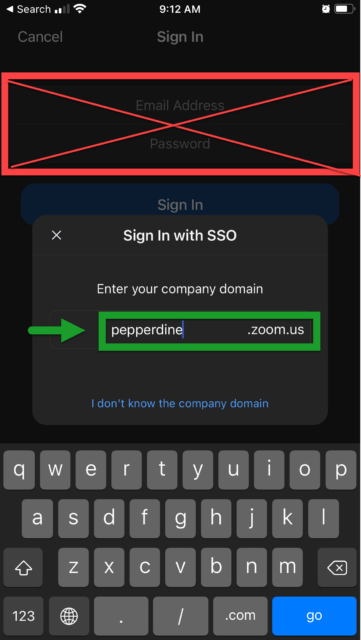
Next, enter Pepperdine as the domain.

Enter Pepperdine as the domain.

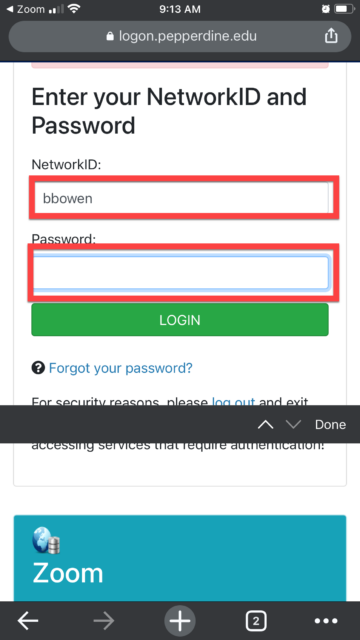
A web browser will open up, prompting you to log into Wavenet using your Network ID.

Enter your network ID and password.

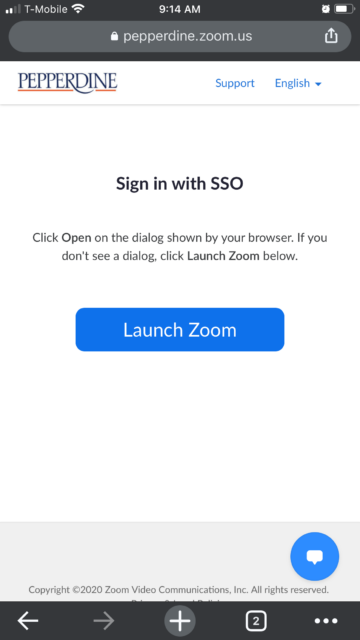
Once you finish logging in, you’ll be sent to web page prompting you to launch the Zoom app.

Select Launch Zoom

The Zoom app will open with you logged into your licensed Zoom account.

More Zoom tips can be found here.

Nefarious Texts! – DON’T CLICK!!

Shipping

Yep, the holiday season is in full swing and the crooks are out to help themselves…
Please be alert to the possibility that you will receive “alerts” via text message (and email too) that purport to update you on the shipping status of something you have ordered.

We strongly recommend that you NOT click that link in the text unless you are positive it’s from the seller or shipper.

Messages that look like this should be immediately suspect:

Ups – package 1z18043 status – shipped!
Click here: j1fnz.info/iqbRGdhgpP

There are several variations on this theme and none of them do good things for you.  Some will waste your time with obvious shenanigans, others will do their best to steal from you.

Here’s an article from earlier this fall on the topic: https://www.howtogeek.com/511049/psa-watch-out-for-this-new-text-message-package-delivery-scam/

If you want status on a package, I recommend that you go back to the order or shipping confirmation email message from your vendor that lists the details of your order and follow that trail to your parcel status.

Copying Courses Information

As the Spring 2021 semester draws near, faculty may want to copy information from one class site to another. Copying from one site to another is easy and can save time.

You can find more information about this at the TechLearn page found here.

How to Copy Course Information

  1. Click the tab for the course or project site, or click the “Sites” menu at the top right and click the desired site. NOTE: You must be in the new course site.  Do not go to the old course site.

2. Enable the same tools from your old site in your new site. You may not see content to copy if you have not added the same tools

3. In the new site, click “Site Info” in the left menu.

Sakai 12 Site Info Image

4. Click “Import from Site.”Sakai 12 Import from Site Image

5. Select the best option:

  • “I would like to replace my data.” – Be careful! This will overwrite all information in the current site and replace it with the information from the selected site. If you want to copy gradebook items, this is the choice. However, be sure you are in the correct site! Also, be sure you haven’t added anything into the current site yet since it will be overwritten. If you erase the existing site contents, that action is permanent and cannot be undone.
  • “I would like to merge my data.” – RECOMMENDED! This simply copies information from a previous site into your new site. It does not overwrite any content you have already added into your new site. This choice is recommended in most cases.
  • “I would like to merge my user(s).” – Be careful! This option only copies users and only those users that have been manually added into a previous class site.  NOTE: This process will not copy roster-provided users. For official class sites, see how to merge or combine course sections into your site.

6. Choose a past course site to copy materials from and click “Continue.”

7. Select the desired tools that contain the content you wish to copy. If you do not see a tool, look at your left tool menu. Remember, you must first enable the tool in your new site before you can import materials into it.

8. Click “Finish.”

Note: Announcements that instructors chose to generate “on-the-fly” when assignments were created or updated in a prior term will not import to another site. This is a good thing, as those announcements were tied to specific due dates and changes for the respective term, and would no longer have any relevance to the new term.

Zoom: Turn on Captions as a Participant

For information on how to enable closed captions for your meeting/class/event as a host please see this page.

Desktop Client

  1. Sign in to the Zoom desktop client.
  2. Join a meeting or webinar.
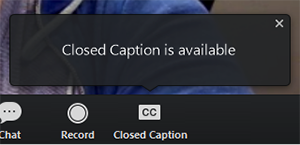
  3. When closed captioning beings, you will see a notification above Closed Caption in the meeting controls.

4. Click Closed Caption to start viewing closed captioning. Tip: Click and drag the closed captioning to move its position in the meeting window.

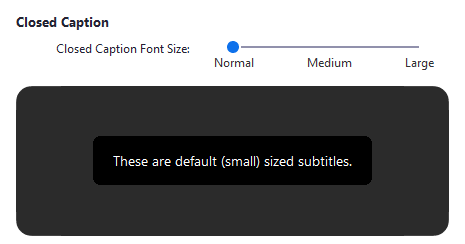
(Optional) To adjust the caption size:

  1. Click the upward arrow next to Start Video/ Stop Video.
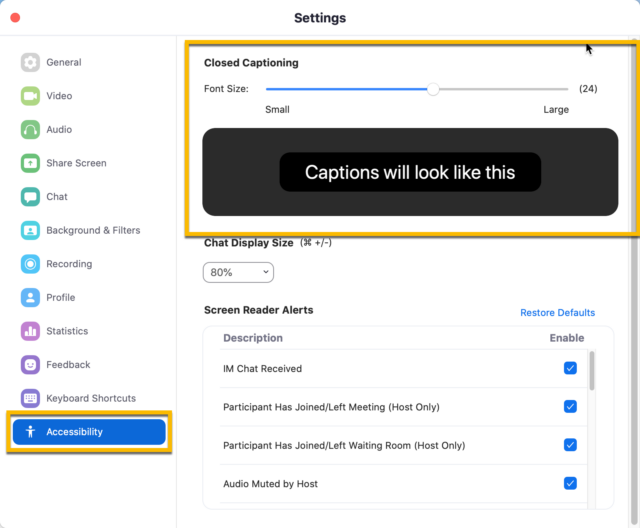
  2. Click Video Settings the Accessibility.
  3. Move the slider to adjust the caption size.

Mobile Application

  1. Sign in to the Zoom mobile app
  2. Tap the Settings icon.

3. Tap Meeting.
4. Toggle Closed Captioning to on. When you are in a meeting where closed captioning is available, they will automatically appear on the bottom of the screen.

Pulled from Zoom's support page: https://support.zoom.us/hc/en-us/articles/207279736-Managing-and-viewing-closed-captioning

If you have any questions, please feel free to contact Information Services at [email protected] or (310) 506-7425.
Zoom: Automatic Closed Captioning

Automatic Closed Captioning is a new feature in Zoom that can be helpful for your students. 

See this article for Participant View of Closed Captions.

To enable automatic Closed Captioning in Zoom (as the Host):

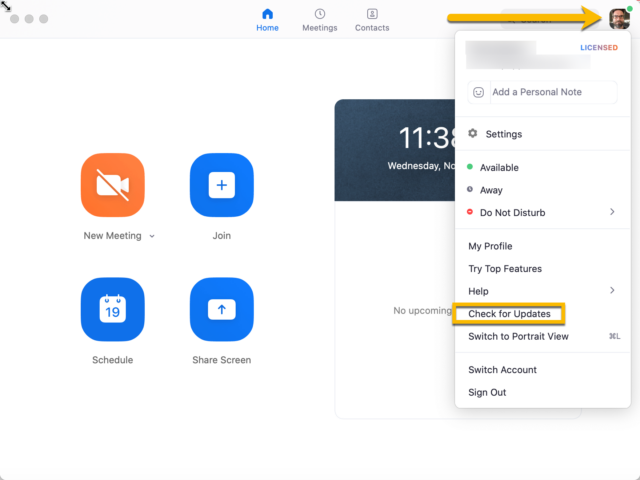
  1. Check for updates on the Zoom app. Select your portrait in the top right, and then Check for Updates in the drop-down menu. 

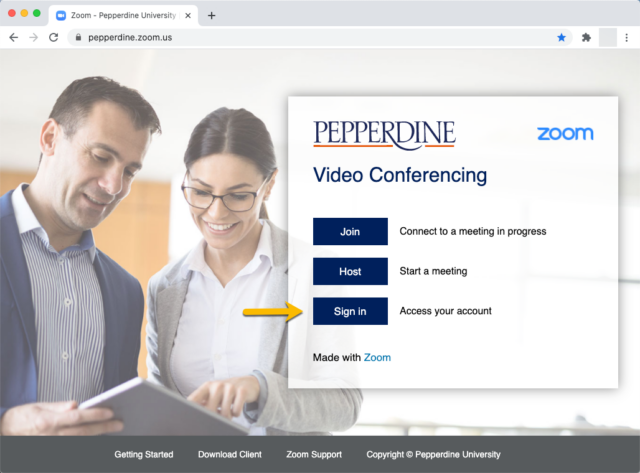
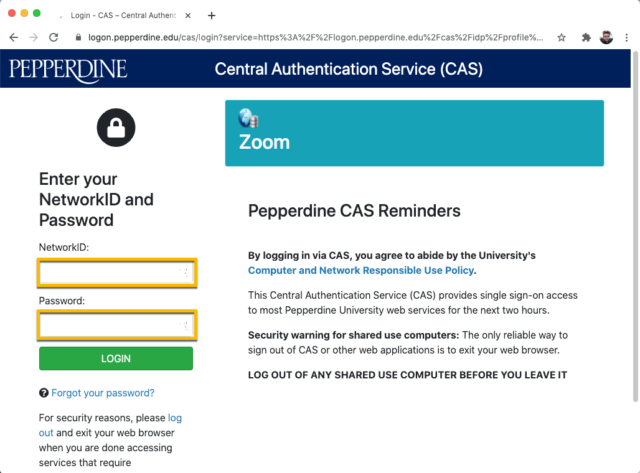
2. Go to pepperdine.zoom.us and select Sign in.

3. If needed, log in using your Pepperdine Network ID and Password. (You should always log into Zoom using your Network ID and not your email. 

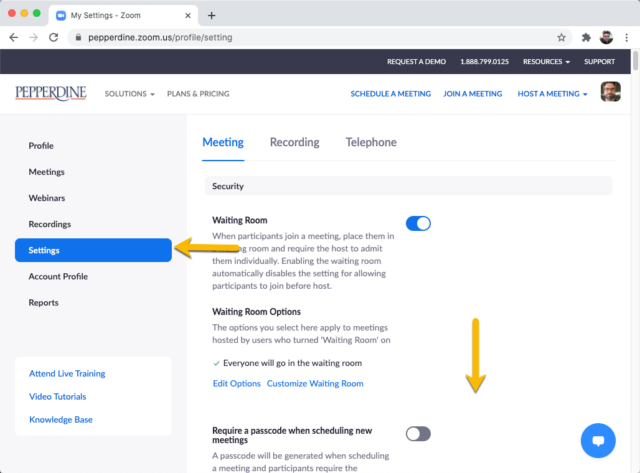
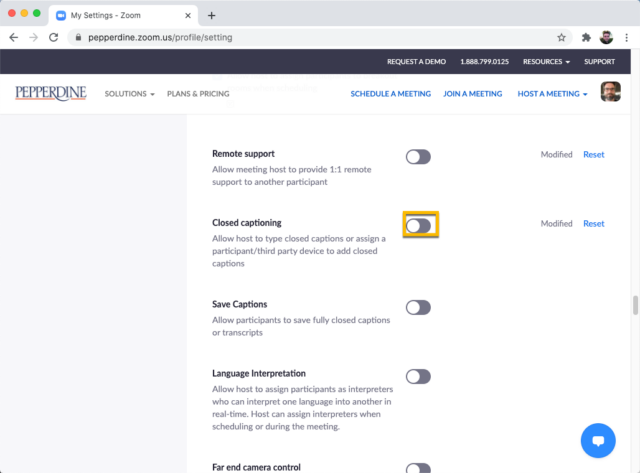
4. In your profile, select Settings and scroll down to the Closed captioning option under Advanced Settings.

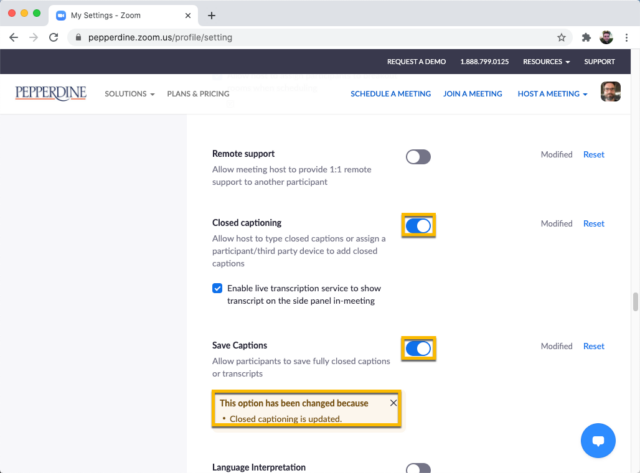
5. Select Closed captioning. 

6. This will also turn on Save Captions.

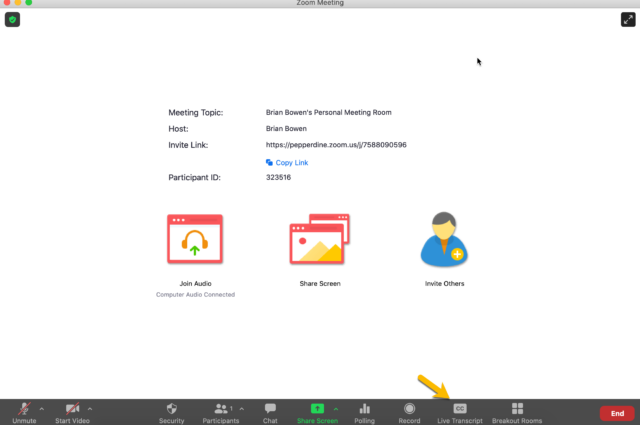
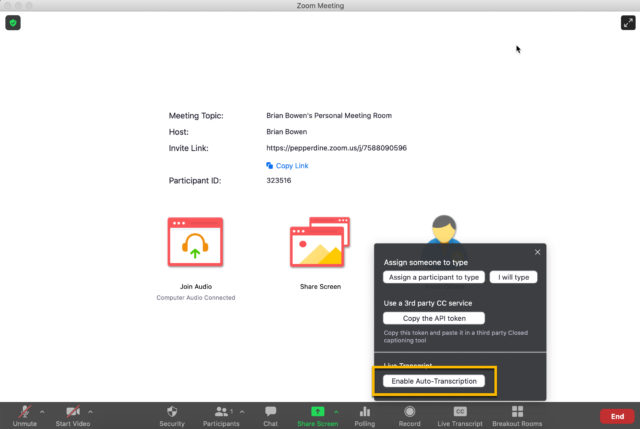
7. In your next meeting, press the Live Transcript button at the bottom of your window. 

8. Select Enable Auto-Transcription. 

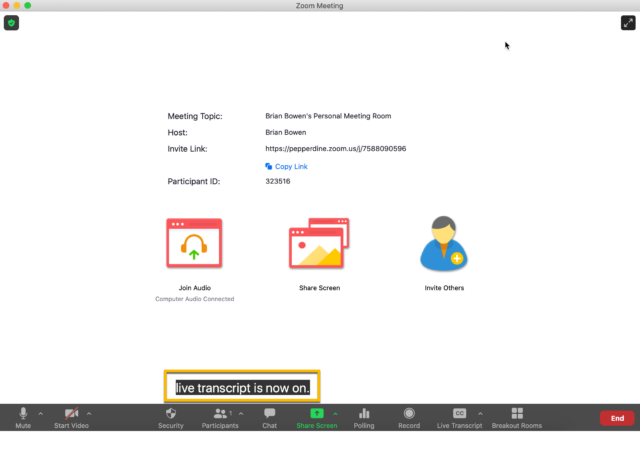
9. The live transcription will now appear at the bottom of your screen

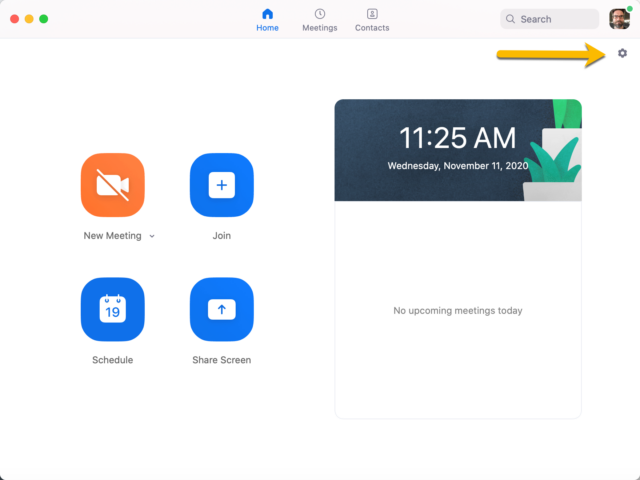
10. To adjust the size of the font, select the options button underneath your portrait. 

11. Select Accessibility in the menu and you can adjust the Closed Captioning font size.

If you have any questions, please feel free to contact Information Services at [email protected] or (310) 506-7425.
Zoom Retention

Zoom recordings are generally stored in the Cloud, which does not have infinite storage. To preserve room for new incoming recordings, Pepperdine is implementing a six month Zoom retention period.

This retention period is important to ensure that enough cloud storage space remains available for our community during an active academic term.  It will also promote good stewardship of University data and resources by encouraging the review and transfer of any critical meeting or lecture recordings to Pepperdine’s longer-term video storage locations.

This will begin January 4, 2021. Please see this timeline to understand when recordings will be deleted:.

What does this mean?

  • Pepperdine’s cloud server will refresh every six months. This means that new Zoom cloud recordings will be available for six months before being automatically moved to Zoom trash.
  • Once moved to trash, meeting hosts (professors) will have 30 additional days to access the recording from trash before permanent deletion.

What to do before January 4th?

  • Review your old Zoom recordings, and determine which ones you wish to keep long term.
  • Download any recordings you wish to keep, and archive in either Panopto or Google Drive. See the steps below for how to archive Zoom recordings.

Archive Zoom Recordings to Google Drive

To archive Zoom recordings to Google Drive, follow the steps below.

  1. Begin by navigating to your online Pepperdine Zoom account, by logging in through https://pepperdine.zoom.us/. For more information on how to access your Zoom account, see Lawtech’s general Zoom page.
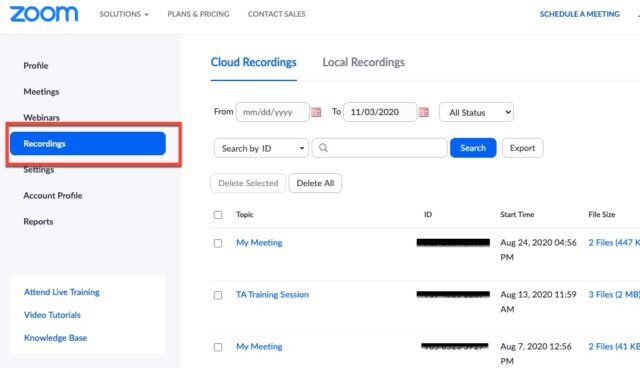
  2. Click Recordings from the left-hand tool column.

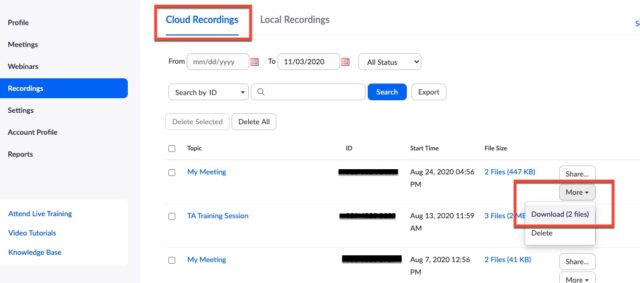
3. Next, under the Cloud Recordings tab at the top of your page, scroll through your meetings until you find the recording you wish to preserve. Click the More button at the far right of the recording, then from the drop-down menu click Download.

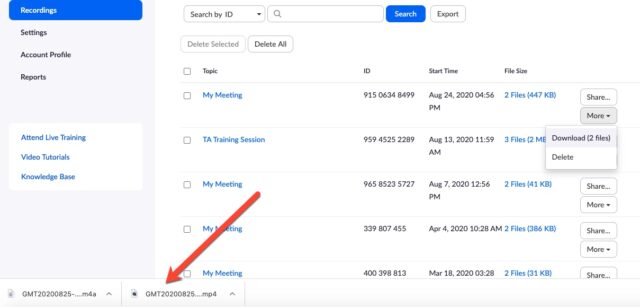
4. You will see the downloaded recording(s) appear at the bottom of your browser, or saved to your downloads wherever they are kept.

5. Now, navigate to Google Drive and log in using your Pepperdine email.

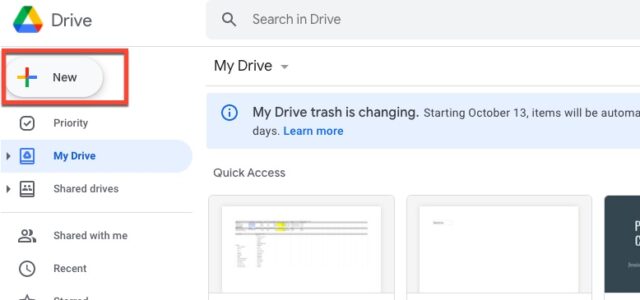
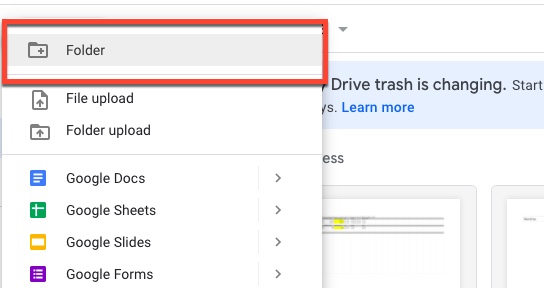
For archiving purposes, we recommend that you create a new folder. To do this, begin by clicking New and then Folder.

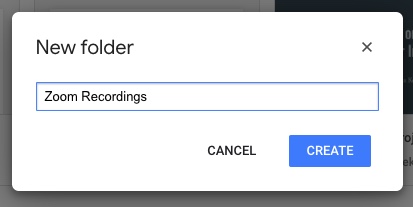
6. Name the folder accordingly.

Once you click Create, you will be directed into the folder itself.

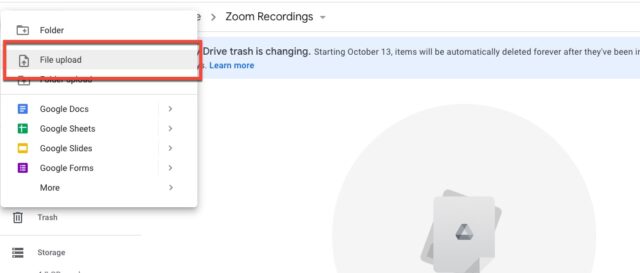
7. To upload your recently downloaded Zoom recording, click New (again) from the upper left hand corner, and then File Upload.

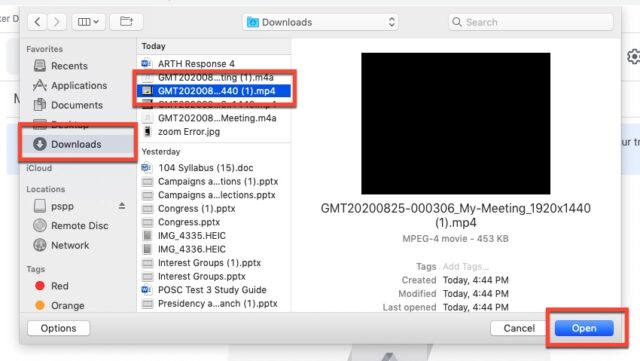
8. You will be directed to your files, where you will navigate to Downloads and then select the recording you wish to archive. Select Open.

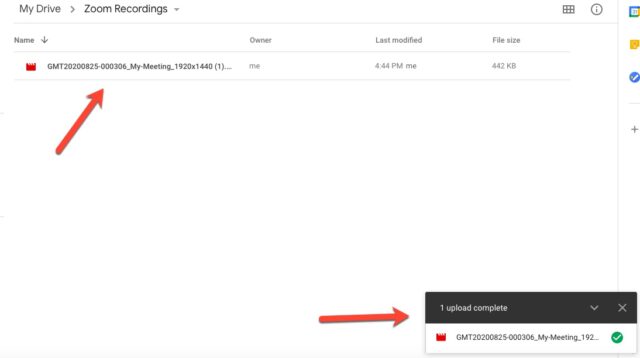
9. Success! Your recording will upload to your new Google Drive folder, to be archived long-term.

If you would like to mass archive many recordings at once, the process is exactly the same. Just download them all from Zoom, and choose all of the downloaded recordings to be uploaded to your Drive from step 8, instead of one recording only.

For more information, see Pepperdine’s web page on Zoom Cloud Storage Retention.

If you have any questions, please feel free to contact Information Services at [email protected] or (310) 506-7425.