Getting Connected – Internet Access in The George Page Complex

In our digitally-connected world, it seems everything requires access to the internet now. Laptops, gaming devices, TV’s Bluray players, refrigerators, microwaves, toasters, pencil sharpeners… Ok maybe not Everything, not yet anyway. 

But all that connecting does make you wonder, “How do I connect all my stuff in on-campus housing?” Well, we have a few tips for you to follow.

If you have a laptop, desktop computer, tablet, or mobile device (smartphone) simply turn on your WiFi and choose the ‘pepperdine’ network from your list of available network options. Then open any browser and navigate to www.pepperdine.edu  and follow the “Faculty, Staff and Students” connection prompts to register your device on the network and connect.

You will need to know Wavenet ID and password so be sure to have this information readily available or memorized.

If you have friends visiting who wish to know how to access the internet, follow the instructions on Pepperdine’s Connection Page to help get them connected.

Well, that part was easy, but what about a TV or streaming device? If your device has a web browser you can connect the same way as a computer. However, if your device does not, then follow the below steps.

  1. Select the Pepperdine network from your system’s network settings.
  2. Use your computer to access wavesconnect.pepperdine.edu and accept the use policy.
  3. Choose the “Non-browser Devices” link and follow the instructions at that page.

If those don’t work, check out the University’s WiFi FAQ page for more tips.

TV and Internet streaming is available on your TV or streaming device via the University’s partnership with Philo Edu. For more information on how to connect to this service, check out the George Page Housing Page.

Lastly, be sure to review all Rules of Wireless usage to make sure you are being a good wireless neighbor to your fellow WiFi users. TIP: Devices that put off their own WiFi networks like wireless printers and routers are prohibited on campus as it can jam the network signal for other students.

Happy streaming!
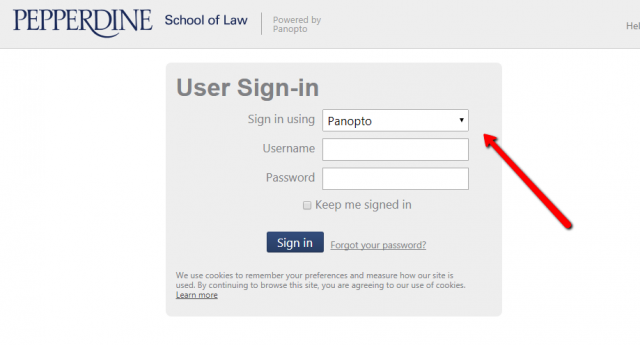
Login to Panopto with your WaveNet Credentials

If you’ve ever had to miss class before, then you may have asked the professor to have the session recorded via Panopto. You then received a viewing link to view the recording and all you had to do was click on the link and Presto! the recording appeared. Only one small issue with that… a little thing called “security”.

In an effort to ensure a more secure environment for all class recordings, the Panopto service has now moved to an online authentication that prompts you to log into the service with your Pepperdine WaveNet credentials.

This means that when you get a viewing link now, you may have to “login” before you can view the session. This is super easy as long as you have a current Pepperdine network ID. All you have to do is follow the 3 steps listed below to login and “Viola” you’re watching your riveting class recording in no time!

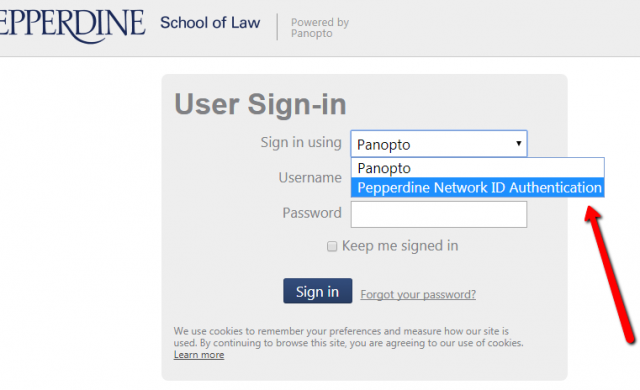
1. Select the drop-down menu for the “Sign-in using” box.


2. Choose the “Pepperdine Network ID” option.


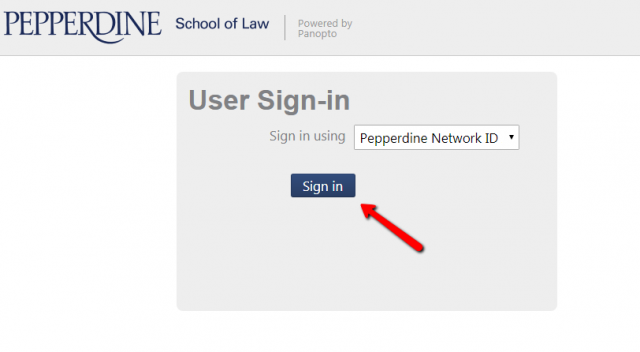
3. Then choose “Sign In” and sign in through the Pepperdine Portal to be connected.

Installing Printers (Windows and Apple)

A quick step by step instruction guide for installing on a Windows computer:


1. Open a new explorer window (not Internet Explorer).
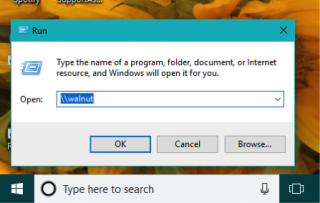
a. Type (Windows Button)+(R)


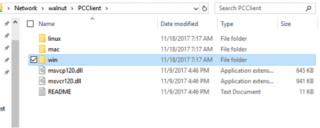
2. Enter the following in the address bar.  \\walnut
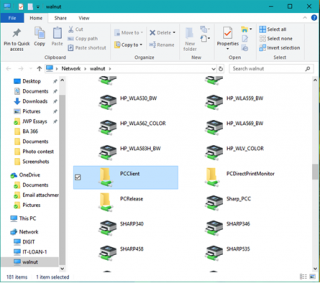
3. Locate and open the folder PCCLIENT.

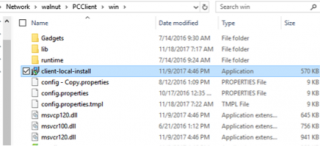
4. Open the WIN folder and double-click on the CLIENT-LOCAL-INSTALL installer.


5. Accept the UAC if prompted.
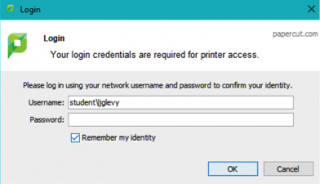
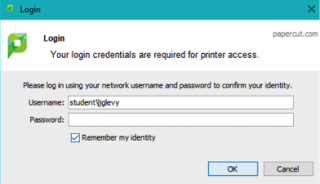
6. Enter your network credentials.  DOMAIN\USERNAME
EX: student\juser


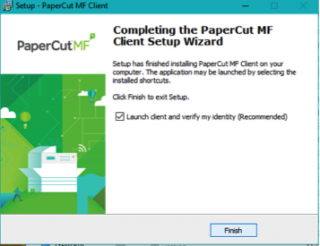
7. Run through the installer and leave all of the default settings.
8. Leave the checkbox checked to LAUNCH CLIENT… and click FINISH.


9. Enter your credentials into the pop-up client as noted in step 6.

EX: student\juser


Install FindMe Queue:

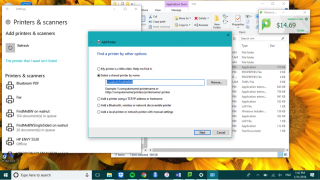
1. Open CONTROL PANEL and launch DEVICES and PRINTERS.
2. Click ADD A PRINTER.
3. Click THE PRINTER I WANT ISN’T LISTED.
4. Select the radio button to add PRINTER BY NAME and enter the following. Click NEXT.
\\walnut\FindMeBW

5. It may take a few minutes to locate the printer.
6. When prompted, enter your credentials.  DOMAIN\USERNAME
EX: student\juser


A quick step by step instruction guide for installing on an Apple computer:


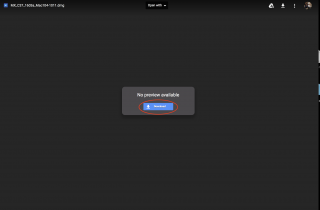
  1. Download the Mac Driver.
  2. Install the driver by opening the image file from the download. (e.g. MX_C37_1603a_Mac104-1011.dmg)
    • Click on “MacOSX”.
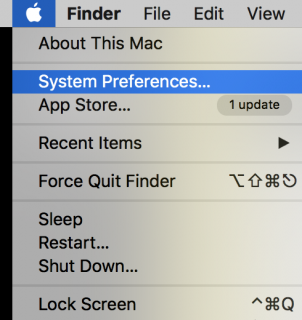
    • Choose the driver for your operating system (e.g. Version 10.11). Go to the Apple Menu > About This Mac to see the operating system version.
    • Click on MX-C37 to install the driver
    • The Installation Window will appear. Click Continue and follow the on-screen instructions. Use the password that you use to log into your machine when asked for the password.
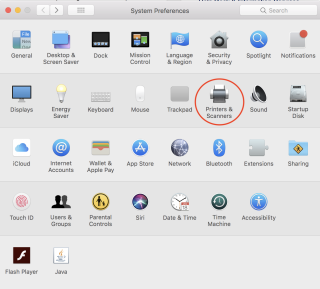
  3. Go to System Preferences > Printers and Scanners.
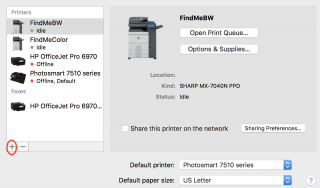
  4. Click “+” to add a new printer.
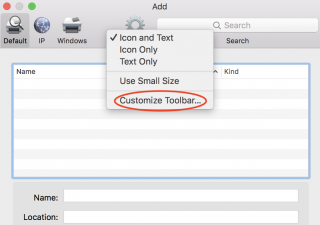
  5. Control-click the toolbar; then select Customize Toolbar.
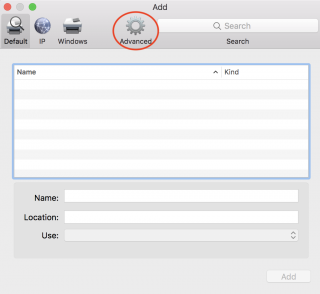
  6. Drag the Advanced icon onto the bar; then click Advanced.
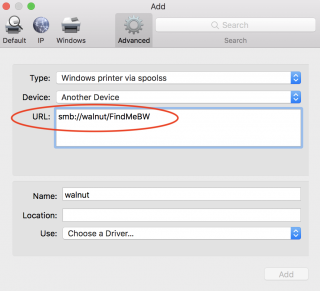
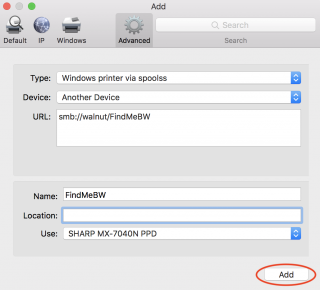
  7. In the “Type” drop down menu, select “Windows printer via spoolss”.
  8. Enter the Device URL, smb://walnut/FindMeBW or smb://walnut/FindMeColor, depending on the current printer you are installing.
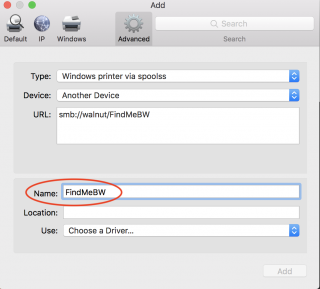
  9. In “Name”, enter FindMeBW or FindMeColor depending on the current printer you are installing.
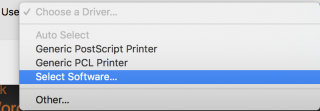
  10. In the “Use” drop down menu, click “Select Software.”
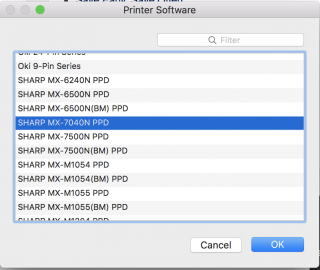
  11. Select Sharp MX 7040N PPD and click OK.
  12. Click Add.
  13. Click “+” and repeat 7-12 for both FindMeBW or FindMeColor depending on which one you have already installed.
  14. Now, when you print to FindMeBW or FindMeColor, a window asking for your credentials should pop-up. If you are staff or faculty, enter your Network ID and password. If you are a student, add “student\” before your Network ID and enter your password as usual.
  15. Go to any Sharp copier and swipe your Pepperdine ID card. Select the job(s) to release and retrieve your document from the print tray.

LexisNexis App for iPad

For those of you who are in law practice or hope to be in the near future, it is becoming clear that you will want to exercise every advantage you can to make your contributions as a lawyer as competitive and innovative as you can.

As in many professions, the use of technology to leverage your skills to greater efficiency is a boon to law practice.

Lexis and Westlaw and now Bloomberg Law are anxious to stay relevant in a world that is in an app frenzy.  Not to say that many apps are not valuable, in fact there are myriad apps that address specific needs very well.

Lexis Nexis’ release of TextMap for iPad leverages this mobile platform for those reviewing transcripts in TextMap  6.2 .  If you are not familiar with TextMap, it is a transcript summary tool most commonly used for summarizing deposition transcripts.

This product is a far cry from what we used for deposition summaries back in the early 1990’s when I was a young law student looking for extra work … “Depo summaries my boy!  That’s what you should do!”  At least we had WordPerfect 5.1 for DOS back then — much better than a manual typewriter — I’m not THAT old.  But in the end it was high pay, highly manual, and high eye strain!  A terrific combination!  I couldn’t hack it.

Facts of life: There will be depositions in law practice.  Where there are depositions, there will be transcripts.  Where there are transcripts there will be transcript summaries.

Yes, you can hire someone to take the transcripts for you but in the end, every party needs their own depo summaries.  Who’s gong to summarize your depo transcripts?  You?  Get a tool.  TextMap is a popular solution and now with the iPad app, you can do it on the run (while you are sitting in the hall outside the courtroom waiting for the next thing to happen).

This is not an endorsement for TextMap.  Think of it as more of an endorsement of getting tools that work for you.  In the end, I found that I wasn’t cut out for depo summaries at all so I’m hardly the person to recommend any product in this area BUT if it makes it easier, I’m a fan.  It’s certainly worth a look.

To keep yourself up to date on law technology news, click here to be directed to Legal Tech News, powered by Law.com.

1L’s Register your WESTLAW PASSWORD ASAP!

It’s a brand new world and you are going to need all the right tools to help you succeed in Law School.

One of the most important tools you’ll need is access to TWEN (an acronym for The West Education Network).

As a new student, you will receive (or have already received) an email indicating how you should register your Westlaw password.

Please do this as soon as possible as this will enable you to access the TWEN system which will provide you with course information placed there by your professors.

To register:

  1. Go to lawschool.westlaw.com
  2. Click on the “Register Your Password” graphic
  3. Complete Step 1
  4. Enter your Pepperdine email address and enter your Westlaw Password (provided in the email referenced above)
  5. Fill out your name, address, and other information
  6. Click on “Create Profile”
  7. Click on “Continue”
  8. Fill in your student profile and click “Agree”

Westlaw

Westlaw (https://lawschool.westlaw.com): Similar to Lexis-Nexis, Westlaw is one of the leading Internet-based legal research providers.  Westlaw has two versions including their basic Westlaw version and a new, advanced Westlaw Next interface.

To use Westlaw using your Pepperdine log-in information, see the Westlaw Registration Tutorial

Additional Westlaw Resources:

**Please note: You will learn more about Westlaw in your Legal Research & Writing course**

If you didn’t receive a Westlaw Registration Code, please email Gilbert Marquez with your Pepperdine Email at [email protected]