Where to find Zoom recordings

After setting up your meeting, you may choose to record your class for saving or distribution purposes after the session is completed. For a guide on how to record in zoom, check out: Two Ways to Record in Zoom (PDF)

Furthermore, see Pepperdine’s Zoom Guide for more information on Zoom meetings.

  • Recordings on the Cloud are saved in your Zoom account.
  • Recordings on your computer are saved in your Documents folder in the Zoom subfolder.
  • Recording folders are named for the date and time of recording, the meeting number, and the meeting name. 

To view a recording in the Cloud

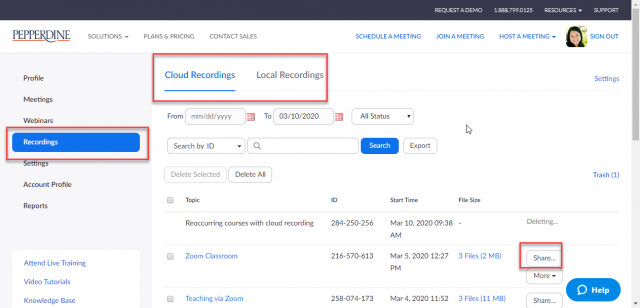
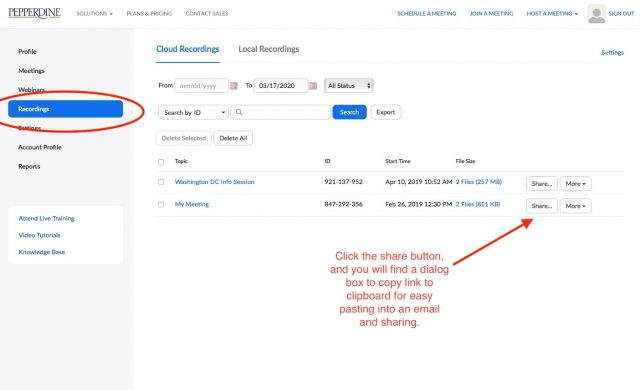
  1. Go to the zoom web portal and click on the “Recordings” tab in your left tool bar.
  2. Your recordings will be listed under the Cloud Recordings tab.
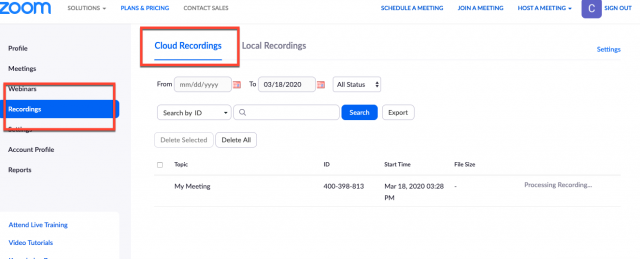
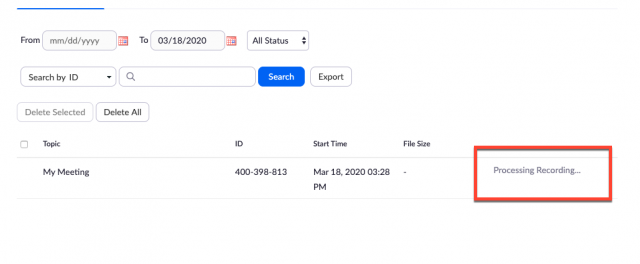
If your meeting has just finished, the recording may still be processing, and you will need to wait for the “processing recording” signal to disappear before viewing and sharing.
  • By clicking on the title of your class, you will receive three recording options to download/share: Audio and video, just audio, or a transcript.
  • By clicking on the “share” icon on the right of the page, you can copy the link to your clipboard, meaning you can paste the link directly into an email or other distributive platform.
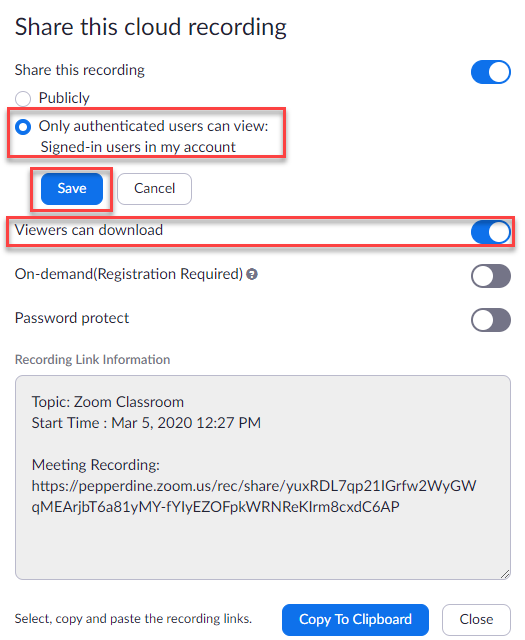
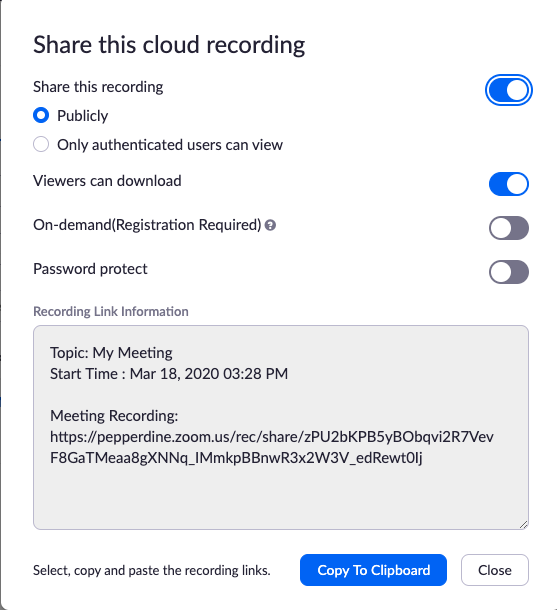
You will receive a dialogue box that will allow you to change sharing settings:
To view a recording on your computer

  1. Navigate to your computer’s Documents folder and open the Zoom folder
  2. find the meeting you would like to view; the meeting title will be “double-click-to-convert-01”
  3. Double click the file and zoom will convert the file.
  4. When conversion is done, the double_click_to_convert_0X file will be replaced by three files:
    • audio_only – an M4A file
    • playback – an M3U file with video and audio
    • zoom_0 – an MP4 file with video and audio
  5. Play the files in a media player. 
  6. If you want to share the recording, you’ll have to save the file and share it manually. 

For more about accessing your local recordings and changing the recording location, see Local Recording in the Zoom Help Center.

If you have any questions, please feel free to contact Information Services at [email protected] or (310) 506-7425.
Setup a Virtual Backdrop for Zoom

So the backdrop for your Zoom meetings isn’t that amazing? Maybe you can spice it up?

Please note though, it does take more than a little computer power to do this as it’s a real time graphics effect that makes this work.

First check out this support article at Zoom: https://support.zoom.us/hc/en-us/articles/210707503-Virtual-Background

Short cheat sheet version:

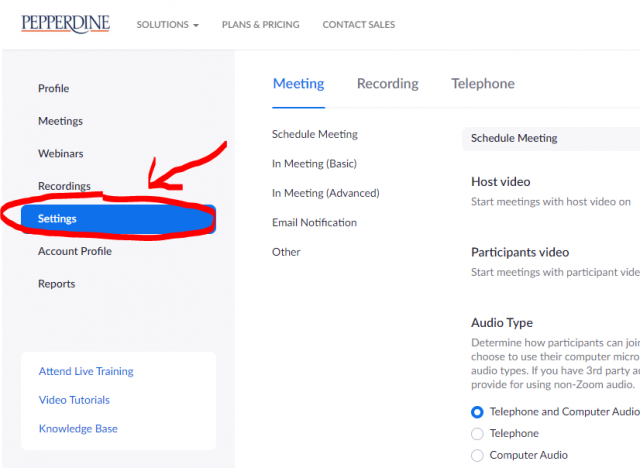
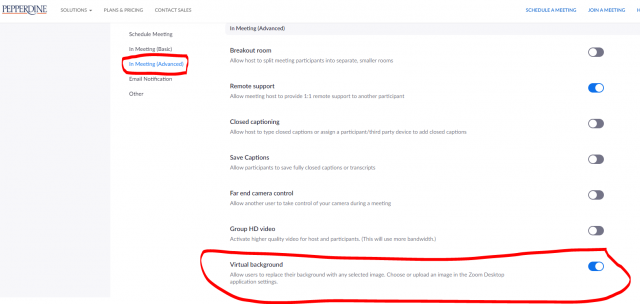
  • First go into your Zoom website profile — go to peppedine.zoom.us and click on “Settings.”
  • After clicking “Settings” go to “In Meeting (Advanced)” and make sure that the dot next to “Virtual Background” is slid to the on or “blue” position. If it’s gray, it’s not on.
  • Make sure you have the Zoom application installed on your computer (not using the web app).
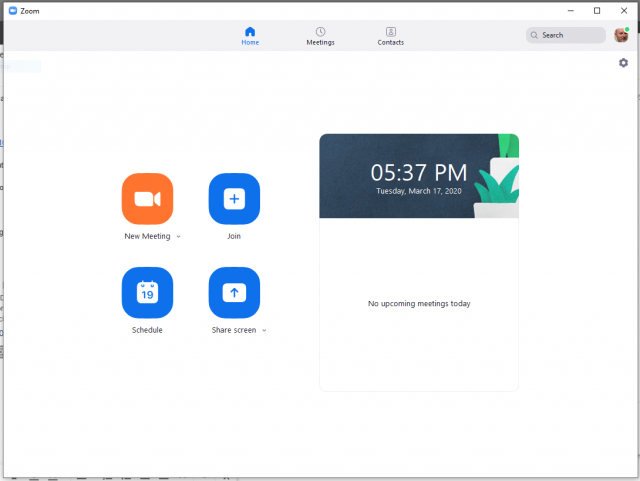
  • Open the application
  • Login using SSO and Pepperdine as your domain
  • And you are presented with the Zoom app’s desktop version
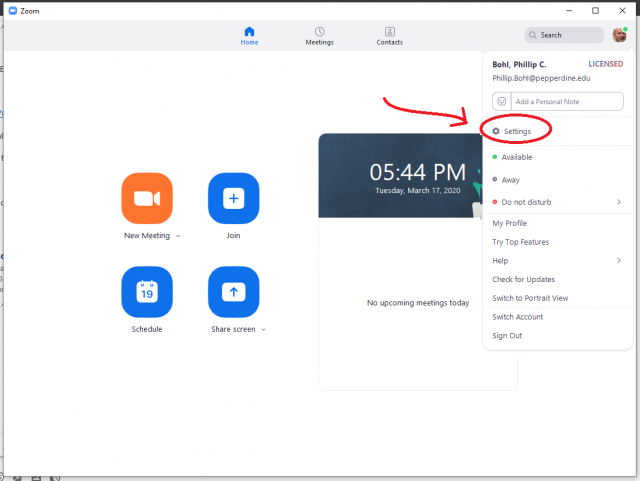
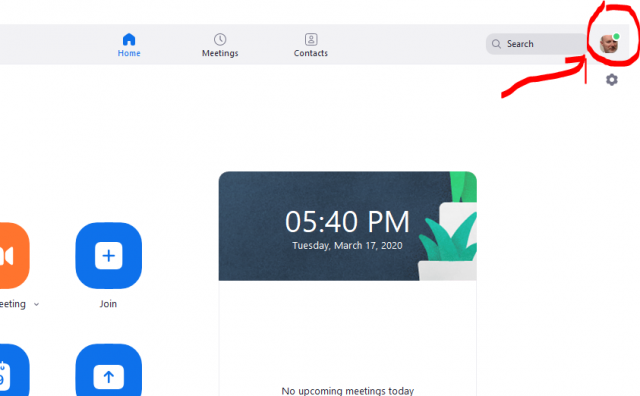
  • Select the icon in the upper right of your Zoom screen that represents you (for me it’s my face)
  • Then select the “Settings” choice in the drop down menu
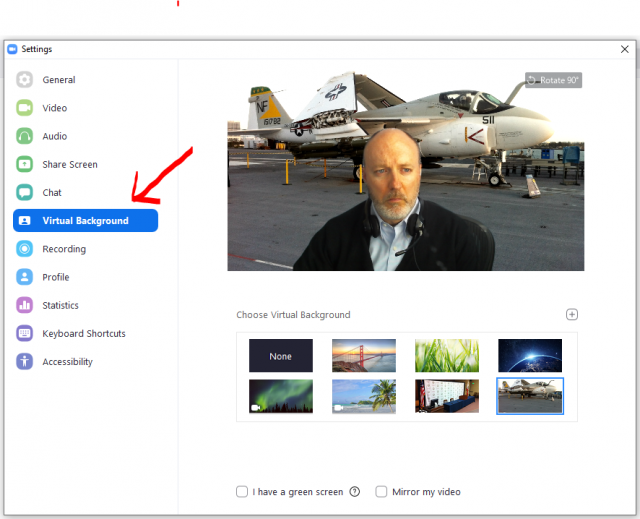
  • Then select Virtual Background
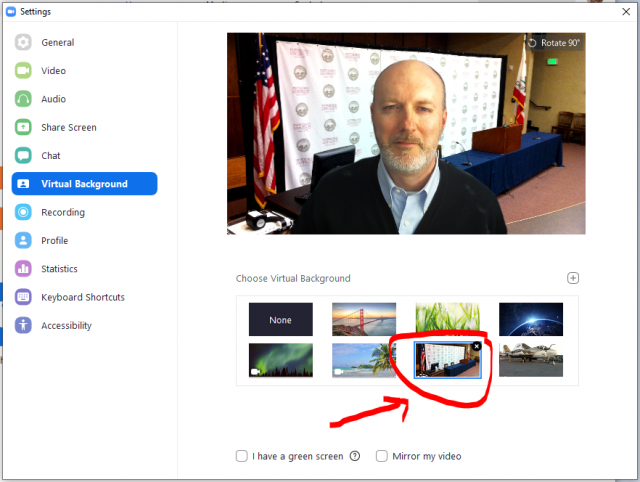
  • Then select your background from the group.

Uploading Your Own Virtual Background

In this example, we will be using a background developed for Pepperdine Carruso Law School’s 50th anniversary — you may use this background for your own personal use!

To save the Pepperdine Carruso Law School background, click and drag the image below to your desktop. This will save in your desktop files for personal use and for following along in this tutorial.

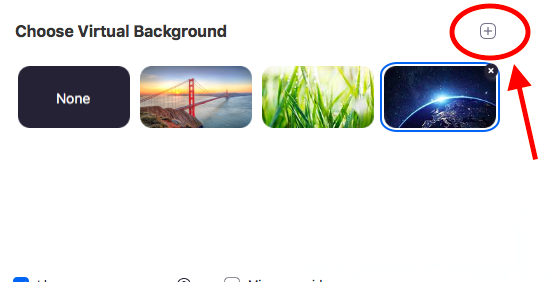
1. From the window you were left at on the previous guide, click on the “+” button on the top right corner.

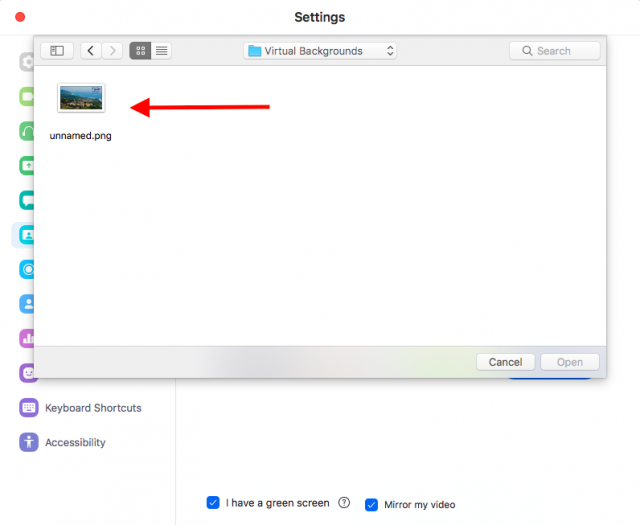
2. A pop-up window with your file options will now appear, and you may browse and select the proper image. After selecting the image, click “Open” to have it download onto the Zoom software.

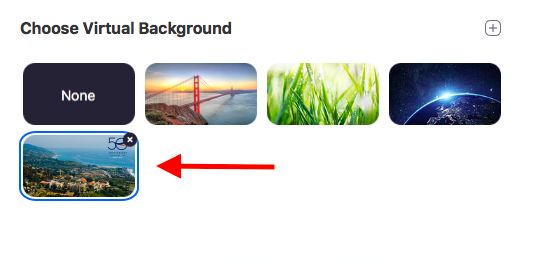
3. You will now see your downloaded image displayed as an option for choosing a virtual background. Select the image, and you may now see the background in the video preview above. If you would like to remove this image from your options, click the “x” on the top right of the corresponding image.

Please note that this new virtual background will only be functional on the computer where you made this setting.

More for Faculty Zoom users

More for Student Zoom users

If you have any questions, please feel free to contact Information Services at [email protected] or (310) 506-7425.
Microphone Settings — trouble-shooting

If you are having trouble with your microphone when using Zoom please check your microphone input settings to ensure there is input level.

Both Windows and Mac settings are addressed below:

On MS Windows it would look something like this:

In the bottom right corner of your screen, you will notice the volume icon in the system tray.

image3.png

Right-Click on the volume icon and click Open Sound Settings.

image4.png

In the Sounds Settings window, look for Input and Choose your input device and then click the blue Device properties link (circled in red) in the screenshot below..

image1.png

This will pull up the Microphone Properties window. Click the Levels Tab and you will then be able to adjust your microphone volume settings. 

image2.png

The volume level does not have to be at 100%, but should be high enough that the computer can detect audio. 

Please make sure that your microphone is not muted. If you see the icon below, click the speaker icon to un-mute. 

image.png

Once you determine the best settings for you and your system, click OK to save the settings and then close all settings windows upon completion of adjusting your microphone volume settings.

For MacOS:

——————————–

You will need to open your System Preferences menu, and in the second row to the right will be Sound. Click on that.

Prefs.png

In the Sound menu, click on the Input tab to see the list of microphones available to use. This is where you want to select the mic you’ll be using. If you’re using a laptop, it will have a built-in Internal Microphone that is usually selected by default.

internal.png

If you have headphones with a mic attached and they are plugged in, you’ll see them listed as an External Microphone. Either of these will work, and you can test them by talking and seeing that the bars in the Input level fill up.

external.png

If none of this solves your microphone solution, please send a note to [email protected] or call Pepperdine University IT support at 310-506-HELP (4357).

When I need Zoom Support …

If I have technical difficulty with Zoom what do I do?

  • Test your computer with Zoom before class.  Check out the audio and video settings.
  • If you have problems, the first thing to do, is to completely shut down your computer and restart.  Most computer problems are corrected with this remedy.
  • Before you begin your Zoom session, we strongly recommend that you shut down and turn off any and all extraneous applications, especially those using the camera, the microphone, or the speakers.  Turn off facebook and other social media apps. The only thing you should have running is your Chrome browser with minimal tabs open (two or three?). Avoid news sites, sites with video, other things that require more bandwidth while using Zoom.
  • Mic Problems? Try checking your microphone settings in Windows or on the Mac. Make sure that the microphone is on and is turned up enough to pickup your voice.
  • As a student you may want to use MS Word for taking notes but note that this may be an ideal time to use Google Suite apps as they are very lightweight and will save your computer’s power for more Zoom fun.
  • If your trouble shooting attempts above do not yield results, please see this comprehensive support site from Zoom
  • Note: you may find it valuable to acquire a USB headset for your Zoom classes. That will remove some variables with your computer’s audio (mic and speakers).
  • Tech Support: 
    • Please contact University Technology Support directly at 310-506-HELP (4357)
    • Secondarily, contact LawTech at [email protected] with technical questions.  
    • Zoom’s user support is available for Zoom Pro users (your Pepperdine Zoom Pro account qualifies for the Education support option — best/highest support level). Report support tickets to Zoom by:
      • Online submission via submit a request.
      • Chat live with our support team by visiting your account and selecting help in the lower right hand corner here.
      • Phone dial-in: 888-799-9666 ext 2
    • If you do not have a computer or way to connect to Zoom via the internet, please contact Dean Goodno.

What if, as a Pepperdine Caruso Law student I have a bad internet connection?  How should I join my classes by Zoom? Can I call in?

  • You must use the Zoom app and connect via Internet. See our guide for students here.  We strongly recommend that students use a computer with a reliable internet connection for connecting to their Zoom class sessions.  Telephone dial-in will not work for attending classes remotely It is possible to connect using cell phone data to “tether” the phone’s internet connection to a laptop or desktop computer.  Check with your mobile phone provider for details on this feature. Android Tether Article  iPhone Tether Article

More for Student Zoom users

More for Faculty Zoom users

Two ways to record during a Zoom session

Please note that you can start recording your meeting/class after you start the session. If you want to setup recording as an automated feature you can do that as well, even after you have setup the meeting link.

Below is the information on how to start a recording DURING your class session. There are two options. One is for the professor/host and one is for the attendee/student.

Recording a Zoom session: Downloadable PDF

Host (professor) manages recordings

  1. As the faculty member hosting the meeting you have the option to record your Zoom session to the
    cloud or locally to your computer.
  2. We recommend you record to the cloud as it is easier to track and manage through Zoom’s web
    interface.
  3. There are two ways to access your recordings.
    • The first way is to use the link Zoom emails you after your session has ended.
    • The second way is to log back into your Zoom profile at http://pepperdine.zoom.us and click on Recordings menu on the left as shown in the image below.
    i. Then click on Cloud Recordings
    ii. Locate the session you want to share and click on the share button.

4. Select “Only authenticated users can view; Signed-in users in my account” and then “save”

5. You can choose if you would like to allow viewers to download the link by clicking the slider to blue for yes or gray for no.

6. Click on the Copy To Clipboard button will copy the information that is the grey box labeled “Recording Link Information”. You can then copy all of that information into an email for students.

Students manage their own recordings

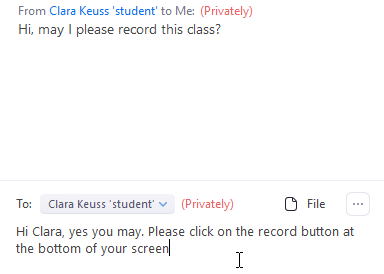
  1. Student participants should request for their professor’s permission to record the session either via email prior to the Zoom sessions or privately to the professor in the Zoom Chat feature.

2. As the host you need to allow for each student individually to record the session. Participants have the option to save to their Zoom cloud account or on their computer. 

From the Chat tool move your mouse to the right of a student’s name and you will see the Mute and More button appear. Click on More.

3. Then click on the Allow Record button

4. You will now notice the red record dot appear at the top left of the screen. Please note that this will appear for everyone in the session.

If you have any questions, please feel free to contact Information Services at [email protected] or (310) 506-7425.
Taking Attendance in Zoom

For your Zoom class, you may take attendance any way that you would like. There are two ways we would recommend:

Screenshot

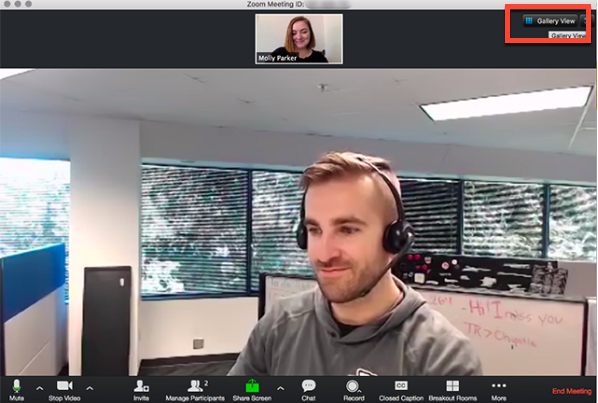
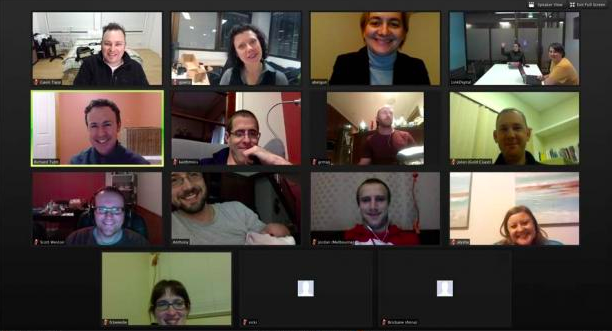
Ensure that you meeting view is in “gallery view” by clicking the gallery view icon in the top right corner of your screen.

This will switch you from speaker view, and allow you to see all participants in the class at once.

On the gallery view page, simply take a screenshot of your computer screen.

For Macs: press Command+Shift+4 and drag your cursor to encompass the entire screen.

For PC: hit the PrtScn (Print Screen) button on your keyboard, which will automatically take a picture fo your current screen.

The photo will save to your computer and you may check it later when noting attendance.

Name List in Chat Box

Alternatively, you can ask students to type their names into the chat box.

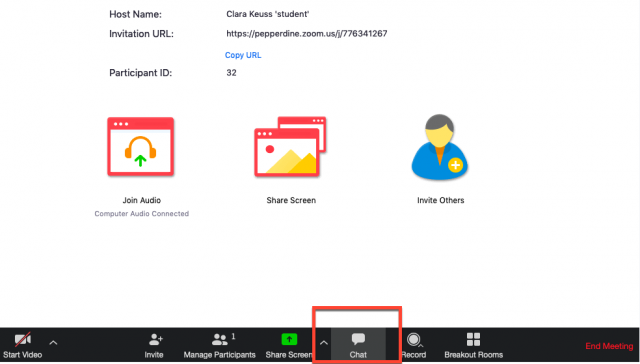
Instruct students to locate the “Chat” icon in the bottom toolbar to bring up the chat box and type their name in the box.

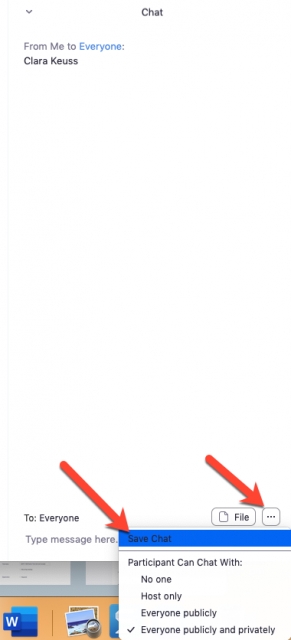
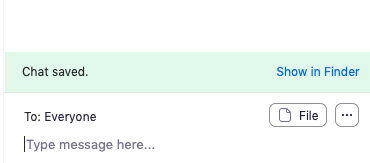
Once everyone has typed in their names, click the three dots beside the file icon, and click “save chat” to save the list of names for your records.

You will be able to access the record in your files later.

If you have any questions, please feel free to contact Information Services at [email protected] or (310) 506-7425.
Zoom Student Basics: Compatible Equipment and Connection Requirements

Zoom is a video conferencing product that all Pepperdine students and faculty are licensed to use. This site is great for joining or hosting meetings, workspaces and webinars–whether it be for attending a remote class lecture or creating a personal audio/video chat.

To access Zoom, enter the URL https://pepperdine.zoom.us/ or click on the link provided.

In terms of compatible equipment, Zoom is compatible with basic i3 Windows 10 and Mac OS X with Mac OS 10.10 and higher. You may use Zoom with an integrated web cam and built-in audio system, or with any mid-range webcam and USB headset. A good approach is to standardize using a USB headset as this will avoid a number of variables that can cause problems for your audio functionality. There is no need to spend a lot of money for very good functionality. We have had great success with Logitech, Sennheiser, and Plantronics brands that range from around $20 up to around $50.

A minimum link of 2 mb (download) is recommended for Zoom usage, yet 600k is a functional minimum. To test your link speed, please visit speedtest.net or click on the link provided.

For tips on how to maximize your remote internet experience, please click here.

TEST your Zoom setup using Zoom’s test meeting.

To view a quick infographic guide for Zoom Meetings, please click here.

Please click here for more on Zoom for Students.

Etiquette for Online Meetings and Conference Calls

Ok, so you’re going to attend a meeting or a class OR A JOB INTERVIEW online using something like a conference call, Zoom, WebEx, Skype for Business, or Google Teams, or … you get the idea.

First, let’s not alienate those we’re connecting with and potentially endanger our careers or at the very least embarrass ourselves.

Here are some simple guidelines for participating in a group connection over the phone or over the web:

MEETING ETIQUETTE: 

  • Mute your audio if you are not speaking.
  • Be presentable in business attire. If for some reason you cannot be presentable, mute your video. Also consider this approach if there may be visual distractions in the frame of your camera (i.e. crazy bird, weird wall hanging, etc.). The ideal is to present a professional image as much as possible and not to distract from the meeting.
  • As mentioned above, it’s always best to be prepared for a professional interaction, especially in your appearance if video will be used.
  • Don’t stare at your phone, your tablet, the newspaper, or something else while other people are presenting.
  • Don’t interrupt other people when they’re speaking (or attempt to speak over them)
  • Test all technology (including camera/video, Wi-Fi, and screen sharing) before the meeting.
  • Read the agenda, and come prepared.
  • Don’t work on other tasks (like checking email) during the virtual meeting.
  • Turn off all notifications and make sure your cell phone is on silent.
  • If you are leading the meeting, make sure all participants are in a quiet area free from unnecessary distractions.

A conference call in real life

Student request for Zoom recording

Students have the ability to record their online classes through zoom, if granted permission by the professor.

Alternatively, the student may email the professor before the class begins to obtain approval ahead of time.

A video with these instructions can be found at the bottom of this page.

Obtaining recording access:

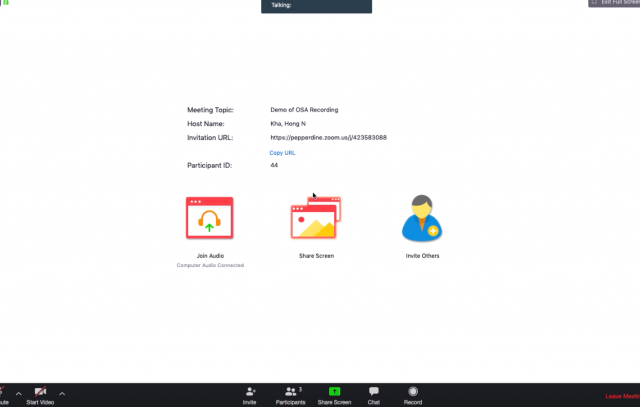
Step 1: Join your class session and ensure your audio and visual settings are set up correctly for the class.

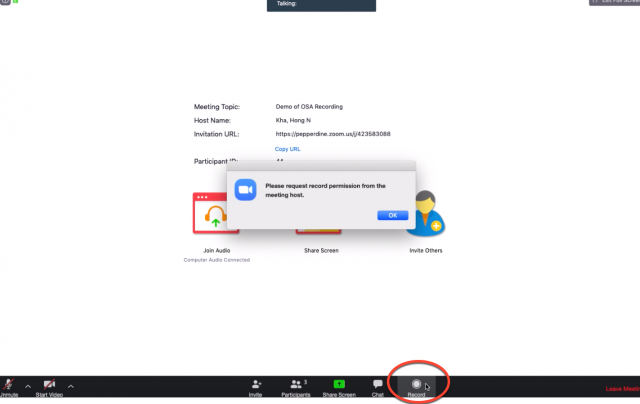
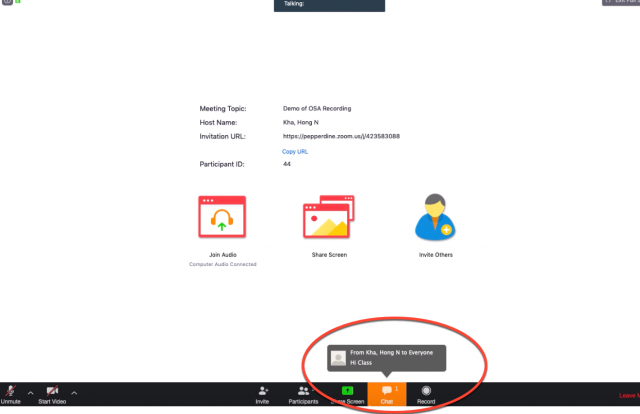
Step 2: If you click on the recording icon in the bottom toolbar, a dialogue box will appear that indicates that you must request permission from the host (your professor) before you can record.

Step 3: To obtain permission, locate the chat box on the bottom toolbar.

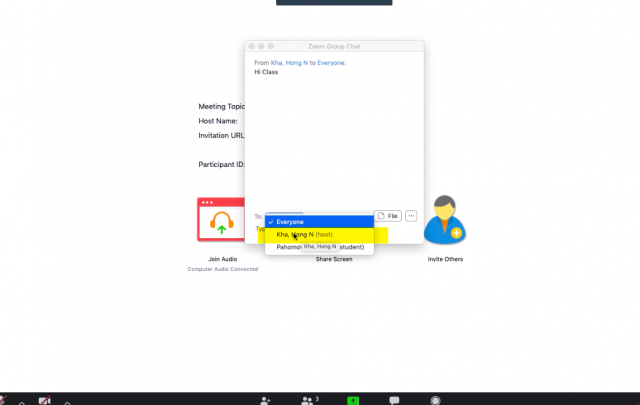
Step 4: Make sure to format the “To” section to a direct message to your professor. This way you may send the request privately in the chat room.

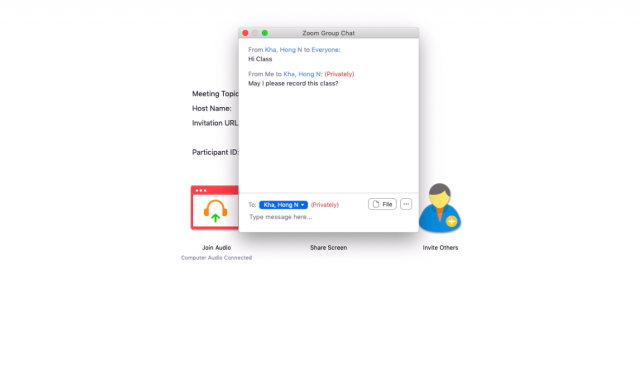
Step 5: Request the recording by sending a private message.

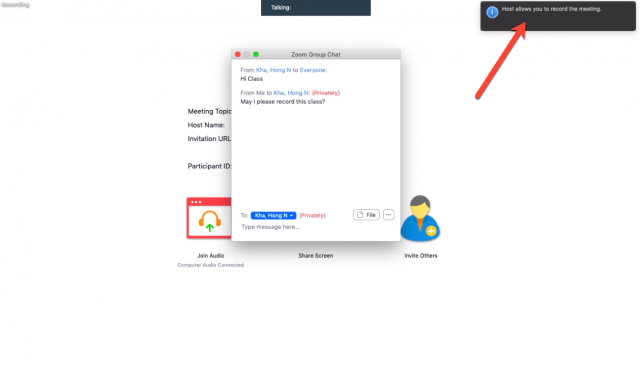
Step 6: Once recording access has been approved by the host, you will receive a notification bar in the top right corner informing you that you may begin recording.

Starting and saving your class recording:

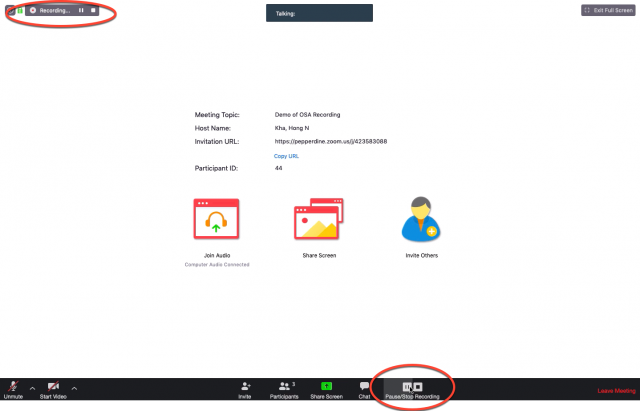
Step 1: Once you have obtained permission, click the recording icon in the bottom toolbar. This will begin recording, and you have “pause” and “stop” recording options in the bottom toolbar and top left toolbar.

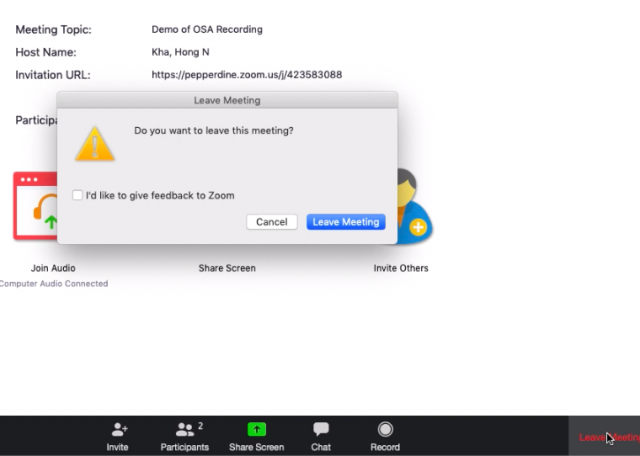
Step 2: Once the class is finished, stop the recording and leave the meeting via the “leave meeting” box in the bottom right corner.

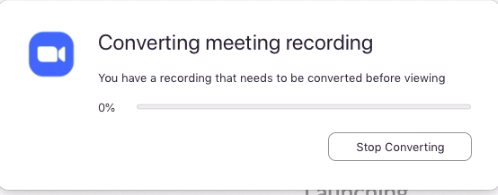
Step 3: Once you leave the meeting, a box will pop up notifying you that the zoom recording is being converted into viewable format.

Step 4: Once the recording has been converted, a “save recording” box will appear. Choose “choose a new location” from the drop-down menu.

Step 5: Save the recording in a folder you can access again later. It may be helpful to create a zoom folder specifically for zoom class recordings.

Please click here for more on Zoom for Students.