Courses by Sakai: Syllabus Tool

Similar to TWEN and other course management systems, faculty may use Course’s by Sakai’s Syllabus tool to post a syllabus for students to easily access in their Course site. This article goes in detail on the different options of creating and/or uploading your syllabus, as well as the specific steps regarding the processes.

For more information, please watch the video and read the information presented bellow.

Syllabus Options

Faculty can include a syllabus to their site in four different ways:

File Attachment. Faculty may add a document (ex, .pdf, .docx) as an attachment to the Syllabus tool in Courses. If uploaded like this, students can download, open, and print the file at their convenience. However, in order to make a syllabus edit, the instructor will must edit the original document and re-upload the new version as a replacement or follow-up revisal. (This is the most common option.)

Webpage from Document. You can also create a webpage syllabus from a text document using the Text Editor within the Syllabus tool by either copying and pasting your syllabus or writing the information directly in the text box. Students may still view and print the syllabus at their convenience, and the instructor may edit the syllabus directly through the same site’s Text Editor.

Multi-Part Syllabus. Instructors can create a multi-part syllabus by adding one syllabus item at a time, with the option of reordering or removing individual items in the syllabus editor. (This is a good option to use if the instructor likes to organize the syllabus by weeks or class meetings.)

Point to Webpage. This option is best used if the faculty has a syllabus posted on a webpage, so the instructor may direct, or link, the Syllabus tool to that syllabus.

Steps on How to Add Your Syllabus

For instructions on how to add a Syllabus, please read below.

1. Log on to Courses with your Pepperdine credentials.

2. Scroll through your left tool bar and select “Syllabus.”

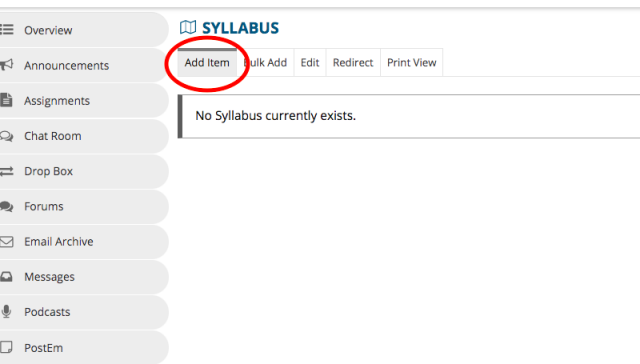
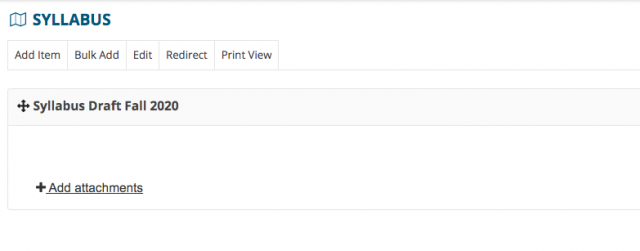
3. Under the Syllabus title, click “Add Item” in the tabs presented.
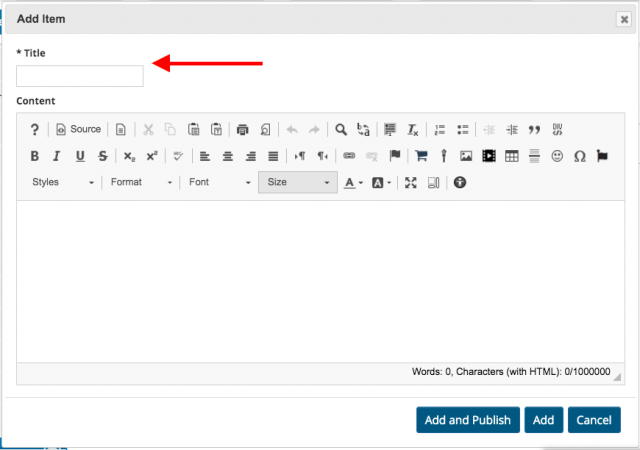
4. A required dialog box will then appear. Proceed to first enter a title for your syllabus item (e.x. “Fall 2020 Syllabus”). 
For attaching a syllabus

  • After entering the title of your syllabus, you may leave the content part blank. Click “Add and Publish,” and skip to step 5.

For other syllabus options

  • You may copy and paste your syllabus information into the Content area, write new information, and/or link to other websites or resources to your syllabus.
  • If you would like to create multiple items, create the titles as your syllabus section titles and type or link the coinciding content with that section. Repeat these steps for each section until you have a complete syllabus. This will allow you to create an online syllabus that does not require an additional application for viewing.

5. To attach a document, click “+Add Attachments.” From here, you may upload file(s) from your computer, point to an outside website link (URL), or select an existing document from the “Resources” tool.

6. If you do not yet wish to have your syllabus viewed by your students, you may hide your syllabus by selecting the “eye” icon on the left side of your published syllabus. To verify that it is hidden, the eye should not have a line across, and a “Saved!” pop-up message should appear near the Syllabus title. To unhide, simply select the “eye” once more.

Wondering what else can you do in Courses? For a list of the top 5 Courses tools and information on how to utilize them, click here.

If you have any questions, please feel free to contact Information Services at [email protected] or (310) 506-7425.
Top 5 Tools in Courses by Sakai

Courses by Sakai is Pepperdine’s open-source, learning management system that offers faculty and students a collaborative online environment to support teaching and learning. As we begin to utilize Courses as our main learning management system, here are the top 5 tools that may be used to the benefit and convenience of faculty and their students.

For instructions on how to add tools to your Courses left-side tool bar, please scroll down to the bottom of this article for the step procedure.

Here is an all-encompassing video that goes through the top 5 Courses tools and how to best utilize them.

For a quick tool summary, read the text briefings below. For an in-depth dive on the tool, visit the hyperlink below the coinciding tool summary to be redirected to a specialized post.

Top 5 Courses Tools:

Zoom Pro Tool

This image has an empty alt attribute; its file name is Screen-Shot-2020-05-08-at-3.33.48-PM-640x229.png

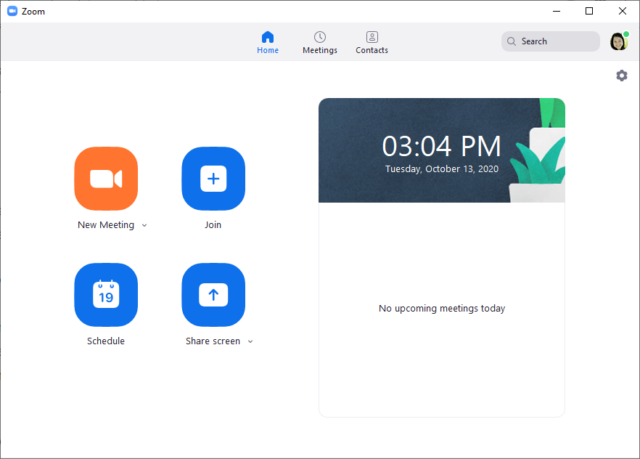
Zoom is an online meeting platform that will be used for holding classes online. The University’s web conferencing software is Zoom, and you can use it to host online class sessions, record your classes, and host office hours. Zoom can be used on laptops, desktops, tablets, and smartphones.

For more information and a video tutorial on integrating Zoom with Courses, such as scheduling or important class sessions, please click here.

Syllabus Tool

The Syllabus tool provides a place in the course site for the instructor to post a syllabus and for students to access the syllabus. Faculty can input their syllabus as a file attachment, a Courses webpage document, a multi-part, or a point-to-webpage.

For more information and a video tutorial on how to utilize Courses’ Syllabus, such as which syllabus type is right for you and/or instructions on how to input a syllabus, please click here.

Roster Tool

The Roster tool displays the names and pictures of site participants, in this case, your class section students. The Roster tool is a helpful way to learn students names, take attendance, and verify identities during class assignments and assessments.

For more information and a video tutorial on how to utilize Courses’ Roster, such as managing participants and viewing student pictures, please click here.

Resources Tool

The Resources tool allows faculty to compile and categorize important information to share with your students in an organized and central manner. Through the Resources tool, you can: share files or website links; post lecture notes, PDF documents, or presentations; release resources based on Gradebook conditions or to specific groups.

For more information and a video tutorial on how to utilize Courses’ Resources, such as how to attach files, links and create folders, please click here.

Messages Tool

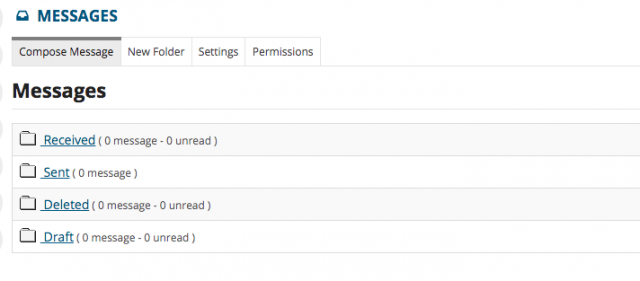
The Messages tool allows you to send and receive messages to students in your course or project site. On this tab, you may view your received, sent, deleted and drafted messages.

For more information and a video tutorial on how to utilize Courses’ Messages, such as how to send messages and select specific message recipients, please click here.

If you have any questions, please feel free to contact Information Services at [email protected] or (310) 506-7425.
Using Zoom through Courses’ Zoom Pro Tool

As we begin to use Courses by Sakai as our main learning management system, it is important to know how this site can be linked with other useful software for the benefit and convenience of faculty and their students. Here, we will discuss some important notes on integrating Zoom with Courses.

Courses has many tools that can be added-on to your class site, and they have numerous benefits, such as allowing students to quickly access third-party sites and overall give your teaching more dimension. Zoom is one of these tools. However, it is important to note that when the Zoom Pro tool gets added to a course site, it does not have any connection to a specific meeting session ID until a meeting is actually scheduled or imported within the tool. If you would like to schedule or important a Zoom meeting into your courses site, please watch the following video or follow these instructions.

To view an informational video on how to use the Zoom Pro Tool, please view below.

Please note: if you have not done so already, you must register for a Pepperdine Zoom account at https://pepperdine.zoom.us.  Without an account, you will receive an error in the Zoom Pro tool in Courses. 

Once you have an account, go to Courses and log in with your Pepperdine credentials.

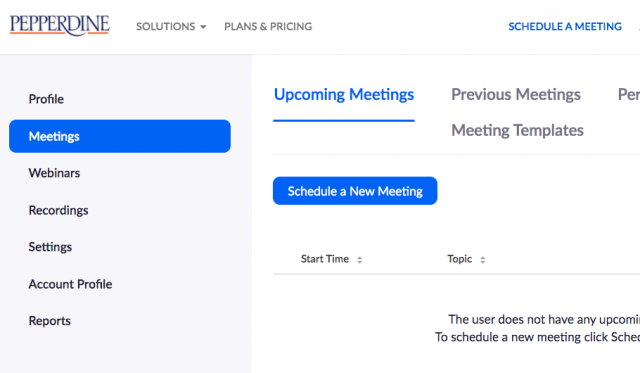
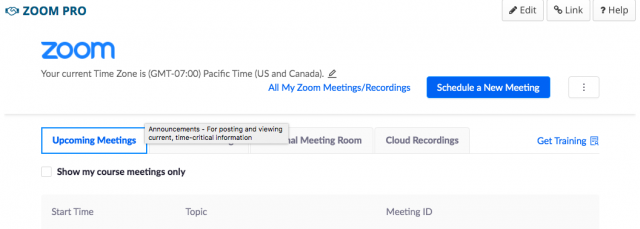
1. Now, you may select “Schedule a New Meeting” at the top right to directly create a meeting within the Zoom Pro add-on in your Courses site.

Creating your Zoom sessions in the Courses Zoom Pro tool directly is preferable to importing an existing sessions for many reasons, some including better centralization, ease of use, and less struggle when finding and sharing reports/recordings. 

Additionally, consider setting a recurrence of the session to simplify the process. If so, it is suggested to adopt a general meeting title (e.x. LAW 1234 Class) so same title will be applicable to all future meetings. 

For more details on the basics scheduling Zoom meetings and the potential settings you may utilize, please click here.

2. However, if you would like to import an already scheduled Zoom meeting, click or hover over the more icon that is indicated by three vertical dots. Then, select “Import Meeting” and follow the listed instruction for copying your existing Zoom Meeting ID.

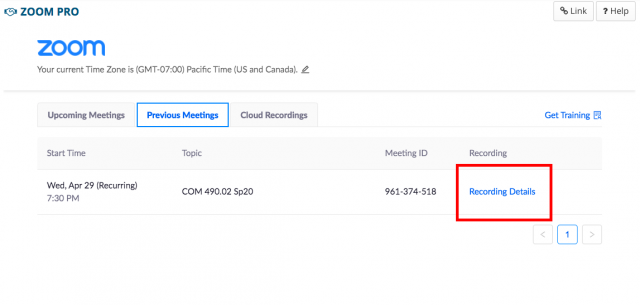
3. You should now be able to see a list of your scheduled meetings underneath the “Upcoming Meetings” tab in your Zoom Pro tool. Please note, if your meeting is recorded, your students may access the recording by clicking on “Previous Meetings” followed by “Recording Details” of the coinciding class session.

Additional Notes:

  • You should not use your personal meeting ID (PMI) link (high discouraged for classes, and moderately discouraged for office hours), due to some reported issues.
  • If you teach both formal Pepperdine classes and 2PEP classes, you must then navigate between the two Zoom accounts. Remember to always sign out of their Zoom app or web profile after each meeting and be sure to sign on to the correct profile based on your needs.

For more information on how to utilize Zoom for faculty, please click here.

For more information on Courses, please click here.

If you have any questions, please feel free to contact Information Services at [email protected] or (310) 506-7425.

Download the newest version of Zoom

Zoom has released a new update, including highlights of the new enhancements created specifically for ensuring the security and privacy of their product. The following steps will guide you through accessing and downloading the newest version.

Checking for an Update (Windows) and Installation

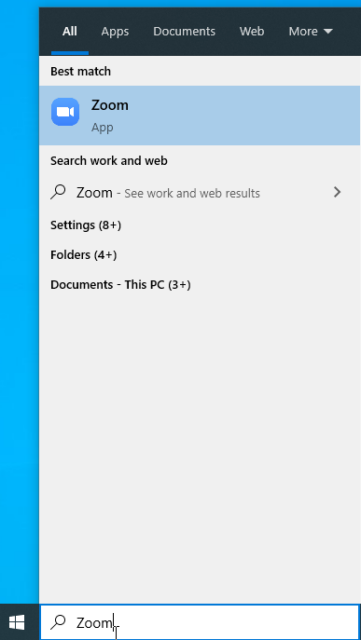
  1. At the bottom left corner of your Windows screen, type in Zoom to open the Zoom Desktop Client

2. You will be directed to a sign in portal. Click on Sign in with SSO to continue.

3. For company domain, type in pepperdine.

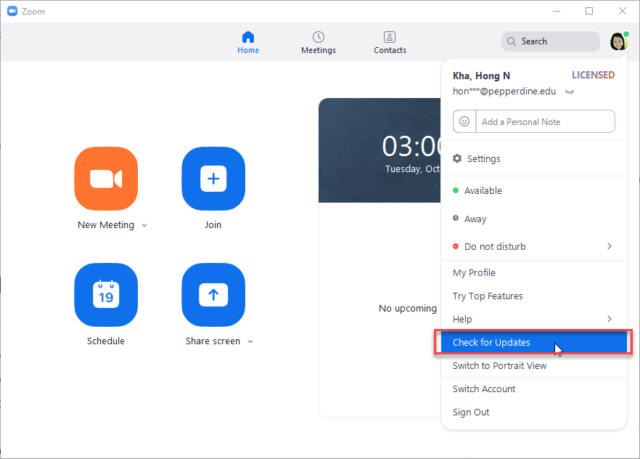
4. Once logged in to your desktop Zoom application, navigate to your profile icon in the top right corner, and click on it to open a drop-down menu. Click on Check for Updates.

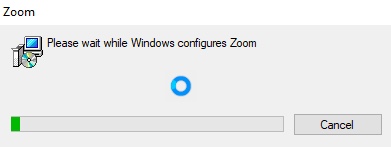
5. If there is an update available, you will receive the page shown below. Click on Update and Install then wait as the update is installed.

7. You will be directed out of the Desktop application while the update finishes.

6. You will be brought back to Zoom Desktop Client when the update has completed.

Checking for an update on a Mac

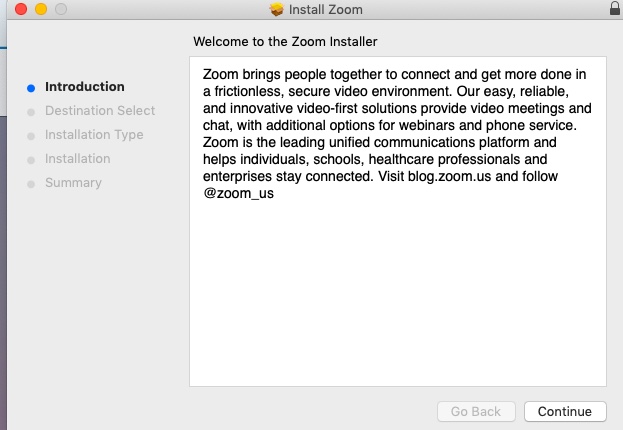
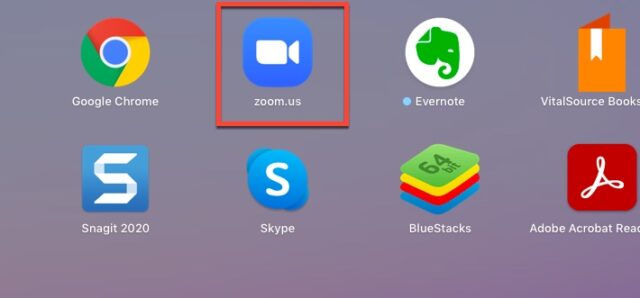
  1. In your bottom toolbar, click on your launchpad icon to be directed to all of your applications. Click on the Zoom application.

2. Follow the instructions from number 2 onwards in the Windows instructions towards the beginning of this page, as they are the same.

Please be sure to update to zoom’s latest release to take advantage of new features and subscribe to their Blog for more information and resources in the days to come.

Also be sure to check out our LawTech page on Zoom for other important information.

If you have any questions, please feel free to contact Information Services at [email protected] or (310) 506-7425.

How to trim the ends of your Zoom recording

If a Zoom recording is hosted in the cloud, the start and end times can be modified.

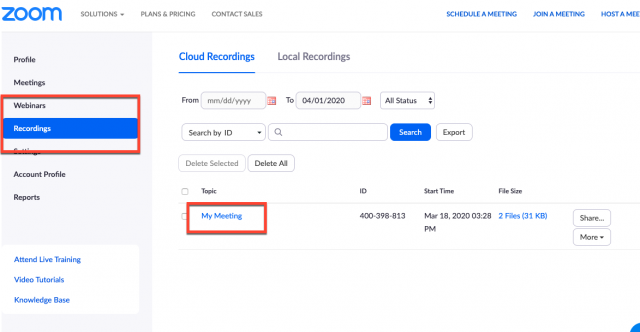
First, log into zoom.pepperdine.edu using the Sign in button. Then, go to your Recordings tab in your zoom account. Click on your video to open up the preferences for that recording.

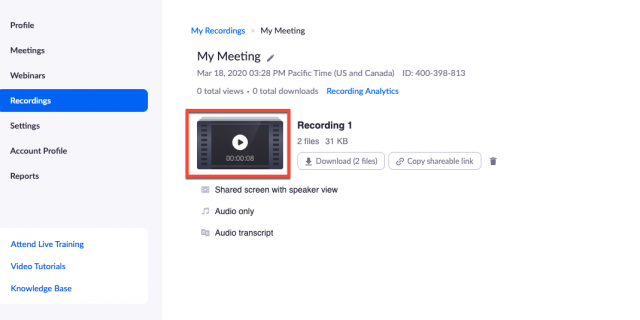
Next, click on the play arrow in your video to open up the video and editing preferences.

This will open up your video. Click on the scissors icon on the bottom right of your screen, which opens “playback range”

Finally, drag the arrows at either the beginning or end of your video to trim.

If you have any questions, please feel free to contact Information Services at [email protected] or (310) 506-7425.
How to Use Your Personal Zoom Meeting ID for Office Hours

When figuring out your preferred system for office hours, consider utilizing your Personal Meeting Room and ID. Your Personal Meeting Room is a permanent, virtual meeting room that you may access with your Personal Meeting ID or personal link. Your personal link is a specifically generated URL that is associated with your Personal Meeting Room. This is an easy alternative to scheduling individual meetings and managing a plethora of links for each necessary student.

Your Personal Meeting Room is ideal for use with people you meet with regularly; so this may be useful if you would like to schedule office hours on the same time and day every week and share the link with your class. You can start instant meetings with your Personal Meeting ID, or you can schedule a meeting that uses your Personal Meeting ID.

However, because it the same Meeting ID and personal link, it is always accessible when students have your link. Once a student has the link, they can join it at any time the meeting is in use. To precent this, you may lock the meeting with a password or use the Waiting Room feature to admit students individually.

ACCESSING YOUR PERSONAL MEETING ROOM

  1. Go to the Zoom website at http://pepperdine.zoom.us
  2. Click “Sign In” and log on with your WaveNet username and password.
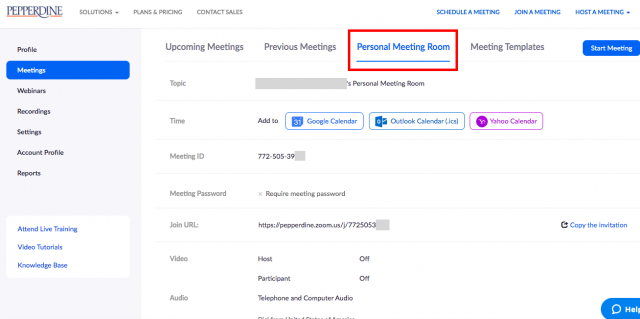
  3. First, ensure that the “Meetings” button is selected on the left-hand side. Then, at the top menu, select “Personal Meeting Room”. Here, you will see all of the information and some of the settings associated with your Personal Meeting Room.

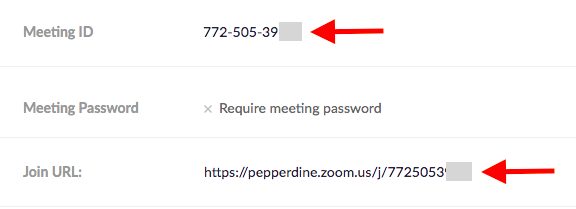
4. Toward the middle of the page, you can see your personal “Meeting ID” and “Join URL” associated with your personal meeting room. To give your students access to your room, share your URL link.

Setting a Password for your Personal Meeting Room

  1. Go to the Zoom website at http://pepperdine.zoom.us
  2. Click “Sign In” and log on with your WaveNet username and password.
  3. To set a password for your Personal Meeting Room, first click “Meeting” on the top menu.
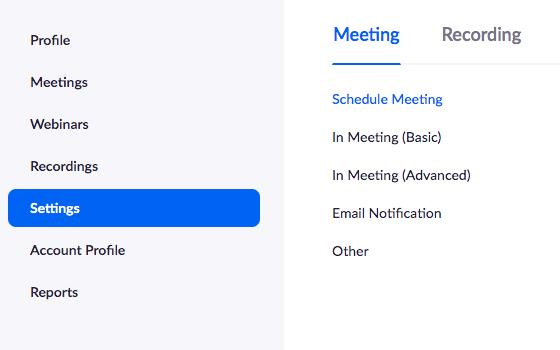
  4. Next, select “Settings” on the side bar listed on the left.

5. Scroll down until you see a setting titled “Require a password for Personal Meeting ID (PMI)” and select the button to switch it “on”. To verify, make sure that the color has switched from gray to blue.

To view Zoom’s support page on the topic, please click here.

Click here for more Zoom information for faculty.

If you have any questions, please feel free to contact Information Services at [email protected] or (310) 506-7425.

Safeguard Your Online Meetings and Classes against Zoombombing

If you haven’t already, please read the email on zoombombing sent from Pepperdine’s CIO, Jonathan See.

Also, consider watching this video by Zoom Support on how to secure your meetings:


Since Zoom is a free and public platform, anyone with access to a meeting link can join. Unfortunately, recent incidents have occurred known as known as “Zoombombing” where unwanted participants enter the Zoom meeting room and screen-share and/or proceed to say or write very offensive things. Here are the ways to safeguard your meeting against zoombombing:

Treat the Zoom Session as a Private Event

  1. Share the Zoom meeting link only with intended participants.  Participants should not share the link publicly or with others who do not need to be in the meeting.
  2. Don’t post the meeting link in social public forums.  Faculty are encouraged to post the meeting link in their institutional learning management system for students to access.

Consider these Zoom settings (if appropriate)

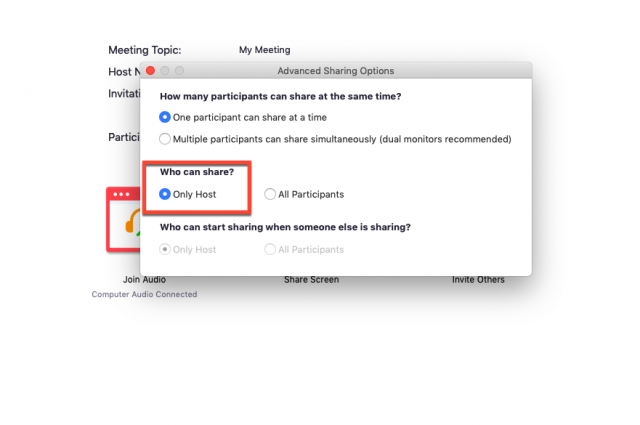
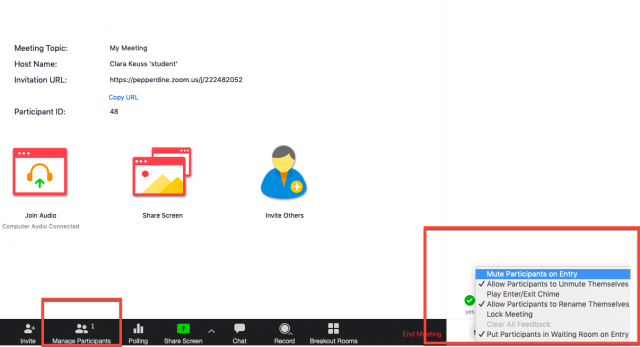
  • Assign screen sharing ability only to the host. In Zoom, click the upward arrowhead (^) next to Share | Advanced Sharing Options | Only Host.
  • Mute participants upon entry and disable their ability to unmute themselves.  In Zoom, click Manage Participants | the “More” button and check both “Mute Participants On Entry” and “Allow participants to unmute themselves.”
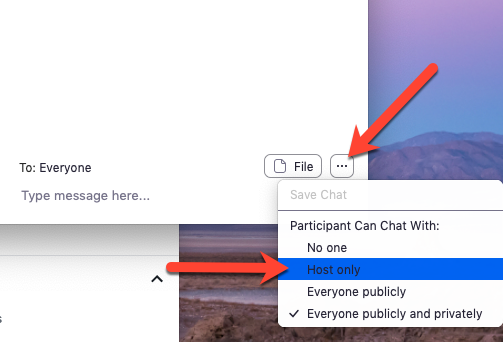
  • Allow participants to chat with the host only.  In Zoom, click Chat | the “ellipsis” button and check “Host only.”

Zoombombing is both offensive and highly disruptive for you and your participants, and it can happen in Zoom or any other video conferencing solution.  If you experience such activities, please report the incident as soon as possible to an IT member. 

If you have any questions, please feel free to contact Information Services at [email protected] or (310) 506-7425.

How to set up Zoom Meeting Breakout Rooms

Pepperdine Caruso Law is dedicated to assisting you in making the transition to online teaching. To that end, we have created this guide. Please contact us with any questions!

Note: Only the host of the meeting may manage breakout rooms. A co-host will not be able to access this feature.

Please carefully read and follow these instructions for setting up breakout rooms in your online class meetings. You will need to be fully able to manage your online class breakout rooms. To view and download this document in a separate window, please click.

Enabling “Breakout Room” Setting in your Zoom account

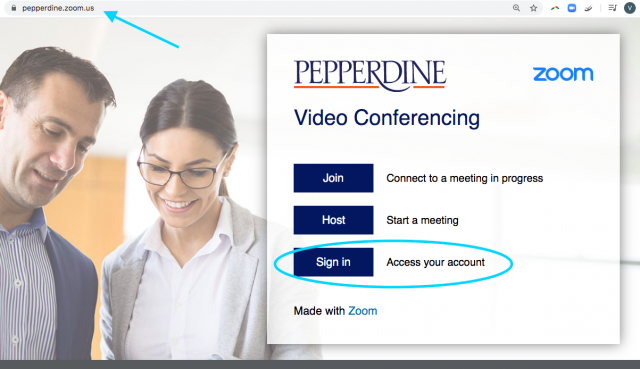
Go to pepperdine.zoom.us and click “Sign In” to log-in to your account.

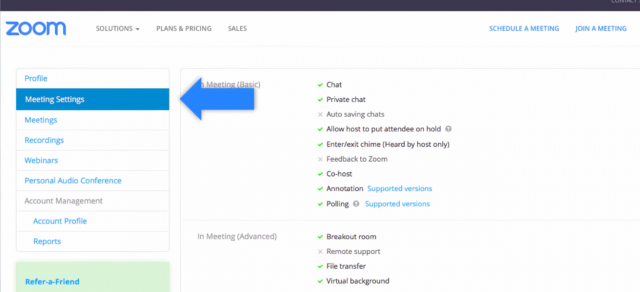
To get started, view the “Meeting Settings” tab on the left-hand side of the page.

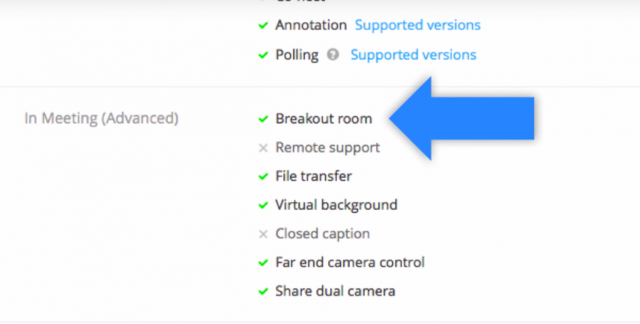
Verify that “Breakout rooms” is checked under advanced settings.

How to create the Breakout Rooms and Assigning Students while hosting your Zoom meeting

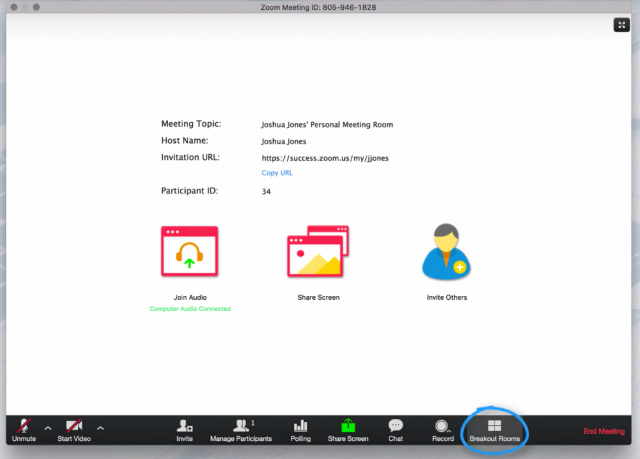
Once you are hosting your Zoom meeting, the “Breakout Rooms” option will be shown at the bottom of the Zoom panel.

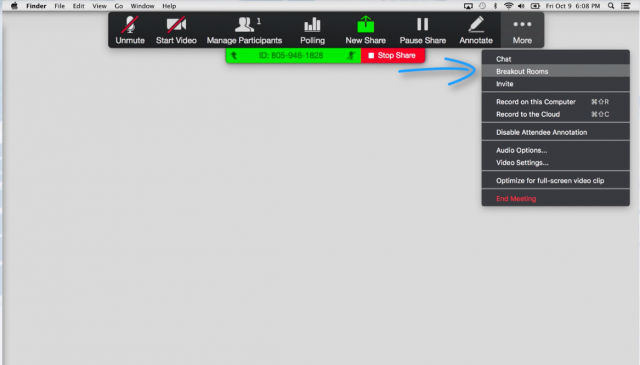
If you are sharing your screen, the button can be found under the “More” menu.

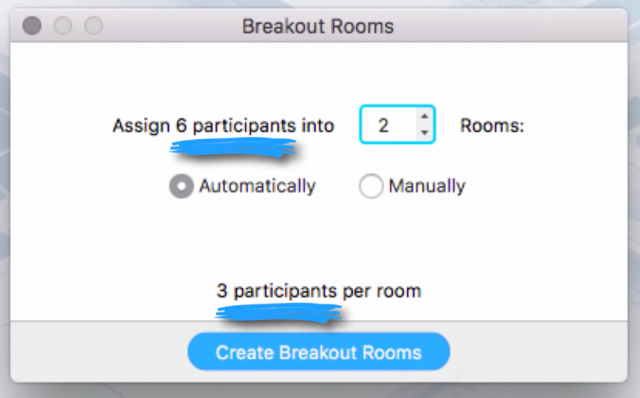
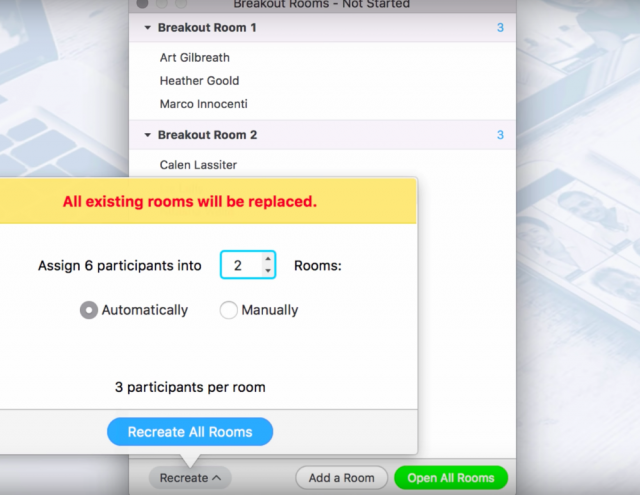
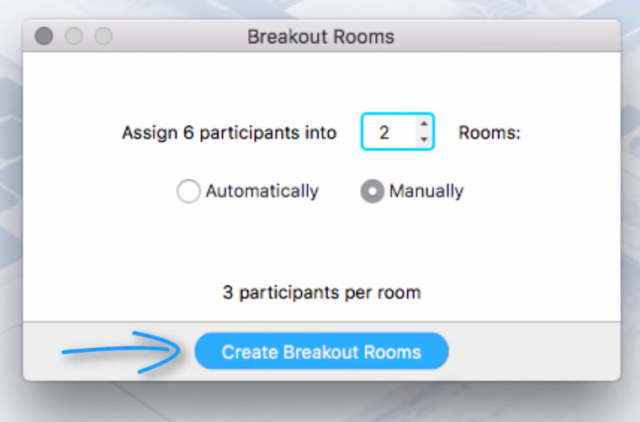
After clicking “Breakout Rooms”, you will be shown the eligible number of participants and asked how many rooms you would like to create. From here, you may either allow Zoom to assign your students to rooms “Automatically,” or assign the students to each room yourself “Manually.”

If you would like to manually assign your students, then click “Manually” and proceed to select “Create Breakout Rooms.”

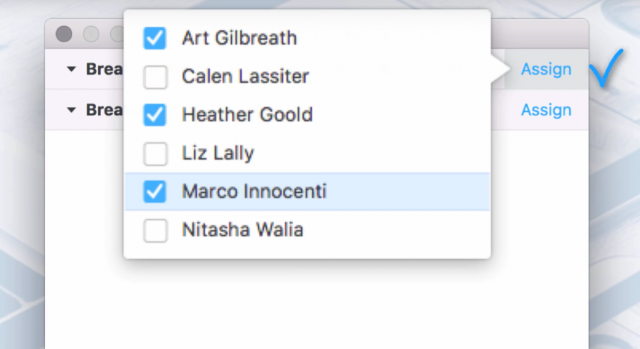
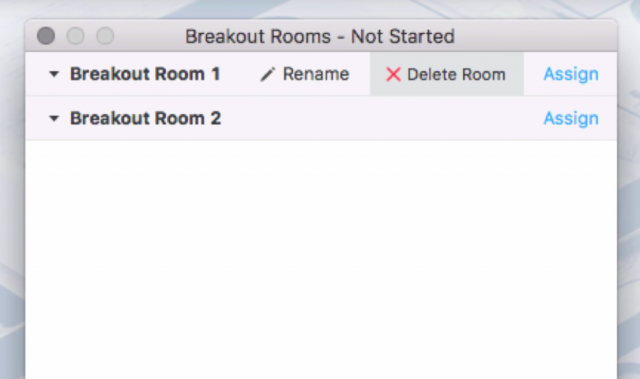
From here, participants are still in the main meeting. By hovering over the breakout room, you can rename, delete or assign members to each room.

To assign participants, click on “Assign,” check their names and click “Assign” again for each breakout room.

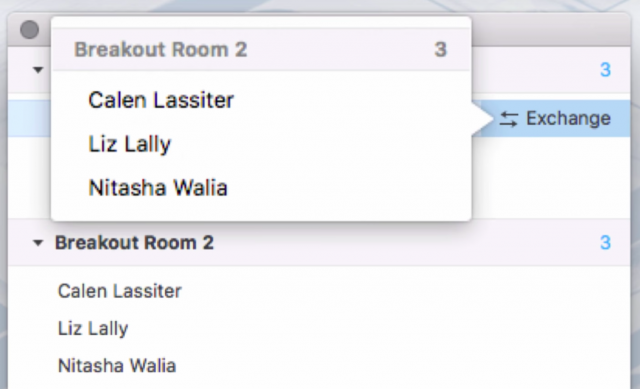
If you wish to change an individual’s assignment, you can hover over the name and make the desired adjustment.

How to create the Breakout Rooms and Assigning Students prior to your Zoom meeting.

Note: A new Zoom meeting ID will be created. Please email CSOL Information Services ([email protected]) that you have created a new Zoom meeting ID for your class.

Go to pepperdine.zoom.us and click “Sign In” to log-in to your account.

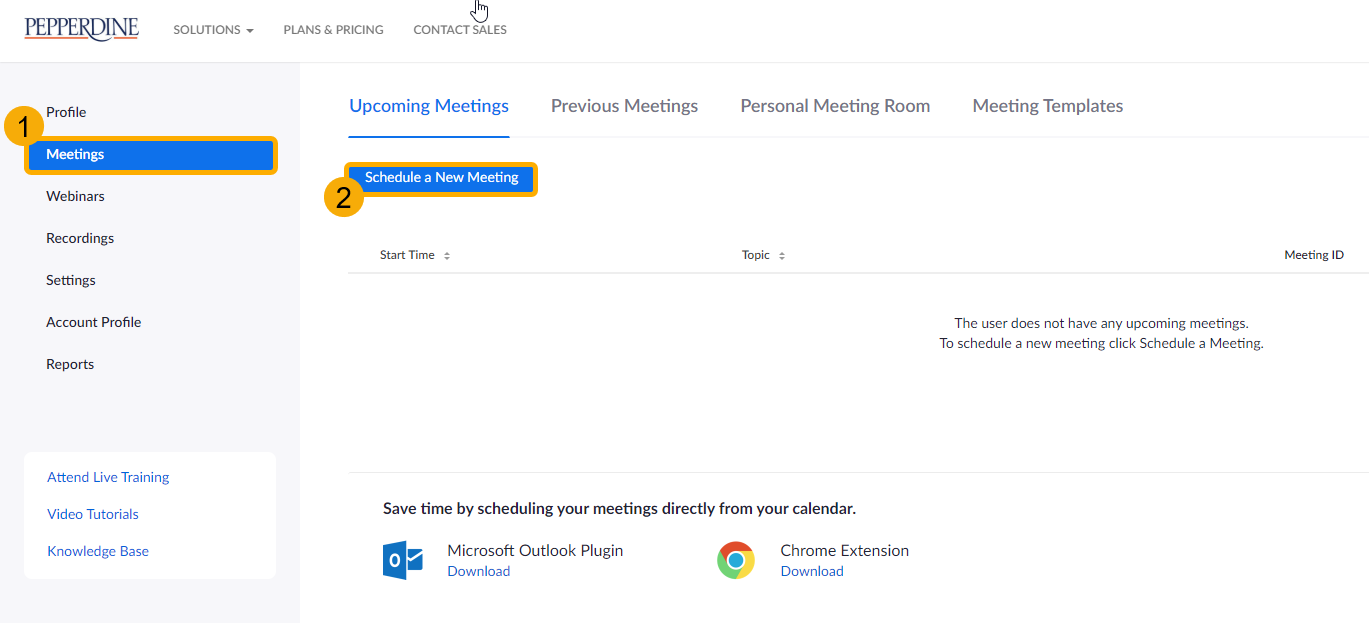
Click “Meetings” > “Schedule a New Meeting“.

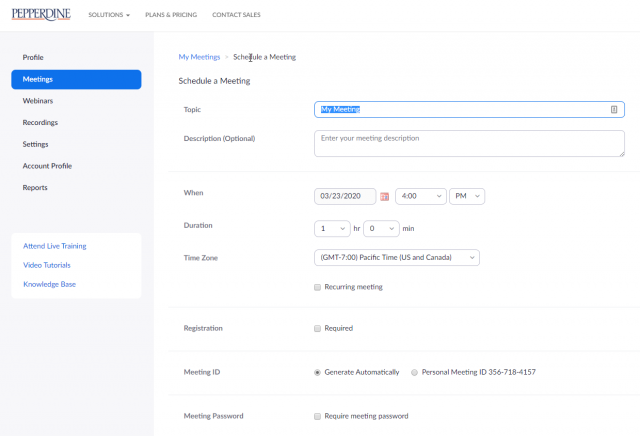
Complete the meeting information.

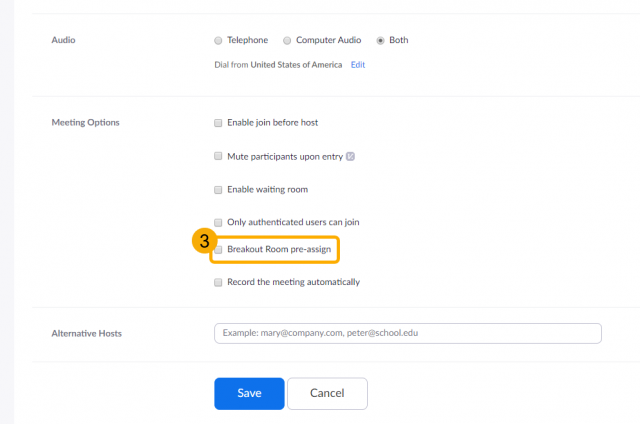
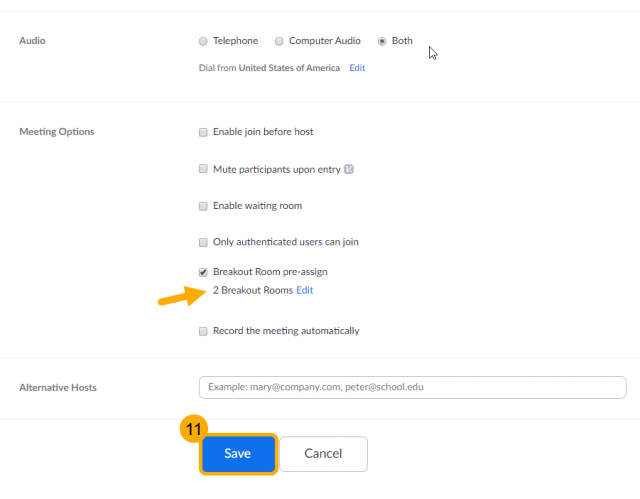
Scroll to Meeting Options > Click “Breakout Room Pre-Assign

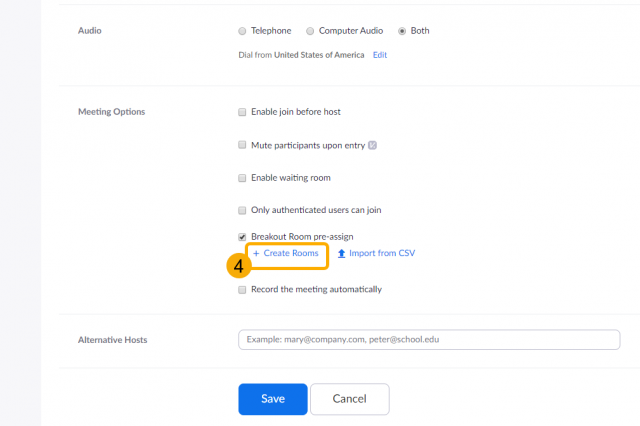
Click “+ Create Rooms“. A pop-up window will appear.

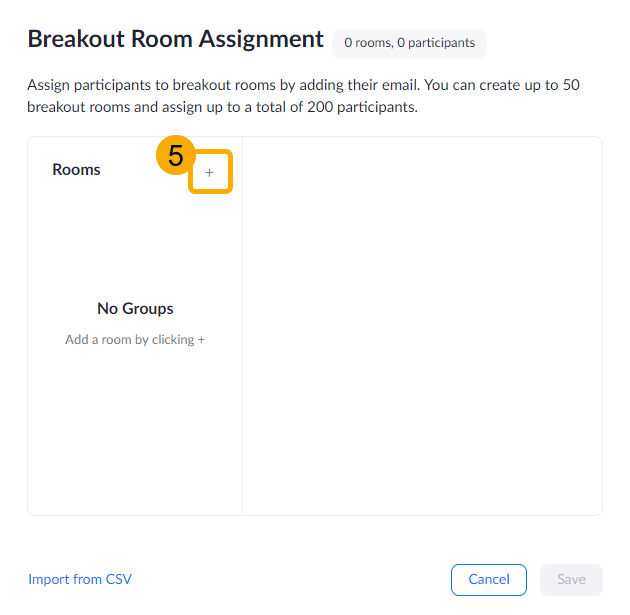
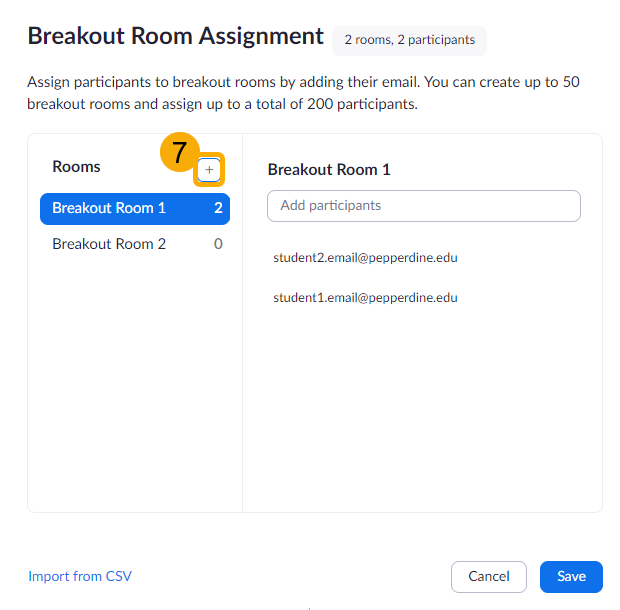
Click “+” to add a breakoout room.

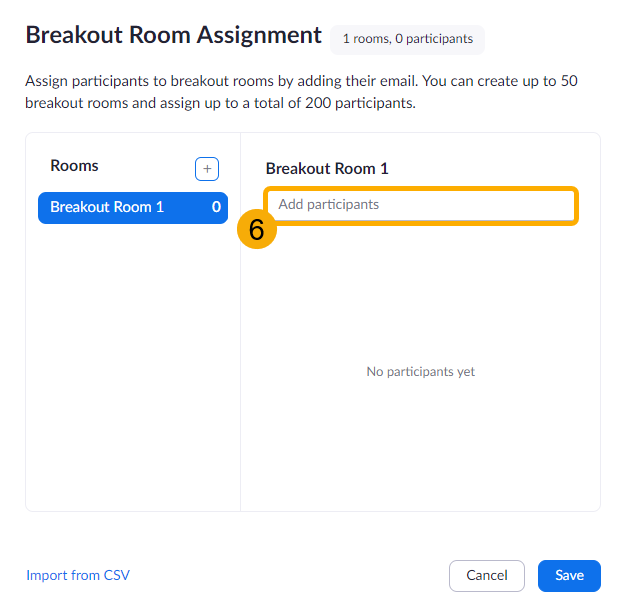
To add participants, type the student’s pepperdine.edu email address in the field. Hit Enter on your keyboard. Repeat this step for each student you would like in Breakout Room 1.

Note: Pepperdine.edu email address must be used or else the student won’t be assigned to a breakout room.

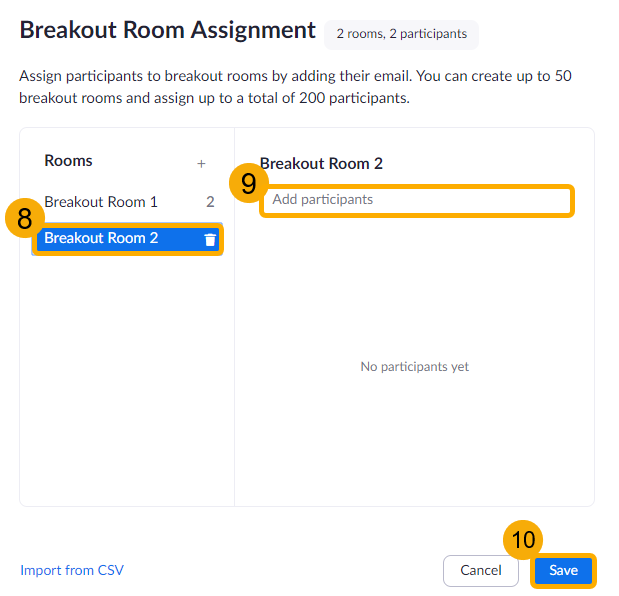
To add a second breakout room, click “+” again. Click “Breakout Room 2” and add your student’s email address to the “Add Participants” field. Hit Enter on your keyboard. Repeat these steps for additional Breakout Room(s). Click “Save“.

You will be taken to the Meetings page. You can confirm that Breakout Rooms have been created. Click “Save“.

Starting the Breakout Room during your Zoom meeting

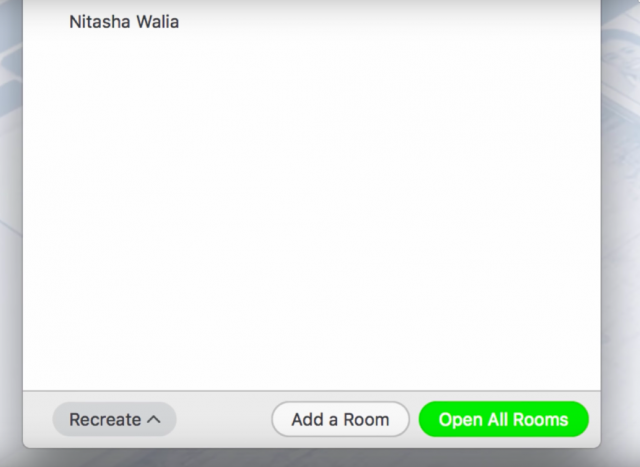
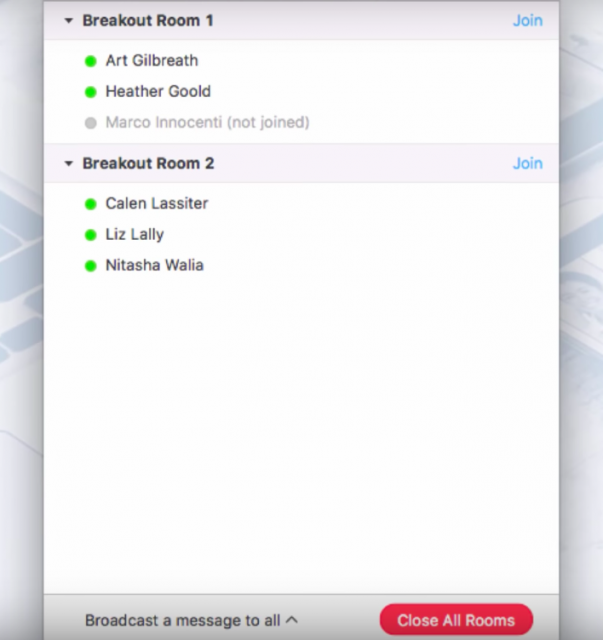
Click “Breakout Rooms.” This will show you the Breakout Rooms and the participants assigned to each.

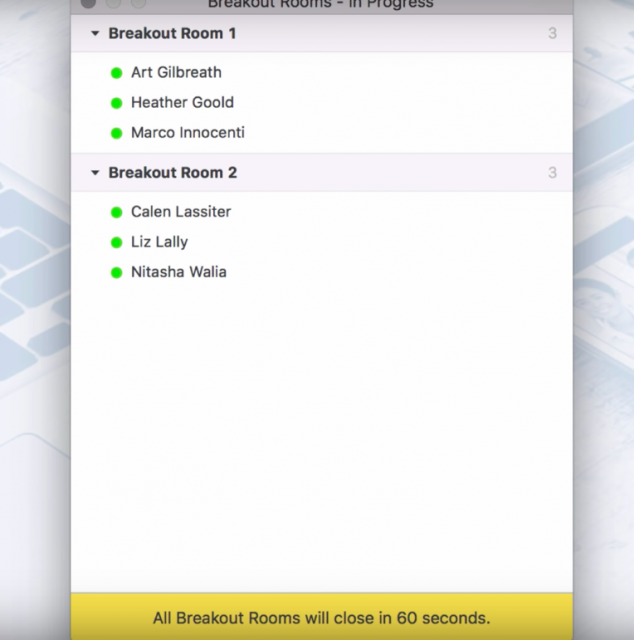
Click “Open All Rooms.” This will automatically move participants into the selected rooms. Successful connection will then be shown by a green dot next to each corresponding individual.

Host Options for Monitoring Breakout Rooms

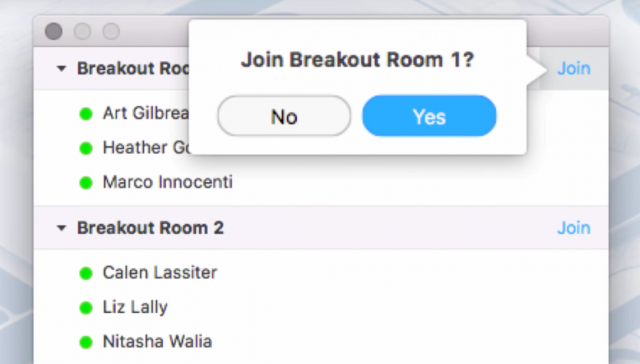
As the host, you may enter any breakout room to monitor discussion or offer assistance.

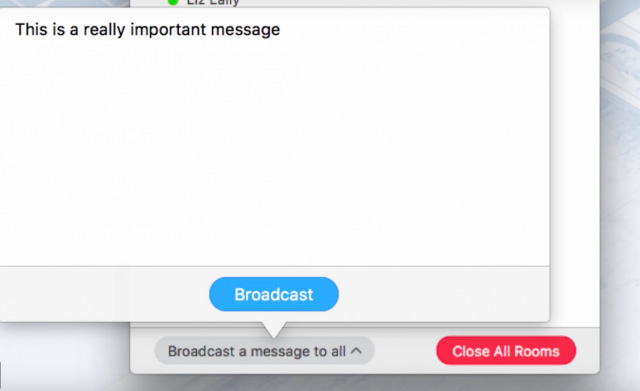
You may also broadcast a message to all participants and have your note displayed as a banner on their screens.

Closing the Breakout Rooms

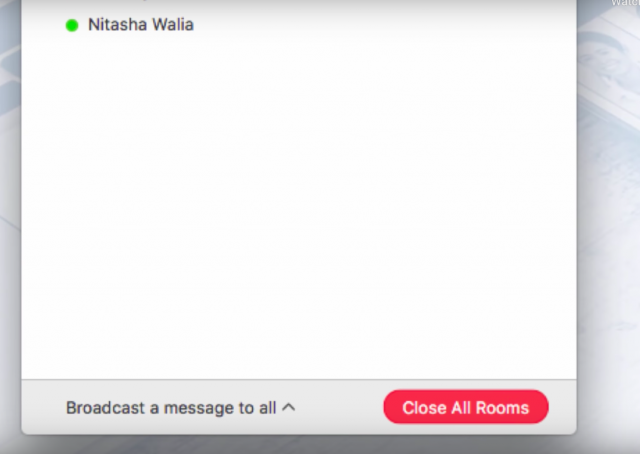
When you wish to end the breakout rooms, click “Close All Rooms.” This will give participants a 60 second warning before automatically being dismissed from their rooms and returning to the main session.

If you wish to reopen the breakout rooms, click again on “Breakout Rooms.” From here, you may now either reactivate the same rooms or choose to create new assignments.

Click here for more Zoom information for faculty.

If you have any questions, please feel free to contact Information Services at [email protected] or (310) 506-7425.
Zoom Training for Faculty 3/23 – 3/27

TechLearn is hosting several question and answer sessions for Zoom during the week of March 23 – 27.

View the schedule and access the Zoom Meeting IDs at Technology & Learning – Academic Continuity Plan for Teaching and Learning 

The sessions titled “TechLearn Q&A Session” are just that – a question and answer session with no agenda or demonstrations. Faculty can attend and get their questions answered about Zoom.


Interested in learning more about Advanced Breakout Rooms? Attend the TechLearn training scheduled for Wednesday, March 25 1-2 pm. See Technology & Learning – Academic Continuity Plan for Teaching and Learning  for the Zoom Meeting ID


Need to learn the basics of Zoom? Recordings of past Zoom trainings hosted by TechLearn can be found at Technology & Learning – Academic Continuity Plan for Teaching and Learning 

How to Include a Guest Speaker in Class Zoom Session

As the Law School’s faculty readjusts to the new teaching dynamic in place, it is important to try to replicate a similar setting with a similar course schedule. If you have a guest speaker scheduled to speak, please continue with this arrangement and follow the Zoom tips below.

1. Go to the Zoom website at http://pepperdine.zoom.us and log in with your Pepperdine credentials.

2. Once logged in, click on “Meetings” on the lefthand menu. Select “Schedule a New Meeting.”

3. Proceed to schedule a Zoom meeting with the proper settings. For a guide on how to schedule a zoom meeting, please click here.

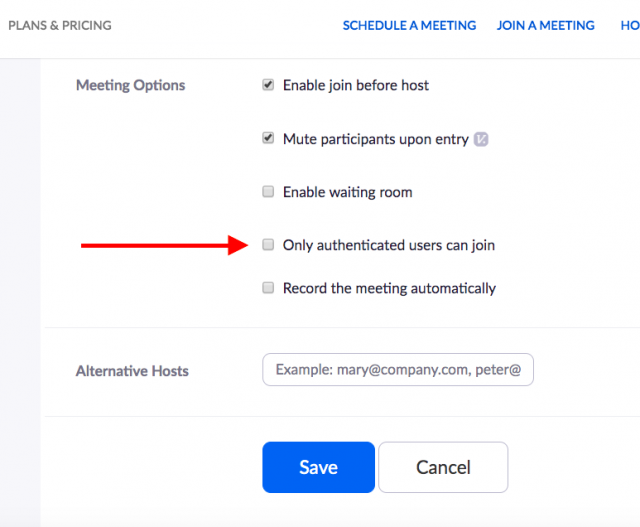
4. Under “Meeting Options,” make sure that the box labeled “Only authenticated users can join” is unchecked. Usually, this box is to be checked to ensure that the attendees of your class session are registered students with proper Pepperdine email accounts. However, in this case, unchecking this box for the class session will allow your guest speaker to enter the meeting without a registered Pepperdine email address.

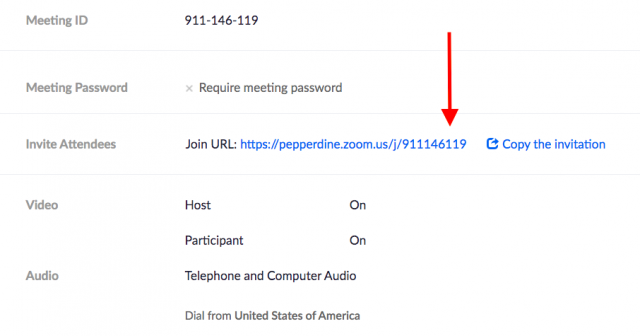
5. After you click “Save” to schedule your class session, remember to send the guest speaker a link to the meetings. This link can be found under the “Invite Attendees” section in the final window under “Join URL.”
More for Faculty Zoom users

If you have any questions, please feel free to contact Information Services at [email protected] or (310) 506-7425.