Please click here to watch the video on Technology services available to students at Caruso Law School.
If you’d like to see the slide show that is embedded in that video click here.
Please click here to watch the video on Technology services available to students at Caruso Law School.
If you’d like to see the slide show that is embedded in that video click here.
 CALI [The Center for Computer-Assisted Legal Instruction] is a resource provided by Pepperdine Caruso School of Law for students that includes over 1,000+ interactive online tutorials written by law professors, on 50+ subject areas. This includes, but is not limited to topics such as, 1L-First Year Lessons, 2L-3L Upper Level Lessons, Administrative Law, Tax Law, Constitutional Law, Legal Research, Property Law, Civil Procedure, and Environmental Law. These interactive tutorials are an excellent resource to enhance your studies. You may find that one or more of your professors will require you to use CALI lessons in the course of your studies.
CALI Registration Code: In order to take advantage of the CALI interactive online tutorials, you will need to register with the CALI service. You will need the institutional registration code to do so. The Caruso Law CALI registration code is available in the Harnish Law Library at the Public Services Desk or you can send an email requesting the registration code to CALI-INFO@law.pepperdine.edu.
Quick Start: Once you have your registration completed using the above referenced code, you may find this Quick Start Guide helpful.
CALI also provides additional services including (but not limited to):![]()
Space really is the final frontier... isn’t it?
Clearing out space on your computer’s main storage (hard drive) volume doesn’t need to be scary or difficult.
Most uses of your computer require significant “free” space on the hard drive. When you try to do something that requires some free space, you may run into some errors or worse, you may be blocked from using that software all together.

Here are a couple of sites that may provide you with some help in removing some of the extraneous contents of your computer’s hard drive.
For Windows Users: https://www.maketecheasier.com/recover-free-space-windows-c-drive/
For Mac Users: https://support.apple.com/en-us/HT206996
Using a PIN to access a University area with card swipe access — Where’s my PIN, What do I do if I forgot it or never knew what it is????
Every student, staff member and faculty member has a university-issued PIN or Personal Identification number for use with your ID card. Residential students use these all the time to enter their apartments or dorm rooms. You may not have needed your PIN until now.
The PIN is used in conjunction with the access control system at Pepperdine and is part of a two factor authentication system that requires a user to “have something” and to “know something” in this case you “have” your ID card which has a proximity chip in it and you “know” your PIN.
Don’t KNOW your PIN? Here are the instructions for retrieving your PIN.
PIN Retrieval App Instructions
1.Login to your personal WaveNet page using your Network ID and Password.
2.Select the Student Services tab and then ID Card PIN Lookup from the drop-down menu.
3.You will be prompted to read a disclaimer and select Agree.
4.You will then be required to login for a secondary security authentication.
5.The PIN information will displayed as follows:
6.If you are not currently setup in the access database you will be directed to the following screen: (You will see this screen for the first 20-30 minutes after your ID card is printed as the computer system updates. Check again soon.)
7.The PIN display screen will reset in 30 seconds and you will be re-directed back to the Disclaimer page. However, another session can be initiated by selecting Agree and following the process again as outlined.
This information is also available HERE with a visual guide: https://drive.google.com/file/d/1-L99QWwGYkjbFri18VXNgcjzXKeYHIf4/view?usp=sharing
Zoom releases updates fairly frequently. Some of those updates contain significant changes to the functionality of your Zoom installation. All provide a better overall experience because the Zoom engineers improve security and stability with nearly every update.
Instructions from Zoom on how to update are here: https://support.zoom.us/hc/en-us/articles/201362233-Upgrade-update-to-the-latest-version
When setting up your secondary monitor (connected to your laptop) or attaching your headset or webcam, you may have questions.
Please check out these very short videos and then if you still have a question, please do call us at (310) 506-7524 or send us a note at support@law.pepperdine.edu
You can use the built-in Polling feature in Zoom to do both ad-hoc and pre-planned polls/surveys which can also function as a voting system.
Zoom’s Polling feature (link to help article on Zoom’s site)
(Lifted from Pepperdine IT’s site on Facilitating a Meeting with Zoom)

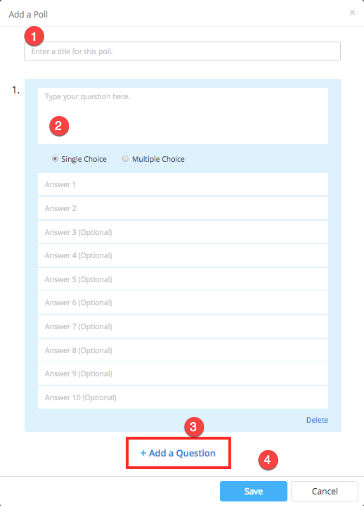
4. Title the poll, enter question type (single or multiple choice), and click “Save.”
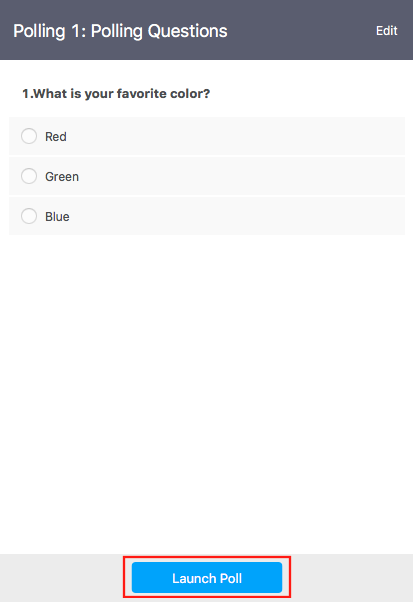
1. Click “Polling” in the bottom toolbar.

2. Click “Launch Poll.”
3. Participants in the meeting will be prompted to answer the polling questions. Once an answer has been submitted, the host will be able to see the live results.
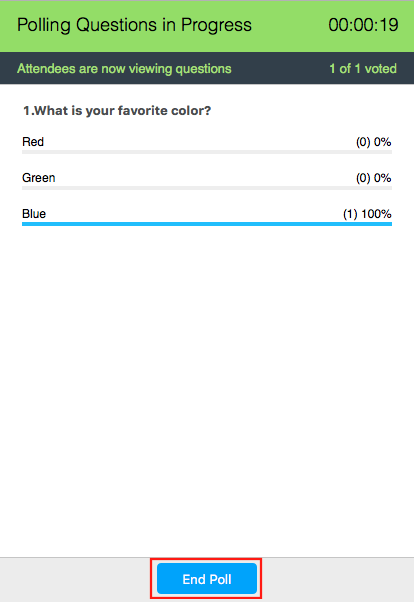
4. When finished with the poll, click “End Poll.”
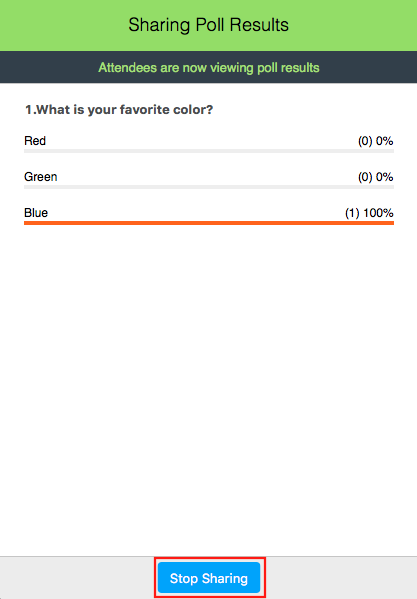
5. (Optional) To share polling results with meeting participants, Click “Share Results.”
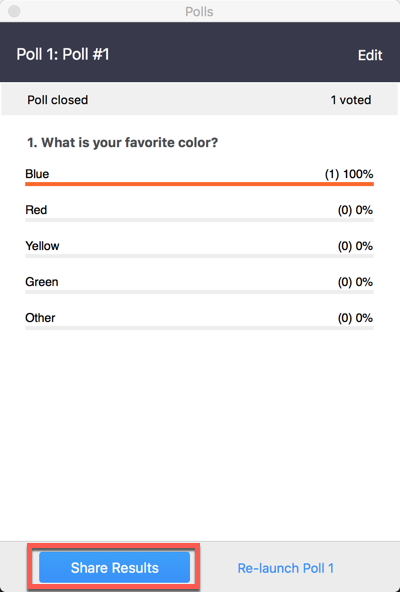
6. Click “Stop Sharing” to stop sharing poll results with meeting participants.
You can also create a poll by clicking Polling during the meeting.

This will open up your default web browser where you can add additional polls or questions. Click “add a question” and then navigate to the page that will appear in your browser, where you can create a question to be used in your meeting.


After your have created your question, follow the same instructions for launching and sharing a pre-planned poll:
First, to get back into the meeting currently running, click Join Now to be directed back to your class.

Next, click the polling icon in the bottom toolbar, which should bring up the newly-created question. Click Launch Poll.

When students finish answering, click End Poll.

Finally, you will have the option to Share Results from the poll, or Re-launch the question.

If you have any questions, please feel free to contact Information Services at support@law.pepperdine.edu or (310) 506-7425.
Pepperdine Caruso Law is dedicated to assisting you in making the transition to online teaching. To that end, we have created this guide. Please contact us with any questions!
Note: Only the host of the meeting may manage breakout rooms. A co-host will not be able to access this feature.
Please carefully read and follow these instructions for setting up breakout rooms in your online class meetings. You will need to be fully able to manage your online class breakout rooms. To view and download this document in a separate window, please click.
Enabling “Breakout Room” Setting in your Zoom account
Go to pepperdine.zoom.us and click “Sign In” to log-in to your account.

To get started, view the “Meeting Settings” tab on the left-hand side of the page.
Verify that “Breakout rooms” is checked under advanced settings.


How to create the Breakout Rooms and Assigning Students while hosting your Zoom meeting
Once you are hosting your Zoom meeting, the “Breakout Rooms” option will be shown at the bottom of the Zoom panel.

If you are sharing your screen, the button can be found under the “More” menu.

After clicking “Breakout Rooms”, you will be shown the eligible number of participants and asked how many rooms you would like to create. From here, you may either allow Zoom to assign your students to rooms “Automatically,” or assign the students to each room yourself “Manually.”

If you would like to manually assign your students, then click “Manually” and proceed to select “Create Breakout Rooms.”

From here, participants are still in the main meeting. By hovering over the breakout room, you can rename, delete or assign members to each room.

To assign participants, click on “Assign,” check their names and click “Assign” again for each breakout room.

If you wish to change an individual’s assignment, you can hover over the name and make the desired adjustment.

How to create the Breakout Rooms and Assigning Students prior to your Zoom meeting.
Note: A new Zoom meeting ID will be created. Please email CSOL Information Services (support@law.pepperdine.edu) that you have created a new Zoom meeting ID for your class.
Go to pepperdine.zoom.us and click “Sign In” to log-in to your account.
Click “Meetings” > “Schedule a New Meeting“.

Complete the meeting information.

Scroll to Meeting Options > Click “Breakout Room Pre-Assign“

Click “+ Create Rooms“. A pop-up window will appear.

Click “+” to add a breakoout room.

To add participants, type the student’s pepperdine.edu email address in the field. Hit Enter on your keyboard. Repeat this step for each student you would like in Breakout Room 1.
Note: Pepperdine.edu email address must be used or else the student won’t be assigned to a breakout room.

To add a second breakout room, click “+” again. Click “Breakout Room 2” and add your student’s email address to the “Add Participants” field. Hit Enter on your keyboard. Repeat these steps for additional Breakout Room(s). Click “Save“.


You will be taken to the Meetings page. You can confirm that Breakout Rooms have been created. Click “Save“.

Starting the Breakout Room during your Zoom meeting
Click “Breakout Rooms.” This will show you the Breakout Rooms and the participants assigned to each.
Click “Open All Rooms.” This will automatically move participants into the selected rooms. Successful connection will then be shown by a green dot next to each corresponding individual.


Host Options for Monitoring Breakout Rooms
As the host, you may enter any breakout room to monitor discussion or offer assistance.

You may also broadcast a message to all participants and have your note displayed as a banner on their screens.

Closing the Breakout Rooms
When you wish to end the breakout rooms, click “Close All Rooms.” This will give participants a 60 second warning before automatically being dismissed from their rooms and returning to the main session.


If you wish to reopen the breakout rooms, click again on “Breakout Rooms.” From here, you may now either reactivate the same rooms or choose to create new assignments.

Click here for more Zoom information for faculty.
If you have any questions, please feel free to contact Information Services at support@law.pepperdine.edu or (310) 506-7425.
So the backdrop for your Zoom meetings isn’t that amazing? Maybe you can spice it up?
Please note though, it does take more than a little computer power to do this as it’s a real time graphics effect that makes this work.
First check out this support article at Zoom: https://support.zoom.us/hc/en-us/articles/210707503-Virtual-Background
Short cheat sheet version:


In this example, we will be using a background developed for Pepperdine Carruso Law School’s 50th anniversary — you may use this background for your own personal use!
To save the Pepperdine Carruso Law School background, click and drag the image below to your desktop. This will save in your desktop files for personal use and for following along in this tutorial.

1. From the window you were left at on the previous guide, click on the “+” button on the top right corner.

2. A pop-up window with your file options will now appear, and you may browse and select the proper image. After selecting the image, click “Open” to have it download onto the Zoom software.

3. You will now see your downloaded image displayed as an option for choosing a virtual background. Select the image, and you may now see the background in the video preview above. If you would like to remove this image from your options, click the “x” on the top right of the corresponding image.

Please note that this new virtual background will only be functional on the computer where you made this setting.
If you have any questions, please feel free to contact Information Services at support@law.pepperdine.edu or (310) 506-7425.
If you are having trouble with your microphone when using Zoom please check your microphone input settings to ensure there is input level.
Both Windows and Mac settings are addressed below:
On MS Windows it would look something like this:
In the bottom right corner of your screen, you will notice the volume icon in the system tray.

Right-Click on the volume icon and click Open Sound Settings.

In the Sounds Settings window, look for Input and Choose your input device and then click the blue Device properties link (circled in red) in the screenshot below..

This will pull up the Microphone Properties window. Click the Levels Tab and you will then be able to adjust your microphone volume settings.

The volume level does not have to be at 100%, but should be high enough that the computer can detect audio.
Please make sure that your microphone is not muted. If you see the icon below, click the speaker icon to un-mute.

Once you determine the best settings for you and your system, click OK to save the settings and then close all settings windows upon completion of adjusting your microphone volume settings.
For MacOS:
——————————–
You will need to open your System Preferences menu, and in the second row to the right will be Sound. Click on that.

In the Sound menu, click on the Input tab to see the list of microphones available to use. This is where you want to select the mic you’ll be using. If you’re using a laptop, it will have a built-in Internal Microphone that is usually selected by default.

If you have headphones with a mic attached and they are plugged in, you’ll see them listed as an External Microphone. Either of these will work, and you can test them by talking and seeing that the bars in the Input level fill up.

If none of this solves your microphone solution, please send a note to support@law.pepperdine.edu or call Pepperdine University IT support at 310-506-HELP (4357).


