This guide will show you how to reduce background noise in Zoom, so that your audio will come through crisp and uninhibited for your audience.
Option 1: In the Meeting
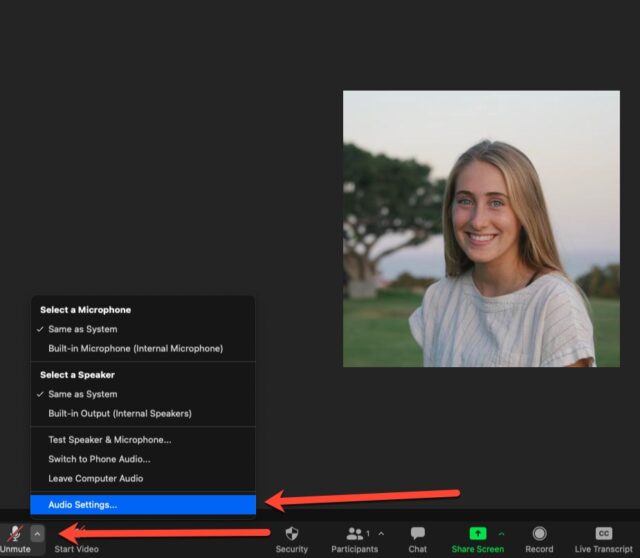
If you are already in the Zoom meeting and notice that you are picking up a lot of background noise, click on the small arrow next to your microphone in the bottom left corner. This will open audio settings. Click on Audio Settings.
Option 2: Before the Meeting
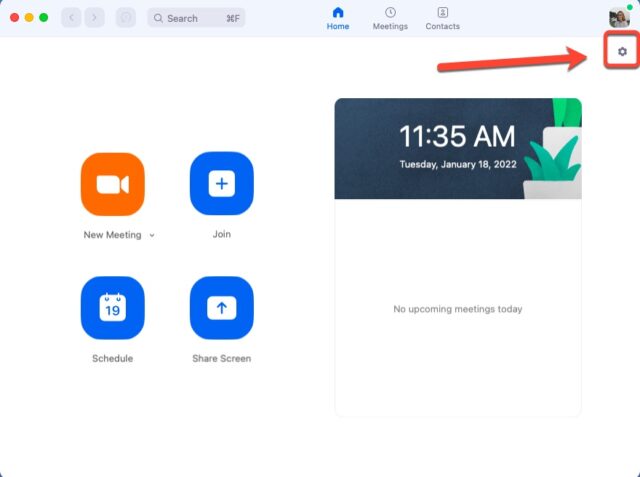
Open the Zoom application on your current computer. Since this setting deals with the audio on the computer you are using, you will need to change this setting for different computers and desktops you use.
Next, click on the gear icon at the top right corner of your application. This will take you into your settings.
Once in Settings: Suppress Background Noise
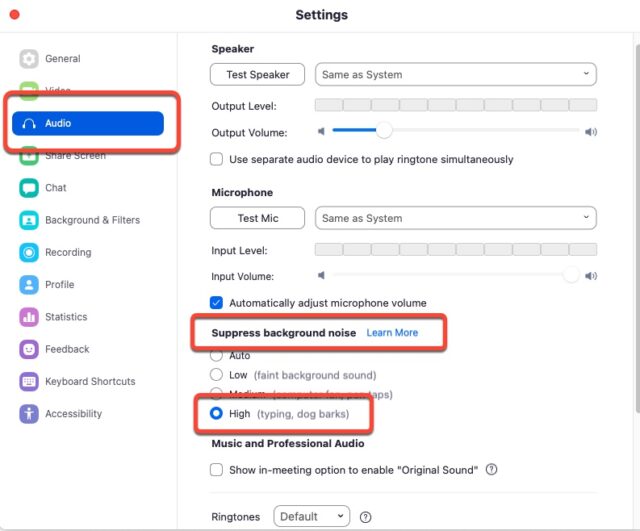
In the Audio tab, there is an option to suppress background noise. The default is Auto, but you may choose High to suppress even loud noises such as typing and dog barks.
If you have any questions, or would like to learn more about the content covered in this article, please feel free to contact Information Services at [email protected] or (310) 506-7425.
The automatic recording feature, found in the setting for your Zoom meetings, is the preferred method for lecture capture at Caruso School of Law.
Follow the instructions below to set up automatic recordings for your Zoom meetings.
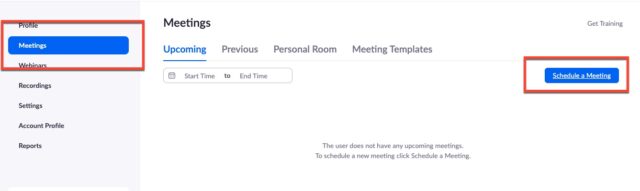
Navigate to zoom.pepperdine.edu and then log in to your account. Click on Meetings in the left-hand column. Either click on a previously scheduled meeting to alter it to include automatic recording or if you are creating one from scratch, click Schedule Meeting.
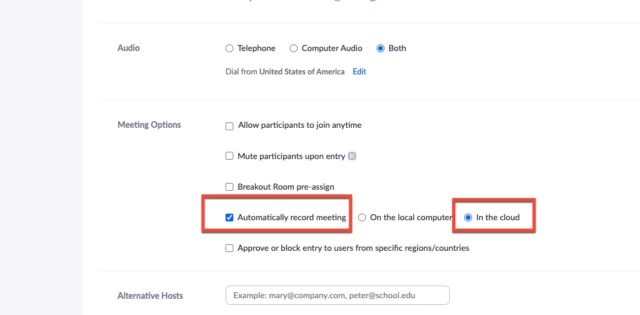
2. Ensure all of the information for the meeting is filled in, then scroll down to the Meeting Options section. Select Automatically Record and In the Cloud.
Please remember to make that change for all occurrences of the meeting, which is automatic if your meetings are automatically recurring.
3. Click Save and you are good to go!
Notes
If you would like to come on to Zoom a few minutes before class begins, simply Pause the recording once you enter class and resume when class begins.
Unpaused, the recording will continue until it is manually paused or stopped, or you end class, even if you run over scheduled time.
If you require any technology assistance, please feel free to reach out to Technology Services at (310) 506-6417 or [email protected]
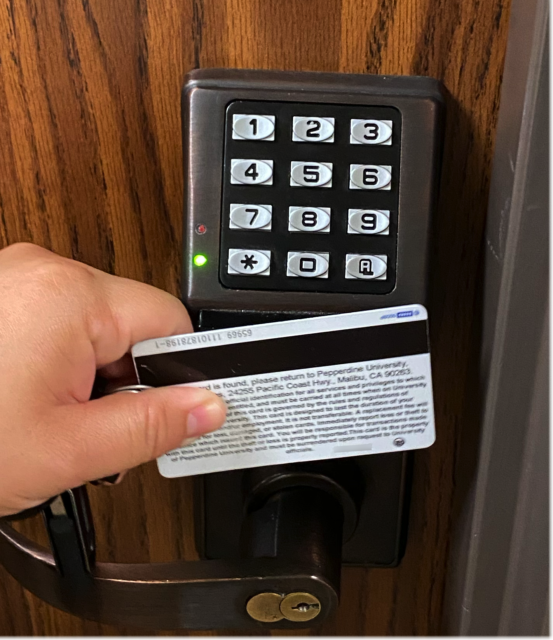
Take out your ID card and place it against the black sensor until the light on the lock flashes green (This will still work if your ID card is in your wallet).
Step 2:
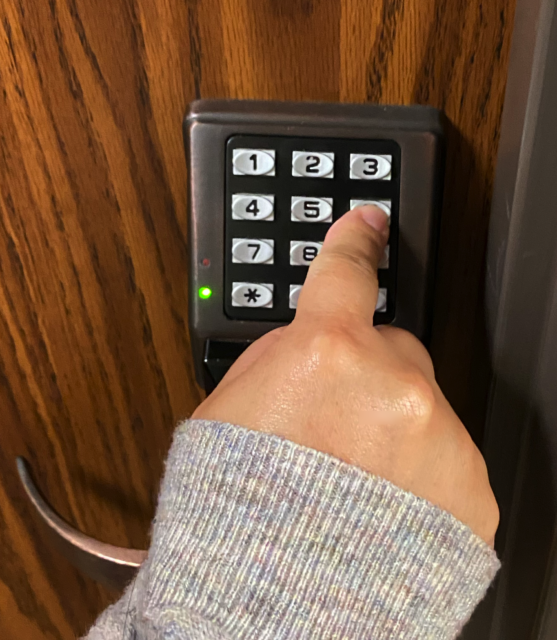
Enter your 4 digit PIN number on the keypad after you have tapped your card and the indicator light has flashed green (If you do not know your PIN number please refer to the secondary directions at the bottom of this page).
Step 3:
After scanning the card, seeing the indicator light flash green, and entering your 4 digit PIN number the door should unlock and open normally.
How to Find Your Door Code PIN Number
Step 1:
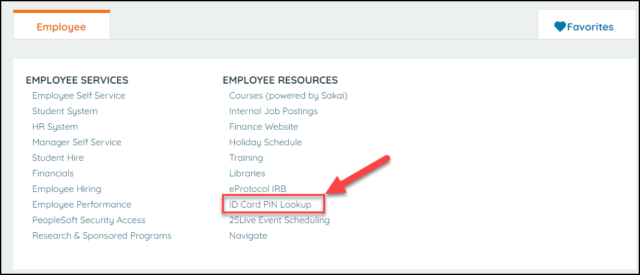
Log onto WaveNet. From the employee tab on the top menu bar of your screen, select “ID card PIN Lookup” under the “EMPLOYEE RESOURCES” heading.
Step 2:
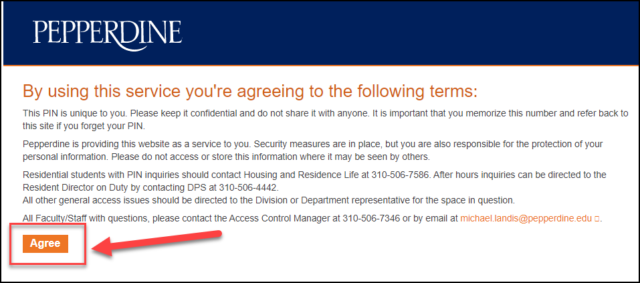
When prompted, agree to the terms of service in order to continue.
Step 3:
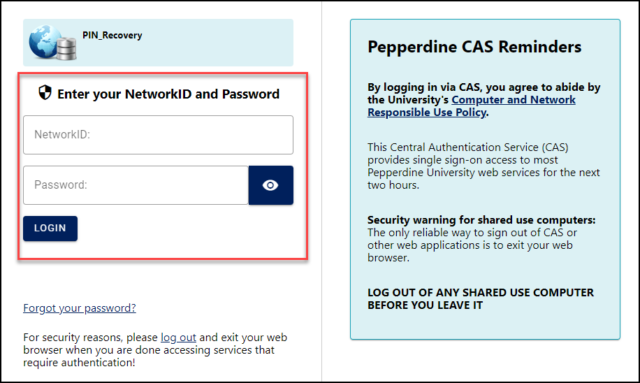
Enter your Network ID and password.
Step 4:
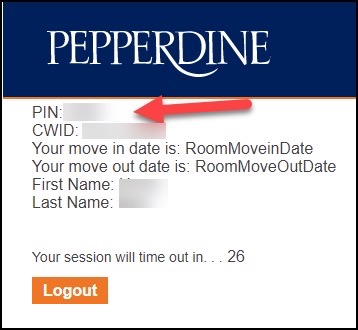
You will be redirected to a page that shows your ID card PIN number.
These instructions will help you use the iClicker app as a study tool for your courses. Please view the instructions below to take advantage of this helpful function in iClicker!
These study guides are customized by you, the student. Learn below how to locate the study tools section in iClicker, and then how to upload your own content to the study tools so you can begin reviewing.
Locating the Study Tools in iClicker
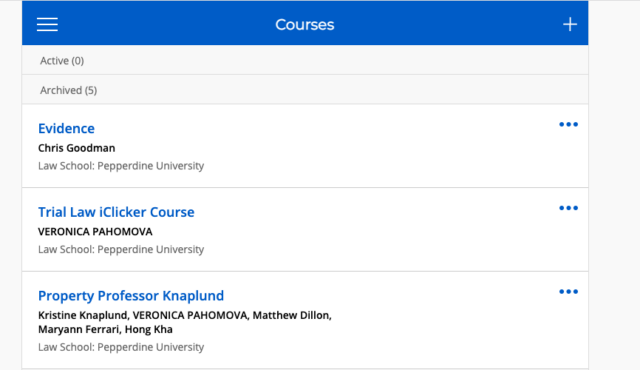
Log in to iclicker.com as a Student. If you do not have an account yet or need instructions for logging in, please read this article.
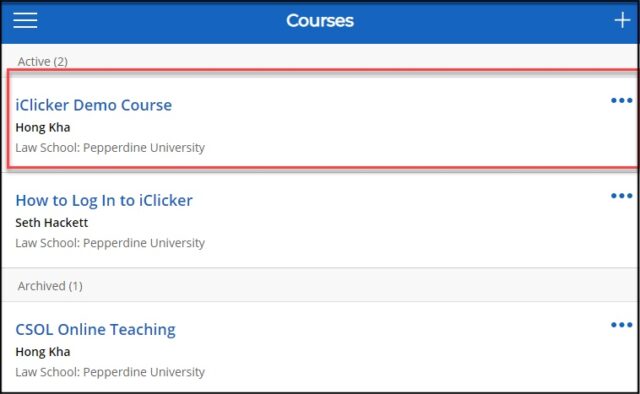
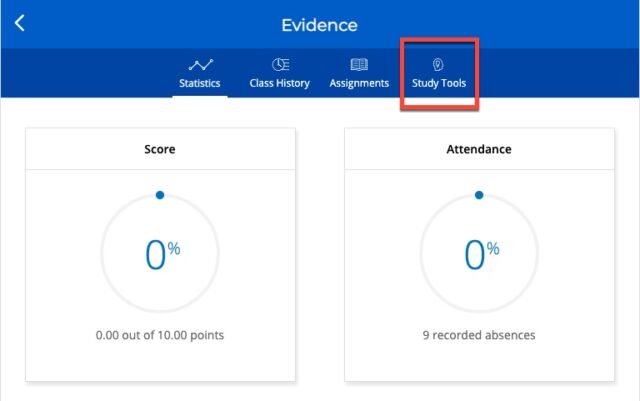
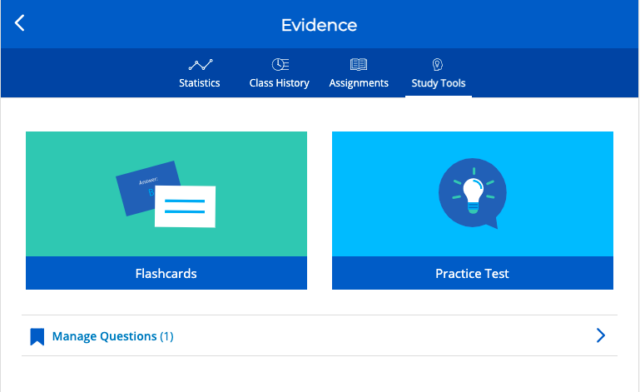
Click into the class you wish to study for. For example, I could click into the “Evidence” course listed below if I wanted to study for that class.
3. There is a “study tools” button in the top toolbar. Click on it to enter your study section.
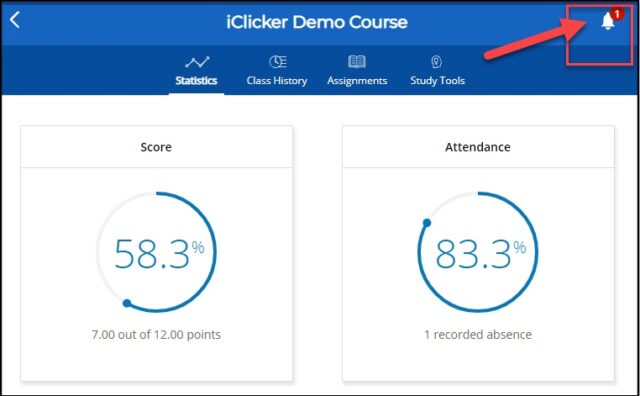
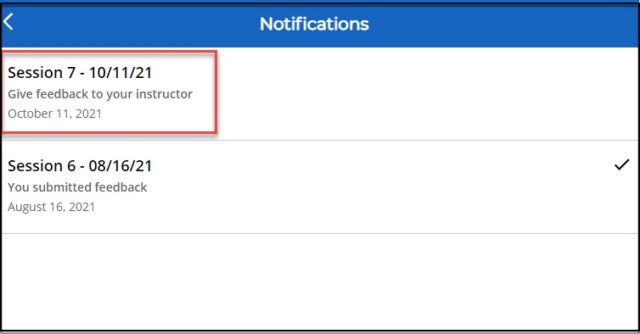
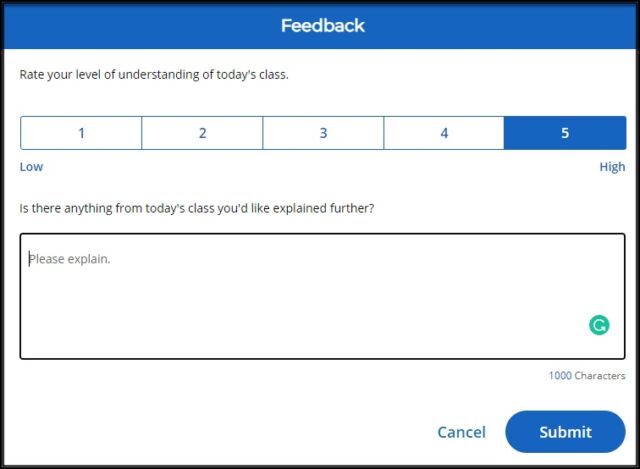
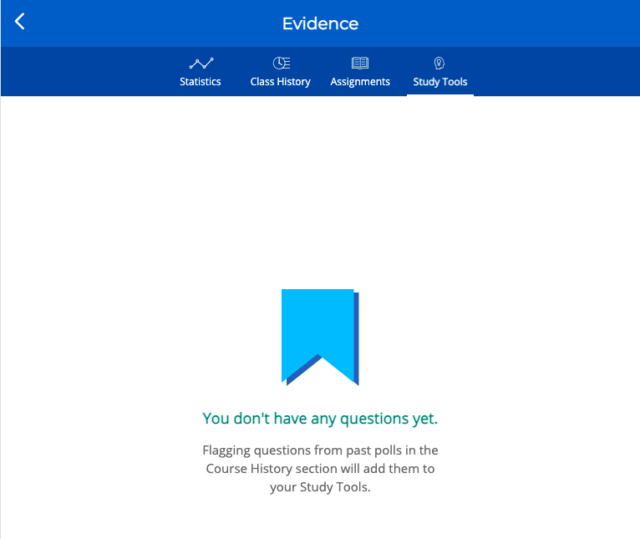
4. You may see that you have no content to review here, if you have not flagged questions. See the below instructions to learn how to flag questions.
Flag Questions for Study Tools
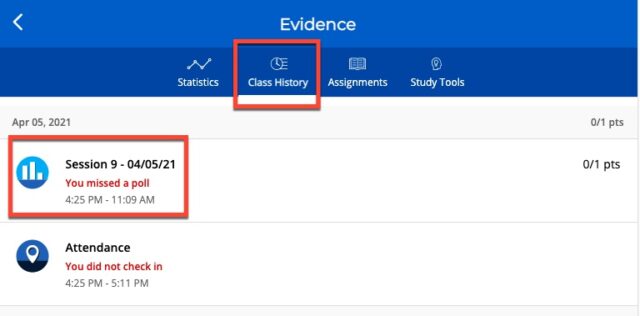
From the top toolbar in your selected course, select “Class History.” Then click on a poll, which will open up the questions that were asked in that poll.
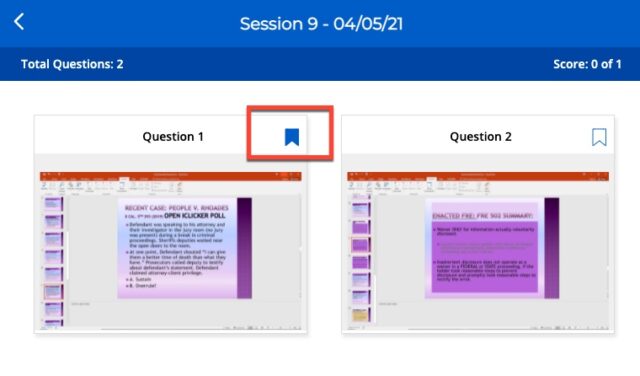
2. You may flag questions that you would like to review here, and the flagged questions will appear in the study tools bar.
3. Now, when you click on the Study Tools button, you will see any questions you flagged. You will now have the ability to use flashcards and practice tests for the questions.
IF YOU NEED ANY TECHNOLOGY ASSISTANCE, PLEASE FEEL FREE TO REACH OUT TO INFORMATION SERVICES AT (310) 506-7425 OR [email protected]. GOOD LUCK!
To turn on Zoom transcripts for your Cloud recordings, please view the instructions below.
1. Log in to zoom.pepperdine.edu (or click this link)
Click the Sign In button, which will take you to the SSO page.
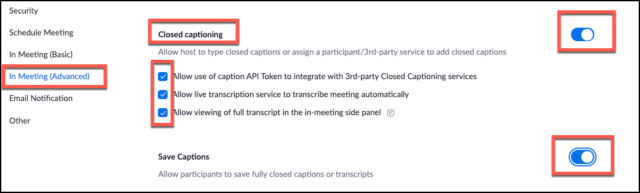
Then, navigate to the far left panel and choose the “In Meeting (Advanced)” tab to open the settings options.
2. Select All of the Options Below
Ensure that you click all of the boxes, namely: 1. Allow use of caption API Token to integrate with 3rd-party Closed Captioning services, 2. Allow live trascription service to transcribe meeting automatically, and 3. Allow viewing of full transcript in the in-meeting side panel.
Also ensure that both the Closed Captioning and Save Captions tabs at the far right are turned on, as shown below.
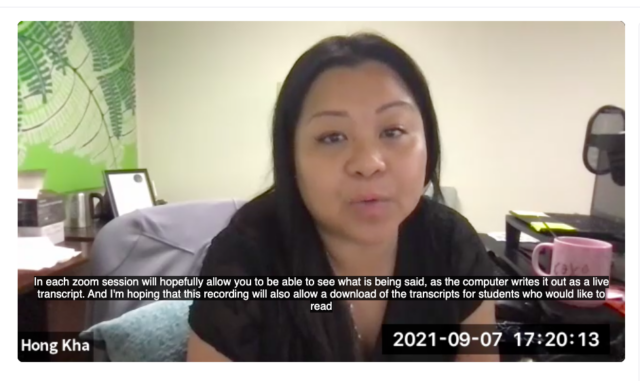
During the live recording session, you should now also have the option to “enable live transcripts”, which will insert live, automatically generated closed captions during your class.
3. Do a test Zoom Pro recording
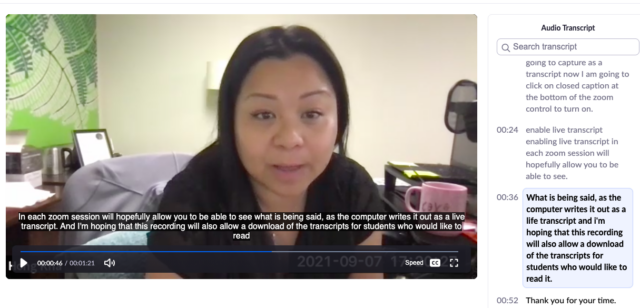
Finally, do a test Zoom Pro recording in Courses to see if the transcripts show up in the Cloud Recording.
You should ideally see the transcript available on the side of the document once the recording is finished uploading.
If you require any technology assistance, please feel free to reach out to Technology Services at (310) 506-6417 or [email protected]
Meet the staff of the Information Services department at Caruso School of Law!
Phil Bohl
Assistant Dean, Information Services
Dean Bohl is our Assistant Dean ofInformation Services here at CSOL. He is originally from a small family farm in southeast Nebraska. After graduating from law school in the early 90’s, he practiced VERY briefly as an attorney (with a perfect record of wins in court — one motion made, one granted!). Joining the team at Caruso was one of his best decisions ever. What can be better than working with great people serving a great mission? Bohl leads the Information Services team, represents Caruso before various university groups on technology-related issues, and serves as an unofficial mover, janitor, and tech guy depending upon the day and the need. Outside of work, he enjoys making sawdust as much as possible.
David Dickens
Director of Information Services Operations
Mr. David Dickens is our Director of Operations for Technology here at CSOL. The two main areas of his work concern computer technology and audio-visual. In addition, when people have the tech and equipment they need but do not know how to use it to its full potential, David likes to train people to use their tech effectively.
David was originally a Seaver student who “never achieved escape velocity,” as he worked for various church departments, communications, business, and central IT at Pepperdine before he was recruited by Phil to work at Caruso. Originally, he applied to Pepperdine as a religion major, and became a music major.
His day-to-day consists of trying to keep up with what is coming next in academic computing and instructional technology. Day to day, there’s a lot of troubleshooting, responding to people’s needs, and keeping the ball rolling. His favorite part of his job is being able to help people achieve their goals. Outside of work, he enjoys “nerdy pursuits of all kinds,” including books, music, video games, board games, and reading his favorite authors (Jean Wolfe, Frank Herbert, J.R.R. Tolkien, and more.)
Gilbert Marquez
Manager of Server Administration
Mr. Gilbert Marquez is our Manager of System Administration at CSOL. Originally, he was brought to this position through the 2011 United States v. Scheinberg case.
Gil’s day to day activities include providing timely, effective, and practical technology to the CSOL community. His favorite part of his job (besides getting paid), is working for the best department at the law school! Outside of work, he enjoys leisure weekends with his wife, as well as playing with his dogs… and raking in pots.
Seth Hackett
Instructional Technologist
Mr. Seth Hackett is the Instructional Technologist at CSOL: the interface between the law school faculty and the Information Services team. Seth came to the IS department from the Straus Institute, where he worked in admissions, recruitment, and faculty support for over five years.
His day-to-day consists of technological troubleshooting and training for various staff and faculty. His favorite parts of his job are getting to know all the faculty and staff at the law school, and having the opportunity to solve many different problems every day. Outside of work, Seth writes songs, sings, and plays guitar. He’s also a gamer, enjoying online games of all types, board games, and tabletop role-playing.
Hong Kha
Director of Learning Systems and Strategic Analytics
Ms. Hong Kha is our Director of Learning Systems and Strategic Analytics for the IS team at Caruso. She ensures that all the learning technology are working and helps faculty and students with their instructional tech-related questions and problems. She enjoys thinking creatively about how learning can be administered best in the classrooms through tech and combines her educational skills with her technology skills to serve CSOL.
Her day-to-day work includes trouble-shooting whatever comes her way, usually accompanied by a dose of “chaos and madness” when tech concerns flare up quickly. Her favorite part of her job is the people, as she has gotten to know many of the IS staff well. Outside of work, she enjoys watercoloring!
We are often asked about a reduced cost or free license for Acrobat Pro for students, faculty and staff.
If you are using a Pepperdine University-owned computer, chances are it already has Acrobat Pro installed according to the University’s site license with Adobe.
If you are not using such a computer (note that the Law Library lab computers and the CDO student computers have Acrobat Pro installed), and you need/want to edit PDFs, you will need to find/install your own PDF editor.
Pepperdine University does not have special pricing for Acrobat Pro for use on a personally-owned computer.
HOWEVER, there is a regular Adobe educational discount that students, faculty, and staff would qualify for. That product is significantly reduced from their regular pricing. You can link to the educational pricing for Adobe Acrobat here: https://www.adobe.com/acrobat/pricing/students.html
Note that Adobe has made their entire Creative Cloud product very attractively priced when compared with the price for just Acrobat alone. For just a few dollars more a month you can have access to many more premium products from Adobe. If that isn’t interesting to you… then you will probably want to investigate other solutions…
You should also note that most word processors and other software will output in PDF format. Granted, that won’t help much when you want to edit or modify PDFs but there are alternatives to Acrobat Pro that may be helpful to you and will be much cheaper.
There is a free service from Adobe called Acrobat online where you must create an account with Adobe to use their “free” software. We have not tested this but it appears that they will use your Adobe account information to market paid services to you: https://www.adobe.com/acrobat/online/pdf-editor.html
Finally, you may find some success in online guides/websites that review PDF editors. As an example, Toms Guide is a pretty well established site that we refer to now and then. They have a guide to PDF editors that may be helpful to you if you don’t want to pay for the Acrobat Pro subscription or sign up for Adobe marketing with their “free” offering: https://www.tomsguide.com/best-picks/best-pdf-editors
Finally, if you have a Mac, you will find that the built-in product “Preview” is a great tool for annotating your PDFs if that is all you need to do.
You can learn how to create transcripts in Zoom in our Turn on Zoom Transcripts page. After these transcripts have been created, they can be edited and updated. Please see these instructions on how to edit transcripts.
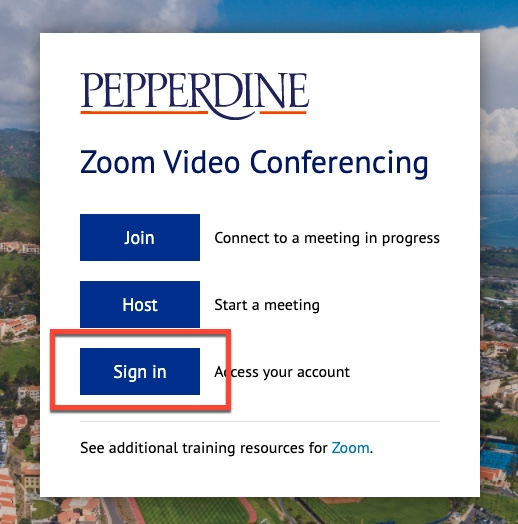
Sign in to zoom.pepperdine.edu
Go to zoom.pepperdine.edu then click “Sign In.” You will be directed to Pepperdine’s CAS, where you can log in using your Pepperdine credentials.
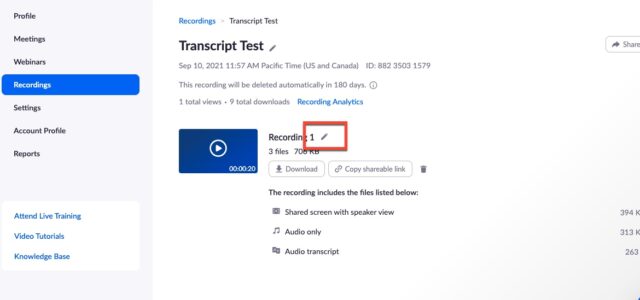
Click Recordings
On the left-hand navigation menu, click “recordings.” Click the name of the recording you would like to edit. You will see a list of recording files.
To edit the name of the recording, click the pencil icon next to the name, which will allow you to type in a new name.
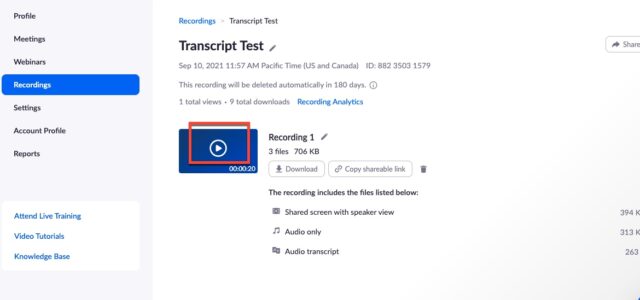
Click the “play” icon on the recording.
Click the “play” icon in the middle of the recording. This will open up the recording in a diagnostics screen, where you may edit phrases.
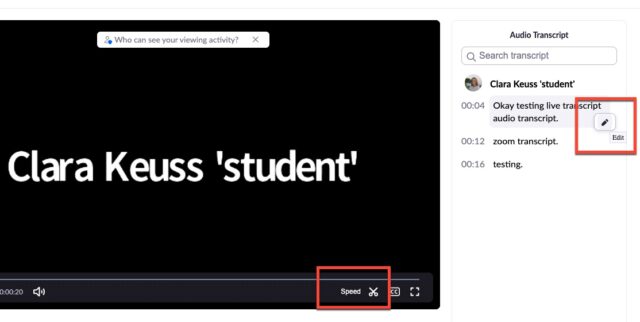
Edit your Transcript
There should be a running transcript bar on the side of your video. You can hover over a phrase with your mouse and click edit, allowing you to change the wording of the written transcript.
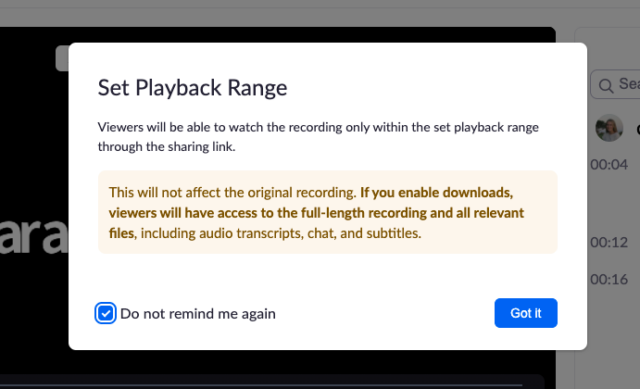
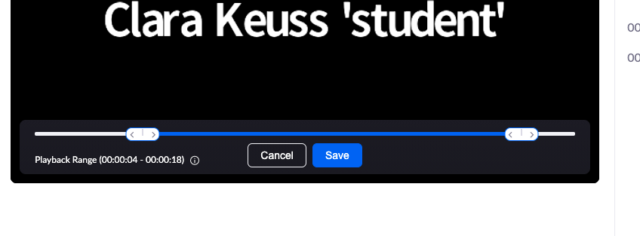
On the video itself, you can click the “scissors” icon to clip sections of the video.
Note that editing will not affect the original recording, but when students download a recording it will be the full-length version.
To edit, once you have clicked the “scissors” icon shown above, click on the arrows on either end of the video playback range to move them closer or further away. When you click save, the blue section will be set as the new payback range.
IF YOU NEED ANY TECHNOLOGY ASSISTANCE, PLEASE FEEL FREE TO REACH OUT TO INFORMATION SERVICES AT (310) 506-7425 OR [email protected]. GOOD LUCK!
Each law course has its own unique email address. To find the email linked to your course, please follow the instructions below.
1. Start a New Message in Gmail
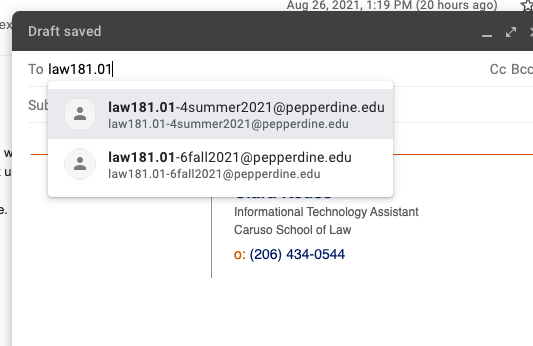
To search for an email address, log in to your Pepperdine email server, and then start a new message. In the by line, you will be able to search for an email already in the server.
2. Type in Law number and Course Number
In the to line, type in the law number and course number, and it will auto-populate. For example, typing “law181.01” should generate the email address attached to that course. Make sure you take note of the current semester, and choose the correct semester in the email address.
IF YOU NEED ANY TECHNOLOGY ASSISTANCE, PLEASE FEEL FREE TO REACH OUT TO INFORMATION SERVICES AT (310) 506-7425 OR [email protected]. GOOD LUCK!