If students cannot open a Zoom recording, you may need to change your permission settings and update the security settings on that file. Below is a guide on how to accomplish this task by examining both the security settings. To view a video on how to remove the permission, please click here.
The last step will also cover share settings, for the event that you may want to make the recording public, or restrict it with further detail, such as a unique password for access, as so forth.
1. First, log into the https://pepperdine.zoom.us site and sign in with your Pepperdine NetworkID and password.
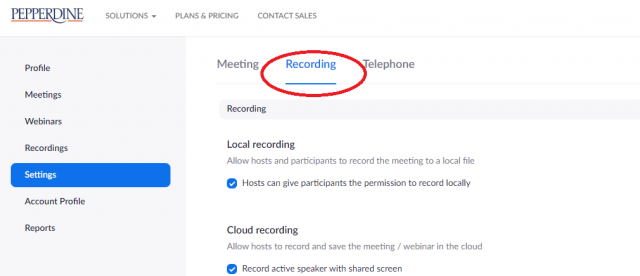
2. On the left menu go to “Settings”.
3. In “Settings”, look at the main part of the screen. Near the top, there are a few choices tabs. Select the tab called “Recordings”.

4. From there scroll down the recordings settings to where the security settings are. Make sure that you have those set to “off” and that they appear “gray” in color. If they are “blue” and switched to the right, they are mistakenly “on”. Click the button to select them off. This should allow student access to the file.

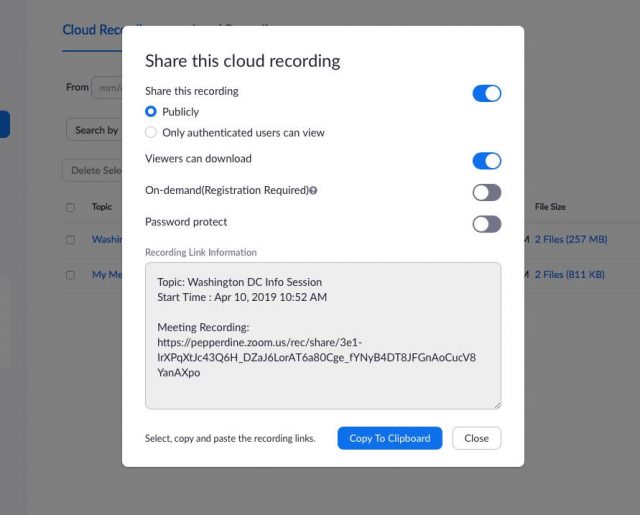
5. Now, to ensure student access, or to otherwise manage permissions for a recording that is already existing, you can check the share settings for a file by navigating to the recordings button. From there, you can find recordings of your meetings and edit their permissions individually. To do this, click the “Share” button next to the recording you shared with your students. Make sure that the permission is “blue”/”on” and set to “Publicly”. Your students should then be able to view the recording.

If you have any questions, please feel free to contact Information Services at support@law.pepperdine.edu or (310) 506-7425.
